Get Appointment
- contact@wellinor.com
- +(123)-456-7890
Blog & Insights
- Home
- Blog & Insights
Keyva is pleased to announce the recertification and rebranding of the BMC Atrium Data Pump (ServiceNow CMDB to BMC Atrium CMDB) App for the ServiceNow Vancouver and Washington DC releases. Clients can now seamlessly upgrade the App from previous ServiceNow releases.
The Keyva BMC Atrium Data Pump App provides synchronization of the CIs, CI attributes and relationships between the ServiceNow CMDB and the BMC Atrium™ CMDB systems. It allows organizations to leverage their existing investment in Enterprise Software and avoid costly "Rip and Replace" projects. It also enables exciting end-to-end use cases for Service Impact Management using BMC's ProactiveNet Performance Management (BEM/SIM/PNET/BPPM).
Learn more and view all the ServiceNow releases for which Keyva has been certified at the ServiceNow store, visit https://bit.ly/4cD9f2H.
[post_title] => Keyva BMC Atrium Data Pump App has been re-certified against Vancouver and Washington [post_excerpt] => [post_status] => publish [comment_status] => closed [ping_status] => closed [post_password] => [post_name] => keyva-bmc-atrium-data-pump-app-has-been-re-certified-against-vancouver-and-washington [to_ping] => [pinged] => [post_modified] => 2024-09-25 09:41:07 [post_modified_gmt] => 2024-09-25 09:41:07 [post_content_filtered] => [post_parent] => 0 [guid] => https://keyvatech.com/?p=4525 [menu_order] => 0 [post_type] => post [post_mime_type] => [comment_count] => 0 [filter] => raw ) [2] => WP_Post Object ( [ID] => 4467 [post_author] => 7 [post_date] => 2024-05-16 13:50:55 [post_date_gmt] => 2024-05-16 13:50:55 [post_content] =>Keyva is pleased to announce the recertification and rebranding of the BMC Truesight Integration App for the ServiceNow Vancouver and Washington DC releases. Clients can now seamlessly upgrade the App from previous ServiceNow releases.
The Keyva BMC Truesight Integration App enables multiple systems and application monitoring tools that generate high volumes of event data to integrate events into a single Proactive Operations Platform. It also enables ServiceNow to view, manage, and model events raised by BMC ProactiveNet Performance Management allowing the customer to use one console for enterprise wide Incident and service impact management.
Learn more about this integration and view all the ServiceNow releases for which Keyva has been certified at the ServiceNow store, visit https://bit.ly/40mc6ZA.
[post_title] => Keyva BMC Truesight Integration App has been Certified for the Vancouver and Washington DC Releases [post_excerpt] => [post_status] => publish [comment_status] => closed [ping_status] => closed [post_password] => [post_name] => keyva-bmc-truesight-integration-app-has-been-certified-for-the-vancouver-and-washington-dc-releases [to_ping] => [pinged] => [post_modified] => 2025-01-07 14:27:05 [post_modified_gmt] => 2025-01-07 14:27:05 [post_content_filtered] => [post_parent] => 0 [guid] => https://keyvatech.com/?p=4467 [menu_order] => 0 [post_type] => post [post_mime_type] => [comment_count] => 0 [filter] => raw ) [3] => WP_Post Object ( [ID] => 4457 [post_author] => 7 [post_date] => 2024-04-18 19:58:22 [post_date_gmt] => 2024-04-18 19:58:22 [post_content] =>Keyva is pleased to announce the certification of the ServiceNow Plug-in for VMware vRealize™ Orchestrator for the Vancouver and Washington DC releases. Clients can now seamlessly upgrade the App from previous ServiceNow releases (Tokyo, Utah).
Learn more about the ServiceNow Plug-in for VMware vRealize™ Orchestrator and view all the ServiceNow releases for which Keyva has been certified at the ServiceNow store, visit https://bit.ly/4cD9f2H.
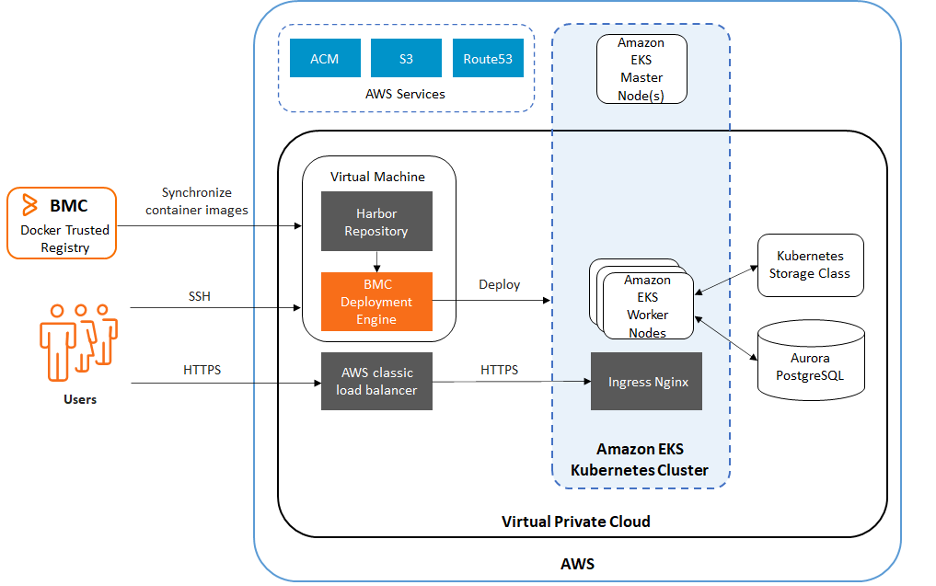
[post_title] => Keyva ServiceNow to VMware vRealize Orchestration Integration App Certified Vancouver and Washington DC Releases [post_excerpt] => [post_status] => publish [comment_status] => closed [ping_status] => closed [post_password] => [post_name] => keyva-servicenow-to-vmware-vrealize-orchestration-integration-app-certified-vancouver-and-washington-dc-releases [to_ping] => [pinged] => [post_modified] => 2024-04-18 19:58:24 [post_modified_gmt] => 2024-04-18 19:58:24 [post_content_filtered] => [post_parent] => 0 [guid] => https://keyvatech.com/?p=4457 [menu_order] => 0 [post_type] => post [post_mime_type] => [comment_count] => 0 [filter] => raw ) [4] => WP_Post Object ( [ID] => 4377 [post_author] => 14 [post_date] => 2024-04-04 13:54:59 [post_date_gmt] => 2024-04-04 13:54:59 [post_content] =>I recently came across an insightful article that provides a step-by-step guide on how to set up BMC Helix Service Management on Amazon Elastic Kubernetes Service (EKS), which will enable seamless CI/CD workflows and code quality analysis within the Kubernetes environment.
Individuals can customize the commands and instruction set based on the specific content and key points covered in the article. For additional details or specific questions about BMC installation on EKS, reach out to Keyva at info@keyvatech.com.
Pre-requisites:
- EKS – version [1.23 – 1.28]
- Ec2 – 2 [preferred to have RHEL8.8]
- one for Setting up Harbor registry to sync up with BMC container registry.
- Postgres RDS 13.3 – Instance type db.r6g.2xlarge
- ACM
- Route53
- Ingress Nginx Service
- Two for setting up the BMC engine – 2 CPU-8GB RAM- 100GB Storage, ami-052f22270b333dff3
Before you begin:
- Ensure you have a domain and have configured DNS for the BMC Helix Service Management applications so that you can access the applications by using URLs.
- BMC certifies the use of the Amazon Web Services (AWS) Route53 service to create the domain and DNS configuration.
- Create an SSL certificate so that BMC Helix Service Management application URLs can support the HTTPS protocol.
- BMC certifies the use of the AWS Certificate Manager (ACM) service to create the wildcard SSL certificate.
- Review the system requirements for BMC Helix Service Management installation.
- Download the installation files and container images access key from Electronic Product Download (EPD).
- Create your Harbor repository and synchronize the repository with BMC Docker Trusted Registry (DTR).
Procedure:
- Create the EKS cluster using IAC/Cloud formation along with new VPC where the scope is for deploying all the services used in this architecture in same VPC. Authenticate to that cluster from local for now to configure Ingress using the manifest file.
- Set the sysctl -w vm.max_map_count parameter to 262144 before installing BMC Helix Platform services.
- In your Amazon EKS cluster, connect to the worker node through Secure Shell (SSH). Run the following commands on the worker node:
sysctl -w vm.max_map_count=262144

echo vm.max_map_count=262144 > /etc/sysctl.d/es-custom.conf- Enable the Kubernetes Metrics Server for Horizontal Pod Autoscaling feature.
- kubectl apply -f https://github.com/kubernetes-sigs/metrics-server/releases/latest/download/components.yaml
- kubectl get deployment metrics-server -n kube-system
- An example output is as follows.
NAME       READY   UP-TO-DATE   AVAILABLE      AGE

metrics-server 1/1 1 1 6m- The NGINX Ingress Controller is a load balancer for your cluster. Install and configure Kubernetes NGINX Ingress Controller by performing the following tasks:
- Install Kubernetes NGNIX Ingress Controller 1.7.0
- Configure a DNS record for your domain.
- You need the deploy.yaml file to install Kubernetes NGINX Ingress Controller. To download the deploy.yaml file, run the following command:
wget https://raw.githubusercontent.com/kubernetes/ingress-nginx/controller-v1.7.0/deploy/static/provider/aws/nlb-with-tls-termination/deploy.yaml- Once downloaded Update the proxy-real-ip-cidr parameter with the value of virtual private cloud (VPC) Classless Inter-Domain Routing (CIDR) details that is used in the Kubernetes cluster.
apiVersion: v1
data:
http-snippet: |
server {
listen 2443;
return 308 https://$host$request_uri;
}
proxy-real-ip-cidr: 192.168.0.0/16
use-forwarded-headers: “true”- Modify the AWS Certificate Manager (ACM) ID details as follows:
This value is obtained from the acm cert.
metadata:
annotations:
service.beta.kubernetes.io/aws-load-balancer-ssl-cert: arn:aws:acm:us-east-2:xxxxxxxxxxxxxxx:certificate/xxxxxxxx-xxxx-xxxx-xxxx-xxxxxxxxxxx- Under the Service object, remove the annotation service.beta.kubernetes.io/aws-load-balancer-type: nlb and add service.beta.kubernetes.io/aws-load-balancer-backend-protocol: http. Then save the deploy.yaml file and run kubectl apply -f <path of the deploy.yaml> .NGNIX Ingress Controller is deployed in the ingress-nginx namespace and an external classic load balancer with TLS termination is created in AWS.
- The above svc can be validated using following command:
kubectl get svc -n ingress-nginxNAME TYPE CLUSTER-IP EXTERNAL-IP PORT(S) AGE
ingress-nginx-controller LoadBalancer 10.100.180.188 xxxxxxxxxxxxxxxxxxxxxx-xxxxxxxxxxxxx.us-east-2.elb.amazonaws.com 80:31245/TCP,443:31285/TCP 6m4s
ingress-nginx-controller-admission ClusterIP 10.100.182.96- Make sure that the ingress-nginx-controller configmap file as the following parameters configured by using the following command:
kubectl get cm ingress-nginx-controller -o yaml -n ingress-nginxkind: ConfigMap
apiVersion: v1
metadata:
name: internet-ingress-configuration
namespace: ingress-ngnix
labels:
app.kubernetes.io/name: ingress-ngnix
app.kubernetes.io/part-of: ingress-ngnix
app.kubernetes.io/version: 1.2.0
app.kubernetes.io/component: controller
data:
proxy-real-ip-cidr: 172.xx.xxxx.0/24
proxy-body-size: “250m”
enable-underscores-in-headers: “true”
ssl-redirect: “false”
server-name-hash-bucket-size: “512"
use-forwarded-headers: “true”
server-tokens: “false”
http-snippet: |
server {
listen 8080;
server_tokens off;
}- Configure a DNS record for your domain so that you can access the applications by using URLs, Navigate to your domain-hosted zone and Create a DNS A type record for the domain to resolve URLs to the load balancer.
Note:
If you use the Load Balancer protocol as SSL, the support for x-forwarder headers is removed and you cannot login to the BMC Helix Portal.
Setting up database:
- Create a RDS instance with the configuration mentioned in pre-requisites section. Once created we got to connect to the RDS create a user by running
mentioned below:
CREATE ROLE db_admin_user WITH LOGIN PASSWORD ‘password’ CREATEDB CREATEROLE INHERIT;Note:
Important: Make sure that you specify this database administrator user in the DATABASE_ADMIN_USER parameter while installing BMC Helix Innovation Suiteand applications.
Setting up harbor Registry to sync up the images from BMC registry:
Requirements:
OS: RHEL 8 > / Ubuntu version 18.04.6
Use Harbor modern day version.
To get right of entry to images from a local Harbor repository, ensure that your system has minimal 4 CPU with 8 GB memory and the following disk space:
750 GB disk area whilst you are putting in the Harbor repository for the primary time.
100 GB approximately when you are synchronizing the container images in BMC DTR with the Harbor repository for an improve.
Docker version 20.10.7 and docker-compose version 1.29.2
Installation:
1. sudo yum install docker-ce docker-ce-cli containerd.io docker-buildx-plugin docker-compose-plugin
2. sudo systemctl start docker
3. sudo systemctl status docker
4. sudo curl -L "https://github.com/docker/compose/releases/download/1.29.2/docker-compose-$(uname -s)-$(uname -m)" -o /usr/local/bin/docker-compose
5. sudo chmod +x /usr/local/bin/docker-compose
6. docker-compose –version
7. wget https://github.com/goharbor/harbor/releases/download/v1.10.17/harbor-online-installer-v1.10.17.tgz
8. tar xzvf harbor-online-installer-v1.10.17.tgz
9. cd harbor
Note: Best practice it so enable ssl certs and make it run on https using self-signed ssl certs.
creating ssl certs self
10. In the harbor.yml file, uncomment the https related config section, and add the values for parameters such as port, certificate, and private_key.
11. Parameter Description
Hostname - Name of the host where you want to install Harbor.
harbor_admin_password - Password for the Harbor application admin username.

# https related config
https:
  # https port for harbor, default is 443
  port: 443
  # The path of cert and key files for nginx
  certificate: /data/cert/dsmlab.bmc.com.crt
  private_key: /data/cert/dsmlab.bmc.com.key
- After editing harbor.yaml with above changes save the file and run install.sh script that installs the brings the harbor up and running. Can be accessed through UI at https://hostname.com
- Login with the credentials into harbor UI, Setting up a Harbor registry endpoint is task number two. Click Registries under the Administration menu in the Harbor admin UI. After selecting NEW ENDPOINT, enter the following values in the fields:
Provider: Docker Registry

https://containers.bmc.com is the endpoint URL.
The Support User ID, or Access ID, is what you use to sign into EPD.
The access secret is the container image access key that you got from EPD in the container-token.bmc file.
Example:
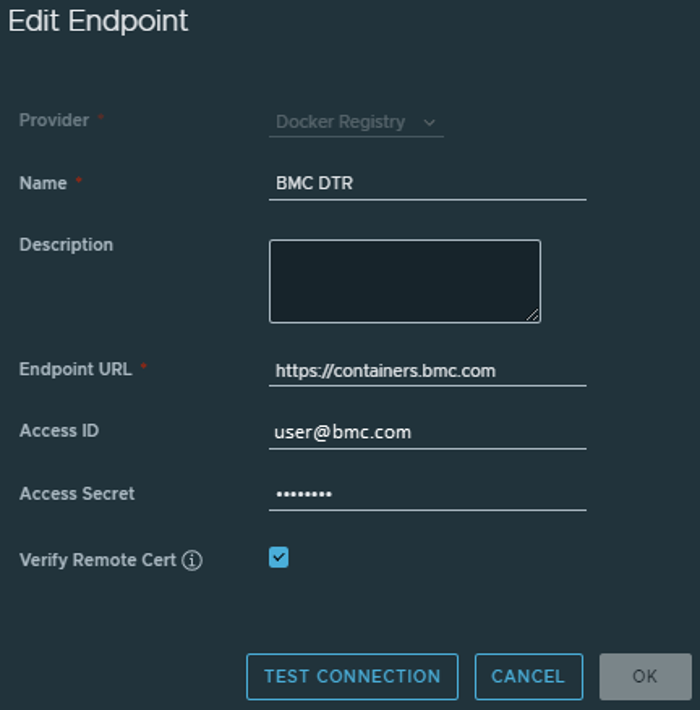
Click TEST CONNECTION to confirm the connection.
Press OK.
The following screenshot illustrates how the configuration is saved and shows that it is in a healthy state:

- Select Projects from the Administration menu. Make a new project with the name “bmc” specified. The container images are synchronized using this project.
- You must synchronize your Harbor repository with BMC Helix Innovation Suite and BMC Helix Platform services container images in BMC DTR. The container images for the BMC Helix Platform services and the BMC Helix Innovation Suite must be synchronized with your Harbor repository in BMC DTR.
Steps:
Open a Linux system and log in
To the system, copy the files 22106_ITSM_Platform_Images.txt, 22106_ITSM_Smartapps_Images.txt, 22106_ITSM_Pipeline_Images.txt, 23202_Helix_Platform_Images.txt, and 22106_Support_Assistant_Tool_Images.txt.
Name your new file all_images.txt.
The BMC Helix Service Management platform container images should be synchronized.
To the all_images.txt file, copy the 22106_ITSM_Platform_Images.txt file.
You should open the push_to_custom_repo.sh file and change the values of the following parameters:
Use the following command to launch the push_to_custom_repo.sh file:
./push_to_custom_repo.shFollow these procedures to synchronize container images for the smart application, pipeline, BMC Helix Platform services, and Support Assistant tool:
- Copy the file to the all_images.txt file
- Use the following command to launch the push_to_custom_repo.sh file:
./push_to_custom_repo.shWhat is BMC deployment Engine:
Deployment Engine.
To deploy BMC Helix Service Management applications, set up BMC Deployment Engine.
One virtual machine is used to set up BMC Deployment Engine. The following tools are part of the BMC Deployment Engine:
Jenkins: The main tool for deployment is Jenkins.
Ansible—Shell scripts and Ansible are used to write the Jenkins pipeline automation.
Git: The deployment artifacts are kept in Git.
The Kubernetes client used to execute Kubernetes commands is called kubectl.
The package manager Helm is used in Kubernetes to deploy applications.
The Jenkins pipelines employ these tools to deliver applications for BMC Helix Service Management.
Requirements:
OS: RHEL 8. > / RHEL 7.>
CPU: 2
RAM: 8 GB
Hard Disk: 100 GB
Note:
Use a user with sudo privileges while configuring BMC Deployment Engine. Applications like Ansible and Jenkins must be installed with the sudo access permission.
Use a non-root user when the BMC Deployment engine is running.
In this arrangement, “user” refers to the non-root user unless otherwise noted.
Verify if bash or sh is the user’s default shell.
In order to install the tools needed to set up Deployment Engine and related binaries, as well as to access the online Jenkins repository for OS software updates or upgrades, make sure the Jenkins server is connected to the internet.
The following is the nomenclature used in pipeline development:
In all subsequent phases, the non-root user’s Home directory is denoted as <home>
The git repo owner is indicated by <user>, and by default, it is /home/git. Jenkins setup is owned by the Jenkins user.
The Jenkins and git groups are both attended by the git user.
The Jenkins user belongs to both the git and Jenkins groups.
The Jenkins server’s host name/IP address is <hostname.
Make sure that /etc/resolv.conf has proper DNS entries. From any remote machine run the following commands:
nslookup <jenkins-server-name>

nslookup <jenkins-server-ip>
Copy both the commands should resolve via DNS from all computers where clusters are setup.
from /etc/hosts make sure to have only relevant entries in this file. If an entry is not correct, delete the entry.
Remove the ivp6 entry for the localhost and ensure that the hostname resolves to the correct DNS IP address.
Run the yum repolist command to view all accessible and OS matching repositories.
The yum commands should be able to install the required repository software.
#!/bin/bash

# Update the package lists and upgrade installed packages
sudo yum update -y
sudo yum upgrade -y

# Clean the package manager’s cache
sudo yum clean all

# Install required packages
sudo yum install unzip -y
sudo yum install perl -y
sudo yum makecache -y
sudo yum install perl-Data-Dumper -y
In Jenkins server, download the BMC_Helix_Innovation_Suite_And_Service_Management_Apps_Version_22.1.06.zip file from EPD.
The following files are included in this file:
- This file, BMC_Remedy_Deployment_Manager_Configuration_Release_22.1.06.zip, has the git repositories.
- Setup_22.1.06_BMC_Remedy_Deployment_Engine.zip
- The BMC_Remedy_Deployment_Engine_Setup_22.1.06.zip file can be downloaded. The BMC Deployment Engine automation script is contained in this file.
Installation of BMC Deployment Engine:
Create below two users:
sudo useradd git -m
sudo passwd git
sudo useradd jenkins -m
sudo passwd Jenkins
sudo usermod -a -G git jenkins
sudo usermod -a -G jenkins git
sudo usermod -aG wheel git ## Run the following command to provide sudo access to the git user:
Execute the subsequent command:
Sudo VisudoThe next line should be uncommented:
%wheel ALL=(ALL) NOPASSWD: ALLImportant:
The execution of the BMC Deployment Engine automation script does not require sudo access permission, thus after you have finished configuring the BMC Deployment Engine, run the following command to remove the Git user’s sudo access.
git wheel deletion using gpasswd.
Login in as su – git to and perform below steps:
Extract the contents of the BMC_Helix_Innovation_Suite_And_Service_Management_Apps_Version_22.1.06.zip file that you obtained from EPD into your home directory or any other directory that you own as a git user.

extract_22.1.06_BMC_Remedy_Deployment_Manager_Configuration.zip

Setup_22.1.06_BMC_Remedy_Deployment_Engine.zip
Change ownership of files:
Sudo chown -R git:git *Unzip BMC_Remedy_Deployment_Engine_Setup_22.1.06.zip file and Cd to change the directory to DE1.0.
Update build.properties and customize the following parameters according to your requirement:
ITSM_REPO_GIT_ZIP=</path/to/BMC_Remedy_Deployment_Manager_Configuration_Release_22.1.xx.zip>

GIT_REPO_USER=git

GIT_USER_HOME_DIR=~git

JENKINS_USER=jenkins

JENKINS_INSTALL_DIR=/var/lib/jenkins

JENKINS_HOSTNAME=<fully-qualified-hostname-or-ip-address-where-DE-setup-is-planned>

ANSIBLE_NODE_ROOT_DIR=~/ansible_node_root_dir

JENKINS_NODE_ROOT_DIR=~/jenkins_node_root_dir
(This is the path that the Jenkins_node needs for various operations that are internal to Jenkins)

GIT_REPO_DIR=~/git_repo/
( This is the location where the entire Deployment Engine git code is copied by the installer for setting up the pipelines.)

JENKINS_CONFIG_FILES_DIR=~/Jenkins_Config_Files
(The Jenkins job pipeline uses this location to store its pipeline jobs.)- Run the BMC Deployment Engine automation script to set up the Jenkins job pipeline framework after making changes to the build.properties file.
sudo perl setup-Helix-ITSM-onPrem.pl 2>&1 | tee ~/BMC-HELIX-DE-AUTO.log.$$- You can utilize the log file, which is generated in the Home directory, to troubleshoot setup-related problems.
- As part of this installation we might certainly ran into some missing files,
Expected error: cannot access the / permission issue which can be created manually for work around and rerun the script. - Make sure the Security groups with Port 8080 inbound is open to the bmc deployment engine, right before hitting UI at http://<hostname_of_bmc deployment engine:8080>.
- Once page opens up seeks for passwd, which can be obtained from :
$JENKINS_INSTALL_DIR/secrets/initialAdminPassword from Jenkins server. - Choose the option to Install Suggested Plugins from the Jenkins User Interface.
- Enter the desired username and password in the Admin User Creation process, then click the “Run” button.
- Use the following command to confirm that ssh functions properly with passwordless logins from root user to git@
<jenkins_server_name> and git user to git@<jenkins_server_name> :
a. sudo ssh git@<jenkins_server_name>
b. ssh git@<jenkins_server_name>
c. Add the kubeconfig file on the Jenkins server.
d. Download the kubeconfig.yaml file to the $HOME directory.
e. Copy the kubeconfig.yaml file to $HOME/.kube/config.
f. cp <kubeconfig complete file path> $HOME/.kube/config
- Use the following URL to log in to the Jenkins server:
Jenkins server host name: Jenkins port: http://<Jenkins port>/credentials In the ID: kubeconfig file, add the credentials.
After choosing kubeconfig, click the credential’s name.
Click Update
Select the Replace checkbox.
Click Choose File and select the kubeconfig file
Click Save.
- Add the credentials in the ID: github account.
Select github and click the name of the github credential.
Click Update.
Click Change Password and enter the git user password.
Click Save.
- Add the credentials in the ID: ansible_host account.
Select ansible_host and click the name of the ansible_host credential
Click Update.
Click Change Password and enter the git user password.
Click Save.
- Add the credentials in the ID: ansible file
Select ansible and click the name of the ansible credential.
Click Update.
Click Change Password and enter the git user password.
Click Save.
- Add credentials in the ID: git account.
Select git and click the name of the git credential.
Click Update.
Click Change Password and enter the git user password.
Click Save.
- (For cloud environments) Update git user private key credentials
Navigate to http://<Jenkins server host name>:<Jenkins port>/credentials/store/system/domain/_/
Click Add Credentials.
Enter the following details:
| Kind | SSH Username with private key |
| ID | git_pk |
| Username | git |
| Private Key | i. Click Enter. ii. Paste the contents of git user private key value (/home/git/.ssh/id_rsa) |
- To update the node configuration in a cloud environment
Navigate to http://<Jenkins server host name>:<Jenkins port>/computer.
Perform the following steps for both nodes, the one with the actual hostname and another with the git hostname.
Click the node name.
Click Configure.
Under Credentials, select the git user ssh key credential and click Save.
Click Launch Agent.
- To add the Jenkins libraries
To add the pipeline-framework library, follow these steps:
Click Manage Jenkins from the Jenkins home page.
Click on Configure System.
Add the pipeline-framework library to Global Pipeline Libraries in the manner depicted in the accompanying figure:
As per the environment, enter the full path of pipeline-framework.git in the Project Repository box. You may retrieve the value of from the build.properties file.
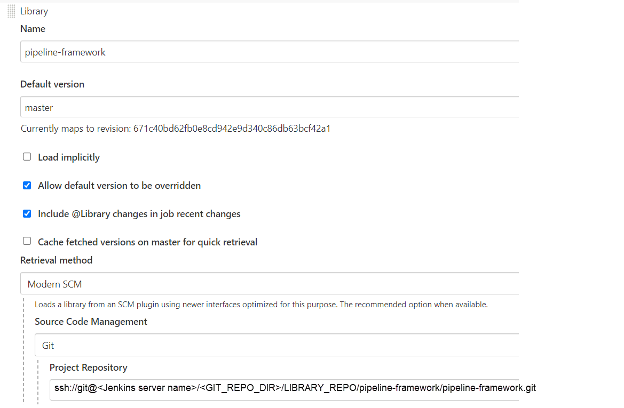
- Please ensure that the pipeline-framework.git location you extract is accurate for the given environment.
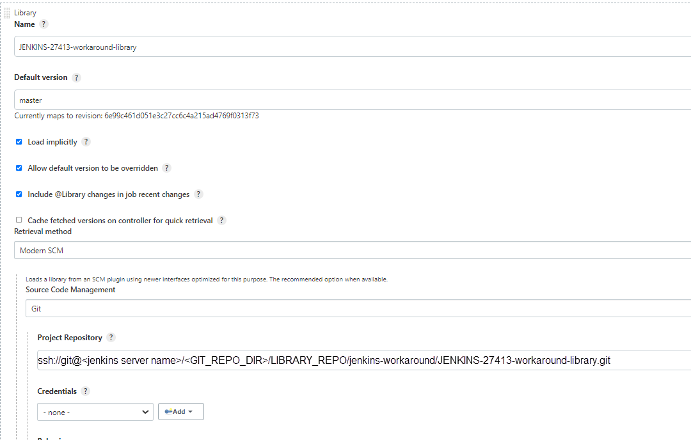
As seen in the accompanying figure, add the JENKINS-27413-workaround-library: Enter the full path of JENKINS-27413-workaround-library.git in the Project Repository field, taking the environment into consideration. Select Load implicitly.
Save the changes.
- (If you are using BMC Helix Platform Common Services 23.4.00 or 24.1.00) To add sizing templates and disaster recovery updates to the ITSM_REPO Git repository
Use Git repository owner user to log into the Jenkins server.
Go to the directory containing the Git repositories, such as /home/git/Git_Repo.
The ITSM_REPO.zip file you obtained from EPD should be copied.
The ITSM_REPO.zip file is contained in the BMC_Helix_Innovation_Suite_Disaster_Recovery_Hotfix_Version_22106.zip file, which is found in the BMC Helix Innovation Suite Disaster Recovery Hotfix Version 22.1.06 folder on EPD.
Use the following command to rename the current ITSM_REPO:
mv ITSM_REPO ITSM_REPO_old
Use the following command to extract the ITSM_REPO.zip file:
unzip ITSM_REPO.zip.
The new deployment size templates replace the Git repository after you unzip the file.
Use the following command to grant owner user permissions to the ITSM_REPO repository:
chown -R git:git ITSM_REPO
- Running the deployment pipelines in dry-run mode:
Dry-run is a mandatory step to update the pipeline configuration for any changes to the BMC Helix Innovation Suite and Service Management Installer.
Note:
To use the dry-run mode for the deployment pipelines
Go to Jenkins Dashboards to see every pipeline that needs to be deployed.
After selecting every pipeline, choose Build with Parameters.
Press Build.
As predicted, the build job status fails.
There is no need for a dry-run for the agent-add-pipeline and HELIX_DR pipelines.
Enter the value of the AGENT parameter for the HELIX_ONPREM_DEPLOYMENT pipeline.
The Jenkins agent used to run the pipeline is the value of the AGENT argument. Give the node with the name git- <hostname>its value.
There are no pipelines selected in the PRODUCT_DEPLOY section.
Run Build with Parameters for the remaining pipelines using the default values found in the pipeline.
- To add the HELIX_FULL_STACK_UPGRADE deployment pipeline
Log in to the Jenkins server by using the following URL:
On the Jenkins home page, click New Item.
In the Enter an item name field, enter the pipeline name as HELIX_FULL_STACK_UPGRADE.
Select Pipeline and click OK.
Click the Pipeline tab.
Enter the following information:
Field
Description
Definition
From the Definition list, select Pipeline script from SCM.
SCM
From the SCM list, select Git.
Repository URL
Enter the Repository URL as the path of your local Git repository in the format
ssh://git@<jenkins_server>/<path to itsm-on-premise-installer.git>.Example:
ssh://git@<Jenkins server host name>/home/git/Git_Repo/ITSM_REPO/itsm-on-premise-installer.git.Credentials
Enter the Git server credentials.
Script Path
Specify the script path.
Example:
pipeline/jenkinsfile/HELIX_FULL_STACK_UPGRADE.jenkinsfileClick Apply and then Save.
After the pipeline is created, make sure that the pipeline is selected from Jenkins home page.
Click Build Now.
The first build job fails because it needs to run the first time to load all the parameters of the pipeline script.
After the build job fails, select the pipeline name again from the Jenkins home page.
The Build Now option changes to Build With Parameters.
Installing BMC Helix Platform Common Services 23.2.02:
Microservices-based BMC Helix Platform Common Services offers the data lake (including Elasticsearch, PostgreSQL, and MinIO) and core services (including tenant management, user management, and single sign-on).
Installation of BMC Helix Platform Common Services is required before installing BMC Helix Service Management 22.1.06.
Make sure that you have created a namespace to install BMC Helix Platform Common services.
Verify that nothing is installed in the namespace by using the following command: a
kubectl get all -n <namespace>
Make sure that you have configured the nginx-configuration configmap.
For information about the nginx-configuration configmap parameter value requirements, see System requirements.
Access the Kubernetes cluster by logging onto the controller or bastion machine.
If you haven’t already, download and extract the deployment manager file, helix-on-prem-deployment-manager-23.2.02.sh, from BMC Electronic Product Distribution (EPD).
To obtain the files from EPD, see Downloading the installation files.
If you haven’t already, get the itom-predeploy-hotfix-23.2.02.002-10.tar.gz file from EPD.
The most recent deployment size templates are included in this file.
Give the helix-on-prem-deployment-manager-23.2.02.sh file permission to be executed by going to the directory where you got the deployment manager from the EPD.
Extract the deployment manager by yourself.
Execute the./helix-on-prem-deployment-manager-23.2.02.sh.
CD Helix-deployment-manager on-premises.
Follow these procedures to apply the hotfix itom-predeploy-hotfix-23.2.02.002-10.tar.gz:
Updated deployment size templates and support for Kubernetes version 1.26 are included in the hotfix itom-predeploy-hotfix-23.2.02.002-10.tar.gz.
The file itom-predeploy-hotfix-23.2.02.002-10.tar.gz should be copied to the helix-on-prem-deployment-manager directory.
Use the following command to extract the itom-predeploy-hotfix-23.2.02.002-10.tar.gz file:
Cmd: tar xvf itom-predeploy-hotfix-23.2.02.002-10.tar.gzThe following folders in the helix-on-prem-deployment-manager directory are replaced with the updated deployment size templates once you unzip the package.
configs/
configs/compact.config
configs/compact.json
configs/compact_jvm.config
configs/small.config
configs/small.json
configs/small_jvm.config
To prepare for password encryption
Go to the commons/certs directory and open the secrets.txt file.
Add the following passwords to this file:
Property
Description
Example
IMAGE_REGISTRY_PASSWORD Password for the Docker registry. 5016adc4-993f-4fc5-8fb0-8ef6b02ca9d3
SMTP_PASSWORD
Password to connect to the SMTP server.
Note:
In the configs/infra.config file, if the value of the SMTP_AUTH parameter file is NONE, leave the SMTP_PASSWORD value blank as shown below:
SMTP_PASSWORD=“”
SMTP_PASSWORD=“” password123
SMART_SYSTEM_PASSWORD
Password to connect to the BMC Discovery appliance.
password123
PG_PASSWD
Password to connect to the PostgreSQL database.
password123
KIBANA_PASSWORD
Password to connect to BMC Helix Logging (EFK).
kibana123
MINIO_ACCESS_KEY
Password to access
MinIO.
admin
MINIO_SECRET_KEY
Password to connect to MinIO.
bmcAdm1n
ES_JKS_PASSWORD
Password to connect to Elasticsearch.
Important:
If you are using a custom CA certificate, specify the password, else specify the value as ES_JKS_PASSWORD=“”
This password must have minimum seven characters.
“”
Save the secrets.txt file.
To install BMC Helix Platform Common Services:
In the helix-on-prem-deployment-manager/configs/infra.config file, modify the following parameters that are environment-specific.
Important
The following load balancer hosts are required. You do not need any subdomains.
LB_HOST
Ensure that the LB_HOST value is not the same as the tenant URL
TMS_LB_HOST
MINIO_LB_HOST
MINIO_API_LB_HOST
KIBANA_LB_HOST
Tenant URL that is derived based on the following parameters from the infra.config file:
$COMPANY_NAME-$TENANT_TYPE-$ENVIRONMENT.$DOMAIN
Make sure that you have created a storage class.
BMC supports a Bring-Your-Own-Storage-Class model, for any block storage supporting high performance IOPS. NFS is not supported for persistent volumes. CephRBD is certified by BMC.
Property
Description
Example
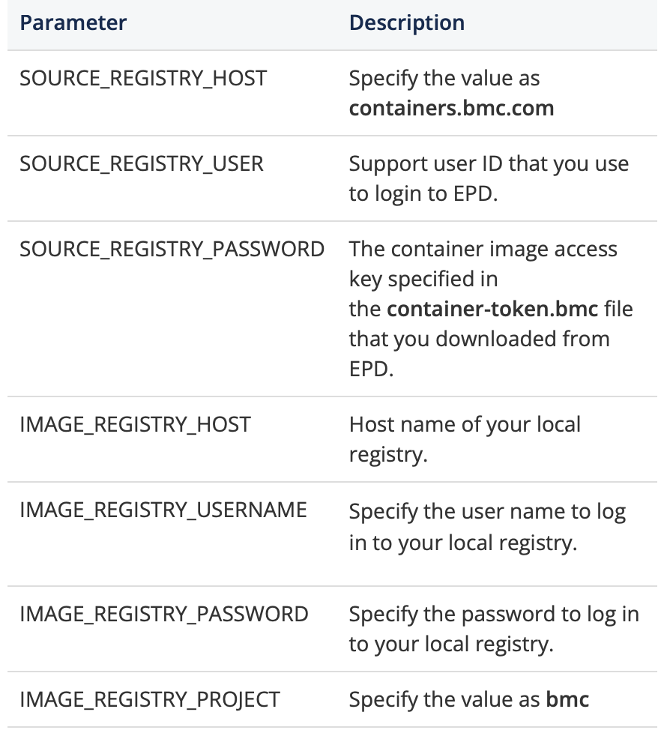
Docker registry details
IMAGE_REGISTRY_HOST :
Specify the host where the Docker registry is running with the BMC container images. If the images are synchronized to a local Harbor registry, make sure the Harbor registry is set up with HTTPS and set the local repository value to this parameter.
Important: Do not specify the host path; specify only the host name.
Example:
In case of BMC repository; IMAGE_REGISTRY_HOST=containers.bmc.com.
In case of local repository; IMAGE_REGISTRY_HOST=value-investing.cluster3.bmc.com.
IMAGE_REGISTRY_HOST=containers.bmc.com
IMAGE_REGISTRY_USERNAME:
Specify the username to access the Docker registry.
If you use a local Harbor registry to synchronize with BMC DTR, specify the user name to log in to your local registry.
IMAGE_REGISTRY_USERNAME=abc@bmc.com
Infrastructure details
ENVIRONMENT:
Specify the environment type.
The value of this parameter depends on the kind of setup that you want to create, such as, dev, qa, or production.
Important:
Do not use prod to indicate the production environment.
Do not use special characters.
The value of this parameter is not based on deployment size such as, compact, small, medium or large.
You can use the same environment value while performing the BMC Helix Service Managementinstallation.
ENVIRONMENT=poc
NAMESPACE:
Specify the namespace where you want to install the services.
You must have separate namespaces to install BMC Helix Platform Common Service and BMC Helix Service Management.
NAMESPACE=dark-helmet
LB_HOST
Specify a URL to create the load balancer host.
The BMC Helix Single Sign-on ingress uses this URL to access the BMC Helix Single Sign-on administration console.
LB_HOST=host-india-app.mydomain.com
LB_PORT
Specify the port number that the load balancer listens to and accepts the client request.
The default value is 443.
LB_PORT =443
TMS_LB_HOST
Specify a URL to create the Tenant Management System host. The value of this parameter is used by the tenant management system ingress.
TMS_LB_HOST=tms-private-poc.mydomain.com
DOMAIN
Specify the URL for domain of the load balancer. This value is used to create a valid base URL for tenants and needs wild card certificate. Having a wild card certificate would help you to create multiple URLs.
DOMAIN=mydomain.bmc.com
MINIO_LB_HOST
Specify a URL to create a MinIO storage. This value is used by the MinIO ingress.
MINIO_LB_HOST=minio.mydomain.bmc.com
MINIO_API_LB_HOST:
Specify a URL to create a MinIO storage. All the API based operations are performed using this URL. This URL is used to create a MinIO bucket.
MINIO_API_LB_HOST=minio-api.mydomain.bmc.com
KIBANA_LB_HOSTS:
Specify a URL to create a Kibana load balancer host. The BMC Helix Logging ingress uses the value of this parameter. The value of this parameter depends on the self-signed/CA-signed certificate or CA custom certificate.
KIBANA_LB_HOST:kibana-private-poc.mydomain.com
Cluster details
CLUSTER_TYPE:
Cluster type can have values openshift or ocp for OpenShift.
If CLUSTER_TYPE is not set to openshift or ocp then cluster type is treated as kubernetes cluster.
CLUSTER_TYPE=openshift
Tenant details for onboarding
COMPANY_NAME:
Specify the name of the tenant.
The value that you specify is used to create the tenant URL in the following format:
$COMPANY_NAME-$TENANT_TYPE-$ENVIRONMENT.$DOMAIN
COMPANY_NAME=purplekite
TENANT_EMAIL
Specify the email address of the admin user of the primary tenant.
TENANT_EMAIL=abc@bmc.com
TENANT_FIRST_NAME
Specify the first name of the admin user of the primary tenant.
TENANT_FIRST_NAME=Myfirstname
TENANT_LAST_NAME
Specify the last name of the admin user of the primary tenant
TENANT_LAST_NAME=Mylastname
TENANT_TYPE
Specify the unique identifier of the tenant.
The COMPANY_NAME value is used as the tenant name. In addition to the tenant name, use the TENANT_TYP Eparameter to identify the teant.
TENANT_TYPE=tyrion
COUNTRY
The country name must match the value in the OS locale.
Important
Add the country name within double quotes. For example:
“India”
Do not use abbreviation in country names.
Click here to view a list of the supported country names.
COUNTRY=“United States”
SMTP configuration details
SMTP_HOST:
SMTP host name of IP address accessible from cluster
This parameter is required.
SMTP parameters are required for the emails that are sent to the administrator for tenant activation after the BMC Helix Platform deployment is complete.
All SMTP mail servers are supported.
To use a temporary SMTP server to receive BMC Helix Platform Common Service installation emails, see the knowledge article 000396217.
SMTP_HOST=mailhost.mycompany.com
SMTP_PORT:
An integer value for the port of the SMTP server. For example. 25
This parameter is required.
SMTP_PORT=25
SMTP_USERNAME
User name to connect to the SMTP server.
If SMTP_AUTH value is set to NONE, keep the SMTP_USERNAME and SMTP_PASSWORD values blank as shown below:
SMTP_USERNAME=“”
SMTP_PASSWORD=“”
This parameter is required.
SMTP_USERNAME=abc@mycompany.com
SMTP_FROM_EMAIL
A valid email ID for the From address in all emails
This parameter is required.
SMTP_FROM_EMAIL=helix-rd@mycompany.com
SMTP_TLS
The SMTP server TLS. If not in use, leave the parameter blank as shown below:
SMTP_TLS=“”
SMTP_TLS=“”
SMTP_AUTH_DASHBOARD
The value can be true or false.
SMTP_AUTH_DASHBOARD: True
SMTP_AUTH
One of the following values:
PLAIN
This value is case sensitive. If you set the value as PLAIN, it is mandatory to set valid values for SMTP_USER and SMTP_PASSWORD.
LOGIN
This value is case sensitive. If you set the value as LOGIN, it is mandatory to set valid values for SMTP_USER and SMTP_PASSWORD.
NONE
This value is case sensitive. Use this value when you want to skip SMTP authentication. If you set the value as NONE, set the user name and password values as shown below:
SMTP_USERNAME=“”
SMTP_PASSWORD=“”
SMTP_AUTH=PLAIN
OPS_GROUP_EMAIL
Specify a valid email address for your organization’s operations team. All emails related to tenant activities such as tenant creation, registration, and offboarding are sent to this email address.
Important:
Special characters are not allowed in an email.OPS_GROUP_EMAIL=ops-grp@mycompany.com
APPROVAL_GROUP_EMAIL
Set a valid email address of the approval group who would approve a new tenant.
Important:
Special characters are not allowed in an email.
APPROVAL_GROUP_EMAIL=grp-rd@mycompany.com
Storage class details
PG_STORAGE_CLASS
Storage class used. Usually there is one Storage class configured for all the infra services. Please repeat the same value in that case
PG_STORAGE_CLASS=ceph-block-storage
VMSTORAGE_STORAGE_CLASS
Storage class for VictoriaMetrics.
VMSTORAGE_STORAGE_CLASS=onprem-storage
VMAGGSTORAGE_STORAGE_CLASS
Storage class for VictoriaMetrics.
VMAGGSTORAGE_STORAGE_CLASS=onprem-storage
ES_MASTER_STORAGE_CLASSStorage class for Elasticsearch master nodes
ES_MASTER_STORAGE_CLASS=block-store-class
ES_DATA_STORAGE_CLASSStorage class for Elasticsearch data nodes.ES_DATA_STORAGE_CLASS=block-store-class
MINIO_STORAGE_CLASS
Storage class for Minio.
MINIO_STORAGE_CLASS=onprem-storage
EFS_STORAGE_CLASS:
Specify a storage class for Amazon Elastic File System (EFS). EFS_STORAGE_CLASS=acme-nfs-storageREDIS_HA_GLOBAL_STORAGECLASSStorage class for REDIS.
REDIS_HA_GLOBAL_STORAGECLASS=block-store-class
KAFKA_STORAGECLASS:
Storage class for Kafka.
KAFKA_STORAGECLASS=block-store-class
ESLOG_MASTER_STORAGE_CLASS:
Storage class for Elasticsearch log.
ESLOG_MASTER_STORAGE_CLASS=block-store-class
ESLOG_DATA_STORAGE_CLASS:
Storage class for Elasticsearch log.
ESLOG_DATA_STORAGE_CLASS=block-store-class
AIOPS_STORAGE_CLASS:
Leave it as blank “”
This parameter is not required for BMC Helix Service Management.
AIOPS_STORAGE_CLASS=“”
OPT_STORAGE_CLASS
Leave it as blank “”
This parameter is not required for BMC Helix Service Management.
OPT_STORAGE_CLASS=“”
SMART_SYSTEM_USERNAME:
Leave it as blank “”
This parameter is not required for BMC Helix Service Management.
SMART_SYSTEM_USERNAME=“”
Certificate details
CUSTOM_CA_SIGNED_CERT_IN_USE:
The default value is false.
If you are using a self-signed or custom CA certificate, set the value to true.
For instructions on using a self-signed or custom CA certificates, see Using self-signed or custom CA certificates.
Important: If you are using a self-signed or custom CA certificate, make sure that you use the same custom certificate during BMC Helix Platform and BMC Helix Service Management installation.
CUSTOM_CA_SIGNED_CERT_IN_USE=false
CUSTOM_SERVICEACCOUNT_NAME:
Specify the _ service account name.
If you have cluster admin permissions to create ServiceAccount, Role, RoleBinding, retain the CUSTOM_SERVICEACCOUNT_NAME: value as helix-onprem-sa, which is the default value.
If you do not have permissions to create ServiceAccount, Role, RoleBinding, create a serviceaccount and assign it to CUSTOM_SERVICEACCOUNT_NAME by replacing default value of helix-onprem-sa.
Create a role and rolebinding from the commons/yaml_files/role_rolebinding.yaml file.
Create a ServiceAccount from the file commons/yaml_files/serviceAccount.yaml file.
Before you create serviceaccount, role, rolebinding, you must replace _SERVICE_ACCOUNT_ with value of CUSTOM_SERVICEACCOUNT_NAME variable and replace NAMESPACE with value of NAMESPACEvariable.
CUSTOM_SERVICEACCOUNT_NAME=helix-onprem-sa
RSSO_CUSTOM_JAVA_KEYSTORE_IN_USE:
If you want to use custom JAVA keystore for RSSO SAML keystore configuration, set variable
RSSO_CUSTOM_JAVA_KEYSTORE_IN_USE to true.
Perform the following steps:
Set the RSSO_CUSTOM_JAVA_KEYSTORE_IN_USEvariable to true.
Rename the java keystore file to rsso_custom_java_keystore.
Save this file in the commons/certs directory. The path of this file would be: commons/certs/rsso_custom_java_keystore
The commons/certs/rsso_custom_java_keystorefile will be mounted in the RSSO container at the following location: /etc/rsso_custom_java_keystore
The default value is false.
RSSO_CUSTOM_JAVA_KEYSTORE_IN_USE=false Ingress class details
INGRESS_CLASS:
Ingress class used while deploying Ingress controller. Change if multiple ingress controllers on cluster.
By default rancher will have nginx.
If you have more than one ingress controllers in your cluster, use INGRESS_CLASS to specify the ingress class name that you want to use.
INGRESS_CLASS=nginx
Binary paths on your system
HELM_BIN:
Specify the absolute path of the Helm binary that is supported for the current release.
HELM_BIN=/usr/local/bin/helm
KUBECTL_BIN:
Specify the absolute path of the kubectl binary that is supported for the current release.
KUBECTL_BIN=/usr/bin/kubectlOpenShift details
OC_BIN:
Specify the absolute path of the OpenShift binary.
Important: OC_BIN path should be set if CLUSTER_TYPEis openshift or ocp .
OC_BIN=/usr/local/sbin/ocSecurity context used by infra components
RUN_AS_USER:
Set the security context that the infrastructure components must use to enforce security.
Set the correct context for this variable according to the OpenShift namespace. For example, in OpenShift namespace, run the following command to get the ID range:
oc describe namespace <namespace-name>
Copy
Example output: 1000670000
After you run the command look for the following line in the output:
openshift.io/sa.scc.uid-range: 1000670000/10000 and copy 1000670000 for
RUN_AS_USER, RUN_AS_GROUP and FS_GROUP.
Set this parameter only if the value of the CLUSTER_TYPEvariable is openshift or ocp.
If the value of the CLUSTER_TYPE variable is kubernetes, set the value of this parameter to null:
RUN_AS_USER=null
Important: The command and output changes for each namespace.
RUN_AS_USER=null
RUN_AS_GROUP:
Set the security context that the infrastructure components must use to enforce security.
Set the correct context for this variable according to the OpenShift namespace. For example, in OpenShift namespace, run the following command to get the ID range:
oc describe namespace <namespace-name>
Copy
Example output: 1000670000
After you run the command look for the following line in the output:
openshift.io/sa.scc.uid-range: 1000670000/10000 and copy 1000670000 for RUN_AS_USER, RUN_AS_GROUP and FS_GROUP.
Set this parameter only if the value of the CLUSTER_TYPEvariable is openshift or ocp.
If the value of the CLUSTER_TYPE variable is kubernetes, set the value of this parameter to null: RUN_AS_GROUP=null
Important: The command and output changes for each namespace.
RUN_AS_GROUP=null
FS_GROUP:
Set the security context that the infrastructure components must use to enforce security.>br>Set the correct context for this variable according to the OpenShift namespace. For example, in OpenShift namespace, run the following command to get the ID range:
oc describe namespace <namespace-name>
Copy
Example output: 1000670000
After you run the command look for the following line in the output:
openshift.io/sa.scc.uid-range: 1000670000/10000 and copy 1000670000 for RUN_AS_USER, RUN_AS_GROUP and FS_GROUP.Set this parameter only if the value of the CLUSTER_TYPEvariable is openshift or ocp.
If the value of the CLUSTER_TYPE variable is kubernetes, set the value of this parameter to null:
FS_GROUP=nullImportant: The command and output changes for each namespace.
FS_GROUP=null
OPT_FSGROUP:
Blank “”
This parameter is not required for BMC Helix Service Management.
OPT_FSGROUP=“”
ML_FSGROUP:
Blank “”
This parameter is not required for BMC Helix Service Management.
ML_FSGROUP=“”
In the helix-on-prem-deployment-manager/configs/deployment.config file, modify the following parameters:
ParameterRequired valueInfra services optionsDEPLOYMENT_SIZE:
itsmcompact or itsmsmall
If you are installing BMC Helix Platform Common Service in a nonproduction environment, specify the value as itsmcompact.
If you are installing BMC Helix Platform Common Service in a production environment, specify the value as itsmsmall.
BMC Helix Service Managementdoes not require BMC Helix Platform Common Services resources with deployment sizes such as medium or large. To optimize resources, the deployment sizes, itsmcompact and itsmsmall, are provided for BMC Helix Service Management installation. The itsmcompact size does not support high availability. Use itsmcompact for nonproduction environments. The itsmsmall size supports high availability, so use this size for production environments.
INFRA:             yes

_PTPOSTGRESS yes

_KAFKA          yes

_REDIS            yes

_RSSO             yes

_ELASTICSEARCH      yes

_VICTORIAMETRICS  yes
Important: For the latest deployment size templates, set this parameter to No if you using only BMC Helix Dashboards and not using BMC Helix ITSM Insights.
_MINIO            yes

BMC Helix Dashboard services

HELIX_DASHBOARD_SERVICES        yes

BMC Helix ITSM Insights

(Optional)ITSMINSIGHT_SERVICES yes
If you are not using ITSM Insights, set the ITSMINSIGHT_SERVICESand _VICTORIAMETRICS parameter values to "No".
AR System services

ARSERVICES   yes
Important: Make sure that you specify the value as yes. This option registers the BMC Helix Innovation Suite services in BMC Helix Platform.
BMC Helix Logging

BMC_HELIX_LOGGING          yes
Set this parameter to "No" if you using only BMC Helix Dashboards and not using BMC Helix ITSM Insights.
Specify this parameter as "No", if you are utilizing BMC Helix ITSM Insights alone and not BMC Helix Dashboards
./deployment-manager.shThe tenant administrator gets the following emails following the deployment of the BMC Helix Platform Common Services:
An email containing account information for the BMC Helix Platform
An email requesting a password change for the BMC Helix Platform account upon initial login
You may find all installation logs in the directory that follows:
helix-on-prem-deployment-manager/logsInstallation guide provided by: bmc_doc_eks
[table id=5 /] [post_title] => BMC Helix IT Service Management installation On AWS EKS [post_excerpt] => [post_status] => publish [comment_status] => closed [ping_status] => closed [post_password] => [post_name] => bmc-helix-it-service-management-installation-on-aws-eks [to_ping] => [pinged] => [post_modified] => 2024-04-04 15:47:29 [post_modified_gmt] => 2024-04-04 15:47:29 [post_content_filtered] => [post_parent] => 0 [guid] => https://keyvatech.com/?p=4377 [menu_order] => 0 [post_type] => post [post_mime_type] => [comment_count] => 0 [filter] => raw ) [5] => WP_Post Object ( [ID] => 4439 [post_author] => 7 [post_date] => 2024-04-03 19:02:31 [post_date_gmt] => 2024-04-03 19:02:31 [post_content] =>Keyva is pleased to announce the certification of the Keyva BMC Atrium Data Pump App for the Vancouver and Washington DC releases. Clients can now seamlessly upgrade the App from previous ServiceNow releases (Tokyo, Utah).
Keyva’s Seamlesss Data Pump™ accelerates and simplifies the integration of CI and relationship data between BMC Atrium CMDB and ServiceNow CMDB.
The Washington DC release has new capabilities that will help streamline operations using Generative AI and Now Assist; simplify complex workflows with Flow Designer Engine V2; and create more robust apps faster on the ServiceNow platform.
Learn more about the Keyva BMC Atrium Data Pump App and view all the ServiceNow releases for which Keyva has been certified at the ServiceNow store, visit https://bit.ly/4cD9f2H.
[post_title] => Keyva BMC Atrium Data Pump App Certified for ServiceNow Vancouver and Washington DC Releases [post_excerpt] => [post_status] => publish [comment_status] => closed [ping_status] => closed [post_password] => [post_name] => keyva-bmc-atrium-data-pump-app-certified-for-servicenow-vancouver-and-washington-dc-releases [to_ping] => [pinged] => [post_modified] => 2024-04-04 15:45:41 [post_modified_gmt] => 2024-04-04 15:45:41 [post_content_filtered] => [post_parent] => 0 [guid] => https://keyvatech.com/?p=4439 [menu_order] => 0 [post_type] => post [post_mime_type] => [comment_count] => 0 [filter] => raw ) [6] => WP_Post Object ( [ID] => 4432 [post_author] => 7 [post_date] => 2024-04-03 18:59:27 [post_date_gmt] => 2024-04-03 18:59:27 [post_content] =>Keyva is pleased to announce the certification of the Keyva Service Integration Hub for Red Hat Ansible Automation Platform and the Service Integration Hub for Red Hat OpenShift for the new ServiceNow Washington DC release. Clients can now seamlessly upgrade their ServiceNow App from previous ServiceNow releases (Tokyo, Utah, Vancouver) to the Washington DC release.
The Washington DC release has new capabilities that will help streamline operations using Generative AI and Now Assist; simplify complex workflows with Flow Designer Engine V2; and create more robust apps faster on the ServiceNow platform.
Learn more about the Keyva ServiceNow Integrations Hub for Red Hat products and view all the ServiceNow releases for which Keyva has been certified at the ServiceNow store, visit Ansible https://bit.ly/3RKgoGA and Openshift https://bit.ly/3PXPGZE.
[post_title] => Keyva ServiceNow Apps for Red Hat Certified for new Washington DC Release [post_excerpt] => [post_status] => publish [comment_status] => closed [ping_status] => closed [post_password] => [post_name] => keyva-servicenow-apps-for-red-hat-certified-for-new-washington-dc-release [to_ping] => [pinged] => [post_modified] => 2024-04-03 18:59:28 [post_modified_gmt] => 2024-04-03 18:59:28 [post_content_filtered] => [post_parent] => 0 [guid] => https://keyvatech.com/?p=4432 [menu_order] => 0 [post_type] => post [post_mime_type] => [comment_count] => 0 [filter] => raw ) [7] => WP_Post Object ( [ID] => 4355 [post_author] => 7 [post_date] => 2024-03-13 19:49:05 [post_date_gmt] => 2024-03-13 19:49:05 [post_content] =>A foundational framework for making complexity manageable. Download now.
[post_title] => The Potential of Pipelines and Automation - POV [post_excerpt] => [post_status] => publish [comment_status] => closed [ping_status] => closed [post_password] => [post_name] => the-potential-of-pipelines-and-automation-pov [to_ping] => [pinged] => [post_modified] => 2024-09-23 14:57:17 [post_modified_gmt] => 2024-09-23 14:57:17 [post_content_filtered] => [post_parent] => 0 [guid] => https://keyvatech.com/?p=4355 [menu_order] => 0 [post_type] => post [post_mime_type] => [comment_count] => 0 [filter] => raw ) ) [post_count] => 8 [current_post] => -1 [before_loop] => 1 [in_the_loop] => [post] => WP_Post Object ( [ID] => 4676 [post_author] => 7 [post_date] => 2024-09-20 20:09:34 [post_date_gmt] => 2024-09-20 20:09:34 [post_content] => IT has transitioned from being a backroom adjunct to business operations to becoming a focal point for revenue and growth. While IT operations teams have historically done well in maintaining smooth operations, increasing complexity has raised the stakes. There are now more regulations to comply with and more stringent demands for competitive system performance. Failure to keep up in either area can be costly to the business. Maintaining a competitive advantage through technology requires operations teams to solve problems faster than ever, continuously monitor system performance to reveal trends before they become problems, proactively improve performance for a competitive advantage, and understand how a code update will affect other processes. In this rapidly evolving landscape, a robust observability strategy is crucial for the smooth operation and success of enterprisescale IT environments. The complexity and diversity of modern IT systems demand a comprehensive approach to monitoring, event correlation, and data integration. By implementing a unified observability framework, organizations can benefit from enhanced visibility into their infrastructure to streamline incident resolution processes and proactively address potential issues before they escalate. Download our eBook to learn more. [post_title] => eBook: Maintaining Smooth IT Operations with an Enterprise-Scale Observability Strategy [post_excerpt] => [post_status] => publish [comment_status] => closed [ping_status] => closed [post_password] => [post_name] => maintaining-smooth-it-operations-with-an-enterprise-scale-observability-strategy [to_ping] => [pinged] => [post_modified] => 2024-09-25 13:57:44 [post_modified_gmt] => 2024-09-25 13:57:44 [post_content_filtered] => [post_parent] => 0 [guid] => https://keyvatech.com/?p=4676 [menu_order] => 0 [post_type] => post [post_mime_type] => [comment_count] => 0 [filter] => raw ) [comment_count] => 0 [current_comment] => -1 [found_posts] => 146 [max_num_pages] => 19 [max_num_comment_pages] => 0 [is_single] => [is_preview] => [is_page] => [is_archive] => [is_date] => [is_year] => [is_month] => [is_day] => [is_time] => [is_author] => [is_category] => [is_tag] => [is_tax] => [is_search] => [is_feed] => [is_comment_feed] => [is_trackback] => [is_home] => 1 [is_privacy_policy] => [is_404] => [is_embed] => [is_paged] => 1 [is_admin] => [is_attachment] => [is_singular] => [is_robots] => [is_favicon] => [is_posts_page] => [is_post_type_archive] => [query_vars_hash:WP_Query:private] => 43dbb0366d3a7536cbe6a299469b3ec9 [query_vars_changed:WP_Query:private] => [thumbnails_cached] => [allow_query_attachment_by_filename:protected] => [stopwords:WP_Query:private] => [compat_fields:WP_Query:private] => Array ( [0] => query_vars_hash [1] => query_vars_changed ) [compat_methods:WP_Query:private] => Array ( [0] => init_query_flags [1] => parse_tax_query ) [query_cache_key:WP_Query:private] => wp_query:d673aa16f26c2c662524de8c69f94f46 [tribe_is_event] => [tribe_is_multi_posttype] => [tribe_is_event_category] => [tribe_is_event_venue] => [tribe_is_event_organizer] => [tribe_is_event_query] => [tribe_is_past] => )
eBook: Maintaining Smooth IT Operations with an Enterprise-Scale Observability Strategy

Keyva BMC Atrium Data Pump App has been re-certified against Vancouver and Washington

Keyva BMC Truesight Integration App has been Certified for the Vancouver and Washington DC Releases

Keyva ServiceNow to VMware vRealize Orchestration Integration App Certified Vancouver and Washington DC Releases

BMC Helix IT Service Management installation On AWS EKS

Keyva BMC Atrium Data Pump App Certified for ServiceNow Vancouver and Washington DC Releases

Keyva ServiceNow Apps for Red Hat Certified for new Washington DC Release