Get Appointment
- contact@wellinor.com
- +(123)-456-7890
Blog & Insights
- Home
- Blog & Insights
WP_Query Object
(
[query] => Array
(
[post_type] => post
[showposts] => 8
[orderby] => Array
(
[date] => desc
) [autosort] => 0
[paged] => 4
[post__not_in] => Array
(
) ) [query_vars] => Array
(
[post_type] => post
[showposts] => 8
[orderby] => Array
(
[date] => desc
) [autosort] => 0
[paged] => 4
[post__not_in] => Array
(
) [error] =>
[m] =>
[p] => 0
[post_parent] =>
[subpost] =>
[subpost_id] =>
[attachment] =>
[attachment_id] => 0
[name] =>
[pagename] =>
[page_id] => 0
[second] =>
[minute] =>
[hour] =>
[day] => 0
[monthnum] => 0
[year] => 0
[w] => 0
[category_name] =>
[tag] =>
[cat] =>
[tag_id] =>
[author] =>
[author_name] =>
[feed] =>
[tb] =>
[meta_key] =>
[meta_value] =>
[preview] =>
[s] =>
[sentence] =>
[title] =>
[fields] => all
[menu_order] =>
[embed] =>
[category__in] => Array
(
) [category__not_in] => Array
(
) [category__and] => Array
(
) [post__in] => Array
(
) [post_name__in] => Array
(
) [tag__in] => Array
(
) [tag__not_in] => Array
(
) [tag__and] => Array
(
) [tag_slug__in] => Array
(
) [tag_slug__and] => Array
(
) [post_parent__in] => Array
(
) [post_parent__not_in] => Array
(
) [author__in] => Array
(
) [author__not_in] => Array
(
) [search_columns] => Array
(
) [ignore_sticky_posts] =>
[suppress_filters] =>
[cache_results] => 1
[update_post_term_cache] => 1
[update_menu_item_cache] =>
[lazy_load_term_meta] => 1
[update_post_meta_cache] => 1
[posts_per_page] => 8
[nopaging] =>
[comments_per_page] => 50
[no_found_rows] =>
[order] => DESC
) [tax_query] => WP_Tax_Query Object
(
[queries] => Array
(
) [relation] => AND
[table_aliases:protected] => Array
(
) [queried_terms] => Array
(
) [primary_table] => wp_posts
[primary_id_column] => ID
) [meta_query] => WP_Meta_Query Object
(
[queries] => Array
(
) [relation] =>
[meta_table] =>
[meta_id_column] =>
[primary_table] =>
[primary_id_column] =>
[table_aliases:protected] => Array
(
) [clauses:protected] => Array
(
) [has_or_relation:protected] =>
) [date_query] =>
[request] => SELECT SQL_CALC_FOUND_ROWS wp_posts.ID
FROM wp_posts
WHERE 1=1 AND ((wp_posts.post_type = 'post' AND (wp_posts.post_status = 'publish' OR wp_posts.post_status = 'expired' OR wp_posts.post_status = 'acf-disabled' OR wp_posts.post_status = 'tribe-ea-success' OR wp_posts.post_status = 'tribe-ea-failed' OR wp_posts.post_status = 'tribe-ea-schedule' OR wp_posts.post_status = 'tribe-ea-pending' OR wp_posts.post_status = 'tribe-ea-draft')))
ORDER BY wp_posts.post_date DESC
LIMIT 24, 8
[posts] => Array
(
[0] => WP_Post Object
(
[ID] => 4905
[post_author] => 15
[post_date] => 2025-03-24 14:30:13
[post_date_gmt] => 2025-03-24 14:30:13
[post_content] => In the same way that humans cannot live without water, today's digital businesses cannot function without data. As individuals, we consume water throughout the day in various forms and locations. We get a glass of water from the refrigerator or the water cooler at work. We take a quick gulp from a water bottle while on the treadmill or from the school water fountain. All this water is sourced from rivers, wells, or lakes, then transported via pipelines or highways, forming a distribution system so reliable we seldom consider its complexity. Similarly, the flow of data in modern enterprises demands robust and dependable systems to keep it accessible, secure, and usable.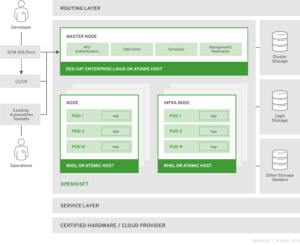
 [Source: Documentation / OpenShift Container Platform 3.11 / Architecture / Overview / What Are the Layers?]
The Keyva Seamless Data Pump
Keyva Seamless Data Pump is a data integration platform designed to transfer large data sets between multiple systems, both on-premises and cloud-based. It secures the data and transforms it into the required format for each end user. The Data Pump also ensures that you are only served the amount of data you need, whether it be a single serving or a disaster recovery weekly backup. This enhances both the relevance of the data and its security. Some of its key features include:- A single source of truth since data is pulled from disparate sources for a single view to make better business decisions.
- Seamless integration with various tools from multiple vendors and support for multiple CMDB platforms.
- Data loads can be scheduled during off-peak hours to minimize impact on business operations.
- Comes with extensive prebuilt modules for faster implementation while offering complete customization to meet specific needs.
Use Cases of Keyva Seamless Data Pump
Need to transform data from multiple sources in multiple datacenters into a centralized CMDB, Seamless Data Pump delivers. Here are two examples use cases: A large global bank needed to make sure their CMDB was kept current and accurate. With multiple sources of data gathering and data inputs, limited capability of the discovery engine, and an engineering team that did not have expertise in every tool’s API schema, they needed help in getting data transformed and entered into the CMDB in an automated way and quickly. Any delays could exacerbate the problem of data drift and data integrity. The Data Pump helped consolidate data from multiple systems and used the power of CMDB reconciliation to assign appropriate weights to specific datasets, and helped control all of this through a standardized interface which also reduced the need for staff training. Now consider an international manufacturing and distribution organization that had three geographically dispersed data centers: two for operational resiliency and one for disaster recovery. In this setup, enormous volumes of data were continuously transferred across dedicated links between these facilities. Just as water transportation incurs significant costs, moving large amounts of data can was expensive. They wanted to optimize data transfer costs, while not changing or losing any of the current endpoint functionality. The Data Pump addressed this challenge with several key features:- Data Compression: Significantly reduces the volume of data transferred, lowering bandwidth requirements and associated costs.
- Real-time Monitoring: Continuously tracks data transfers to ensure completeness and integrity.
- Automatic Error Detection and Correction: Identifies any missing or corrupted data during transfer and automatically initiates retransmission to ensure complete data accuracy.
- Scheduling and Prioritization: Allows for strategic timing of large data transfers to utilize off-peak hours and optimize network resources.
- Deduplication: Eliminates redundant data regardless of disparate IT assets.
Scalability and Security
In today’s fast-paced environments, data surges can be unpredictable. For instance, consider a hospital overwhelmed with patients following a natural disaster or construction accident. Such a surge generates a significant influx of data that must be processed quickly, but with Keyva Seamless Data Pump, there's no need to expand your data teams to manage the load. This highly scalable solution can instantly adjust to ensure that the relevant data is sent to target data sources. Security is equally critical. All data is encrypted during transit to thwart any unauthorized access. The Data Pump also supports the use of service accounts, so organizations can control the permissions model for the type and amount of data that gets processed. It uses secure connection protocols for respective APIs of the source and target products, so that data is securely translated and loaded. The ability of the Data Pump to adapt to sudden data surges while maintaining stringent security protocols makes it an exceptional choice for organizations dealing with high-volume data transfers in dynamic environments.Conclusion
Just as people rely on consistent, reliable drinking water from national distribution networks, businesses and stakeholders should expect the same dependability from their data infrastructure. While many solutions can move data, the Keyva Seamless Data Pump stands out for its consistency, reliability, and scalability. The Date Pump exemplifies Keyva’s commitment to providing innovative tools that transform our client IT environments and businesses. Our team can assess your environment, understand your needs, and demonstrate how Keyva Seamless Data Pump can add value. We offer implementation and customization services to ensure the Data Pump works optimally for you. [post_title] => The Future of Data Automation: Keyva Seamless Data Pump in Action [post_excerpt] => [post_status] => publish [comment_status] => closed [ping_status] => closed [post_password] => [post_name] => the-future-of-data-automation-keyva-seamless-data-pump-in-action [to_ping] => [pinged] => [post_modified] => 2025-02-26 14:32:42 [post_modified_gmt] => 2025-02-26 14:32:42 [post_content_filtered] => [post_parent] => 0 [guid] => https://keyvatech.com/?p=4905 [menu_order] => 0 [post_type] => post [post_mime_type] => [comment_count] => 0 [filter] => raw ) [1] => WP_Post Object ( [ID] => 4933 [post_author] => 7 [post_date] => 2025-03-13 15:31:41 [post_date_gmt] => 2025-03-13 15:31:41 [post_content] => Read about a client who faced operational inefficiencies in managing its mainframe storage system. Download now [post_title] => Case Study: Automated Mainframe Storage Management [post_excerpt] => [post_status] => publish [comment_status] => closed [ping_status] => closed [post_password] => [post_name] => automated-mainframe-storage-management [to_ping] => [pinged] => [post_modified] => 2025-03-20 21:54:25 [post_modified_gmt] => 2025-03-20 21:54:25 [post_content_filtered] => [post_parent] => 0 [guid] => https://keyvatech.com/?p=4933 [menu_order] => 0 [post_type] => post [post_mime_type] => [comment_count] => 0 [filter] => raw ) [2] => WP_Post Object ( [ID] => 4911 [post_author] => 15 [post_date] => 2025-03-03 14:36:50 [post_date_gmt] => 2025-03-03 14:36:50 [post_content] => Think about how much time we spend searching for stuff. Whether it be trying to locate something in the junk drawer at home, searching for misplaced car keys, googling a web search on an unfamiliar topic, or querying an important document at work, we spend too much time trying to find things we need every day. While wasted time searching for items in our personal lives can lead to increased frustration, businesses experience more serious consequences in the form of diminished productivity, increased operational costs, and compromised decision quality when critical information remains elusive.Navigating the Modern Data Maze
Today's workplace presents a fundamental shift in data storage. Unlike the past, when employees could find everything on a local NAS server, information now resides across multiple environments including local storage, cloud platforms, SharePoint, CRM systems, Microsoft 365 applications, SQL databases and various third-party SaaS solutions. This fragmentation has eliminated the convenience of "one-stop shop," often requiring employees to navigate through scattered repositories to locate that one critical piece of information they need. We often hear the phrase, “garbage in, garbage out” when it comes to data analytics. Good decision making depends on clean data that is unbiased and timely. Additionally, ineffective search capabilities can lead to incomplete information resulting in suboptimal decisions and missed opportunities. In essence, the power of your data is directly proportional to your ability to access and utilize it efficiently.Empowering Every Employee to Use Intelligent Search
This is why organizations need to implement intelligent search systems into their enterprise. Intelligent search harnesses advanced technologies such as natural language processing, machine learning, and semantic understanding to interpret user intent and comprehend context. It enhances productivity by minimizing the time employees spend hunting for information. Every organization has power users who excel at searching for information, whether it's mastering the art of Google searches or wielding complex SQL commands. However, businesses shouldn’t depend on a select few with specialized skills to access critical information. Intelligent Search democratizes this capability, making effective information retrieval accessible to all employees, regardless of their technical expertise. This technology allows users to conduct simple searches using natural language, eliminating the need for specialized query syntax or deep technical knowledge. Once a plain language query is initiated, the system then:- Interprets the user's intent
- Identifies relevant data sources
- Constructs and executes appropriate API queries
- Aggregates and presents results in a user-friendly format
From Fragmented to Seamless
A foundational feature of modern network system management and security solutions is the "single pane of glass" approach that provides administrators comprehensive visibility across all infrastructure areas using a single interface. Intelligent search extends this concept to end users, offering a powerful, centralized query capability that spans the entire network ecosystem. Even when users know where to look, they find themselves navigating through different interfaces, repeatedly logging in, and adapting to various search mechanisms across today’s hybrid enterprises. Smart intelligence on the other hand seamlessly integrates with backend connections to various systems, eliminating the need for multiple logins to provide a consistent user experience regardless of the underlying data source. But streamlining the query process does not short-cut the need for security. Smart search utilizes role-based access to filter search results based on user roles, departments, or other attributes to ensure that users only see the information relevant to their position.Intelligent Search Support with Keyva
At Keyva, we have worked on how to democratize data queries for years. A few years ago, we did it through the use of middleware that leveraged APIs for all the endpoints we needed to integrate with, and the translation intelligence was built there. We utilized tagging strategy for documents with weighted relevance, to ensure the most appropriate data was returned to users. Today, the landscape has evolved dramatically with the advent of AI technologies. These advancements have significantly reduced the complexity and setup requirements that were once necessary for effective data integration and retrieval. The role once played by our custom middleware has been superseded by advanced AI algorithms that can adapt to individual user needs and behavior, and continuously learn and improve based on user interactions. AI now serves as the cornerstone for connecting disparate data sources and indexing them into a unified system for seamless discovery across the enterprise. We are indeed living in exciting times. At Keyva, we're at the forefront of this data revolution, and our position allows us to guide our clients through this transformative era in data management and accessibility. Find out how a smarter search can garner smarter decisions for your business. [table id=3 /] [post_title] => Intelligent Search: How Smarter Searches Result in Smarter Decisions [post_excerpt] => [post_status] => publish [comment_status] => closed [ping_status] => closed [post_password] => [post_name] => intelligent-search-how-smarter-searches-result-in-smarter-decisions [to_ping] => [pinged] => [post_modified] => 2025-03-04 16:20:53 [post_modified_gmt] => 2025-03-04 16:20:53 [post_content_filtered] => [post_parent] => 0 [guid] => https://keyvatech.com/?p=4911 [menu_order] => 0 [post_type] => post [post_mime_type] => [comment_count] => 0 [filter] => raw ) [3] => WP_Post Object ( [ID] => 4880 [post_author] => 15 [post_date] => 2025-03-01 20:21:00 [post_date_gmt] => 2025-03-01 20:21:00 [post_content] => "Config" is factor 3 of The Twelve-Factor App. Embedded in that config is the data an application uses to understand and work with the environment it is deployed. Config may contain hostnames, URLs, tags, contacts, and importantly, secrets: Passwords, API keys, certificates, client tokens, cryptographic keys, utilized by the application to secure or access resources and data. Configuration is kept separate from an app to make it easy to configure per-environment, but also to rotate secrets to ensure compliance or protect data in case of exposure. Deploying applications with Red Hat Ansible provides several ways to easily and securely inject secrets into the configuration, so that deployments are unique to the environment they're running in.Managing secrets with Ansible Vaults
Ansible vault is a tool embedded within the Ansible package that encrypts and decrypts variables and files for use within the Ansible ecosystem. Ansible vaults are:- Variables, embedded within a playbook or variable file as a string of encrypted values,
- Variable files, containing multiple variables and values encrypted individually,
- Files, containing the encrypted data encrypted and managed by Ansible vault.
Introduction to Ansible vaults
The key benefit of Ansible vaults are they are the Ansible-native way to manage secrets within Red Hat Ansible infrastructure and integrate neatly with the rest of the Ansible Automation Platform, playbooks, and templates. Being the Ansible-native way of managing secrets, Ansible vault is probably already installed on the hosts and systems developing roles and deploying playbooks. Vault data can be included in playbooks with minor changes to deployment scripts within the CLI or to job templates in Ansible Automation Platform.Using Vault IDs
Vault IDs associate a password source with an encrypted object. To Ansible, they provide the root key that is used to encrypt the- When encrypting, the vault ID tells Ansible vault which source should be used to encrypt data. That source can be a password (root key or “cryptovariable”) from stdin, prompt, password from a file, or a script, which is used to encrypt the data.
- When encrypted and at rest, the ID is a label appended to the ciphertext and specifies the source of the password. Ansible vault uses the label as a hint for the password source (though, not strictly; more on that).
- When decrypting, Ansible will attempt to decrypt the data using all of the provided passwords, from all vault IDs, starting with the password from the vault ID first.
Encrypting secrets with Ansible vaults
Encrypting and decrypting data with Ansible vault likely doesn't require installing any additional packages. 1. Create and install a new virtual environment$ python3 -m venv env $ source env/bin/activate2. Install Ansible
$ pip install ansible
Collecting ansible
3. Create file vars.yml with variables
$ <> vars.yml
api_key: My API Key
db_password: MyD8Pa55word
EOT
4. Encrypt with Ansible vault (enter a password when prompted)
$ ansible-vault encrypt vars.yml
New Vault password:
Confirm New Vault password:
Encryption successful
To decrypt and edit the contents, run ansible-vault decrypt
$ ansible-vault decrypt vars.yml
Vault password:
Decryption successful
Working with vault data in Ansible More likely, though, is that you'll be using those variables within an Ansible Playbook execution. 1. The vars.yml needs to be re-encrypted:
$ ansible-vault encrypt vars.yml
New Vault password:
Confirm New Vault password:
Encryption successful
2. Update the playbook to use the newly created vars file
# playbook.yml
---
- name: Use API key
  hosts: localhost
  vars_files:
    - vars.yml
  vars:
    api_key: "{{ undef(hint=Specify your API key') }}"
    db_password: "{{ undef(hint='Provide a DB password') }}"
  tasks:
    - ansible.builtin.debug:
        msg: "my super secret API key: {{ api_key }}"
3. Specify --ask-vault-pass to prompt for password when playbook is executed.$ ansible-playbook playbook.yml --ask-vault-pass
Vault password:
PLAY [Use API Key] *******************************************************************
TASK [Gathering Facts] *******************************************************************
ok: [localhost]
TASK [ansible.builtin.debug] *******************************************************************
ok: [localhost] => {
"msg": "my super secret API key: My API Key"
}When Ansible encounters the encrypted variables, it will see the header defining it as a vault, and then automatically use the provided IDs to decrypt the data. Credentials can be added within the Ansible Automation platform like any other credentials, and then included in the Job template to be made available within the play.Working with external secrets
Not all secrets will be stored within Ansible Automation Platform. Organizations may have security or audit policies that require secrets be stored in a central platform or service. For that, there are two more commonly used methods for accessing secrets: Lookup plugins and modules.Accessing external secrets with Ansible Lookup plugins
Lookup plugins add additional functionality to Jinja2, the templating framework utilized by Ansible, to return data using the configured provider. Many plugins are included in the default Ansible distribution, and authors can create and include their own plugins within collections, roles, and playbooks. A list of available plugins can be viewed by calling ansible-doc -t lookup -l in the CLI. With lookup plugins, playbooks can template in dynamic data directly within the configuration, eliminating a lot of additional config and code that may otherwise be needed to provide the values to a play. For example, the community.dns.lookup_as_dict plugin will query DNS and return a dictionary of DNS entries for the provided domain.$ ansible localhost \
-m 'ansible.builtin.debug' \
-a "msg={{ lookup('community.dns.lookup_as_dict', 'example.org') }}"
localhost | SUCCESS => {
"msg": [
{
"address": "96.7.128.186"
},
{
"address": "23.215.0.132"
},
{
"address": "96.7.128.192"
},
{
"address": "23.215.0.133"
}
]
}
The lookup function can just as easily be used with external secret managers, like Hashicorp Vault, AWS Secrets Manager, and Azure Key Vault. The lookup function is configured similarly to other Jinja functions and can be used throughout playbooks or templates to pull in secrets. The following example playbook and template file utilize the lookup plugin to grab secrets from Hashicorp Vault and inject them into the task or template.# playbook.yml
---
- name: Query KV from Hashi Vault using Lookup plugin
hosts: localhost
vars:
# Alternatively, export the VAULT_ADDR env to the Ansible runtime
vault_address: https://my-vault-url.dev:8201
tasks:
- name: Using lookup within a playbook
ansible.builtin.debug:
msg: "{{ lookup('community.hashi_vault.vault_kv2_get', 'my_secret', url=vault_address) }}"
- name: Using lookup with a template
ansible.builtin.template:
src: service_config.yml.j2
dest: /etc/myservice/config.yml
owner: user
group: group
mode: '0644'
{# service_config.yml.j2 #}
---
connnection:
  hostname: my_url
  username: my_user
  password: {{ lookup('community.hashi_vault.vault_kv2_get', 'database/password', url=vault_address) }}
Using a lookup plugin reduces the potential for exposure of a secret by only accessing it when required, and writing it directly to the task or template.Using Modules to manage secrets
Lookup plugins are probably the easiest way of reading secrets, but if a playbook needs to manage the full lifecycle of a secret, then it may be better to use Ansible modules. Modules make up the tasks that are performed by Ansible during a run. Here is an example of pulling a secret from Hashicorp Vault using a module.# playbook.yml --- - name: Create secret in Hashi Vault using Module hosts: localhost module_defaults: group/community.hashi_vault.vault: url: https://my-vault-url.dev:8201 tasks: - name: Write secret to Vault community.hashi_vault.vault_kv2_write: path: application/secret_value data: mysecretvalue
Protecting secrets in Ansible
There are a few things to be aware of, though, when writing playbooks that utilize Ansible vault and/or external secrets.Keeping secrets at rest
Ansible vault uses AES-256 to encrypt vault data at-rest, and encrypted HMACs to ensure the integrity of that data. To encrypt, Vault uses the provided password and a unique salt to generate data encryption keys for the data and HMAC each time it performs encryption, and uses that same password and salt to verify and decrypt the data when it reads. The security of data stored by Ansible vault is protected by controlling access to the password(s) used to encrypt, rather than needing to control access to the data itself. Even though data is encrypted with AES-256, it’s still important to keep secrets, even encrypted secrets, secure from unauthorized access by storing them within an artifact repository, object store, or secured filesystemProtecting secrets during Ansible Plays
When Ansible accesses secrets during a play, the content of a secret, whether from Ansible vault or from an external provider, can potentially be output to logs. Printing to logs within Ansible Automation Platform isn’t immediately an issue, but, many organizations configure AAP to forward logs to a central repository for compliance and management. Again, this may be expected. But, when that data is forwarded, it increases the risk that secrets can be seen or accessed by unauthorized individuals. Within Ansible Automation Platform, job template authors can change the configure to limit logging verbosity, reducing the amount of information published to the output during a play. But that setting can still be overridden, and the risk of accident exposure from unaware authors is still there. The best way to control secrets during Ansible plays is to enable the no_log: True for the task. By enabling no_log, Ansible will not print any information from the task, even with verbosity at level 4.$ ansible-playbook playbook.yml --ask-vault-pass -vvvv
ansible-playbook [core 2.18.2]
...
Vault password:
...
PLAYBOOK: playbook.yml *******************************************************************
...
1 plays in playbook.yml
Trying secret <ansible.parsing.vault.PromptVaultSecret object at 0x1025ba510> for vault_id=default
...
PLAY [localhost] *******************************************************************
TASK [Gathering Facts] *******************************************************************
ok: [localhost]
TASK [ansible.builtin.debug] *******************************************************************
task path: .../playbook.yml:9
ok: [localhost] => {
"censored": "the output has been hidden due to the fact that 'no_log: true' was specified for this result"
}Even with connection debug enabled, in the truncated logs above, the task output is hidden. That secret can still be exposed to output, though, if it’s utilized by other tasks. Any task that includes that secret within it’s config or output would need to enable no_log to prevent exposure. This can be frustrating because it makes it difficult to debug issues during a play because several tasks from the playbook might need to be hidden. Ansible Automation Platform provides many tools to secure secrets and data within job templates and plays, and available plugins and modules provide multiple methods of utilizing those secrets within plays. But, authors need to be careful how those secrets are utilized within the play, and utilize the correct features of Ansible to ensure secrets are not exposed or stored insecurely at rest. If you would like to learn more or have a conversation about how Ansible Automation Platform can provide value in your organization, contact us. [table id=12 /]
[post_title] => Managing Secrets with Red Hat Ansible
[post_excerpt] =>
[post_status] => publish
[comment_status] => closed
[ping_status] => closed
[post_password] =>
[post_name] => managing-secrets-with-red-hat-ansible
[to_ping] =>
[pinged] =>
[post_modified] => 2025-02-18 20:21:47
[post_modified_gmt] => 2025-02-18 20:21:47
[post_content_filtered] =>
[post_parent] => 0
[guid] => https://keyvatech.com/?p=4880
[menu_order] => 0
[post_type] => post
[post_mime_type] =>
[comment_count] => 0
[filter] => raw
) [4] => WP_Post Object
(
[ID] => 4919
[post_author] => 15
[post_date] => 2025-02-27 16:14:15
[post_date_gmt] => 2025-02-27 16:14:15
[post_content] => Read about a client who faced significant challenges in automating their virtual machine (VM) image build and lifecycle management Download now [post_title] => Case Study: Virtualization Automation & Infrastructure Management
[post_excerpt] =>
[post_status] => publish
[comment_status] => closed
[ping_status] => closed
[post_password] =>
[post_name] => case-study-virtualization-automation-infrastructure-management
[to_ping] =>
[pinged] =>
[post_modified] => 2025-02-27 16:14:15
[post_modified_gmt] => 2025-02-27 16:14:15
[post_content_filtered] =>
[post_parent] => 0
[guid] => https://keyvatech.com/?p=4919
[menu_order] => 0
[post_type] => post
[post_mime_type] =>
[comment_count] => 0
[filter] => raw
) [5] => WP_Post Object
(
[ID] => 4835
[post_author] => 15
[post_date] => 2025-02-19 20:44:36
[post_date_gmt] => 2025-02-19 20:44:36
[post_content] => In today's fast-paced digital landscape, organizations are increasingly adopting containerization to streamline application development and deployment. One of the leading platforms in this space is the OpenShift Container Platform by Red Hat. This blog delves into the key features, benefits, and use cases of OpenShift, providing a comprehensive overview for developers and IT professionals.What is OpenShift Container Platform?
The OpenShift Container Platform is a hybrid cloud application platform that enables organizations to build, deploy, and manage containerized applications at scale. It is built on top of Kubernetes, the popular open-source container orchestration engine, and leverages Red Hat Enterprise Linux (RHEL) for enhanced security and stability.Architecture:
[Source: Documentation / OpenShift Container Platform 3.11 / Architecture / Overview / What Are the Layers?]Red Hat OpenShift Container Platform
Install and run OpenShift on your own physical or virtual servers, either on-site or in the public cloud.Red Hat OpenShift Dedicated
Using your own OpenShift cluster, which is run and maintained by Red Hat and hosted in the public cloud, create and administer containerized apps.Red Hat OpenShift Online
Build, launch, and host apps in the Red Hat-managed and supported public cloud with speed. Check out the great features, register for free, and begin writing and using apps at openshift.com.Benefits of using OpenShift Container platform:
- Advantages of OpenShift Security
- Speed application development and boost productivity
- Scalability and Availability
- Multi cloud and Hybrid cloud
- Developer Productivity
Advantages of OpenShift Security:
OpenShift's enterprise-grade features are a major factor in corporate clients' decision to use it other than Kubernetes, choosing OpenShift’s higher standards and demands for security and compliance. In OpenShift, role-based access control (RBAC) is a mandatory feature unlike in a standard Kubernetes setup. This makes it possible for various engineering team roles to have permissions based on the concept of least privilege. For instance, although software engineers are limited to certain Kubernetes namespaces, Kubernetes administrators may have complete access to the cluster. Pod Security restrictions (PSPs), which are extended to the Kubernetes Pod level, are derived from the built-in Security Context Constraint (SSC), which offers default execution restrictions such prohibiting containers from being executed with root capabilities. The security level of the entire Kubernetes cluster is significantly increased by these preset baseline settings that come with OpenShift. The Red Hat Container Catalog, which is included with OpenShift, lets developers use container images that Red Hat and its partners have tested and approved. As opposed to obtaining container images straight from online sources, these images are tracked, updated, and routinely examined for flaws and vulnerabilities, improving the organization's security posture.Speed application development and boost productivity:
An effective software development pipeline is fueled by a strong continuous integration and delivery (CI/CD) procedure. OpenShift is crucial to the generation of business value because it provides developers with the tools they need to create, test, and launch their applications into production, effectively addressing the need to implement end-to-end CI/CD pipelines. Tekton is the framework that makes it possible to create cloud-native CI/CD pipelines. Tekton defines and executes the required activities using Kubernetes' control plane and Custom Resource Definitions (CRDs). Tekton allows software engineers to write code for their CI/CD pipelines. Tekton covers a variety of situations and is based on industry standards. Additionally, the pipelines developed can be used with other tools, such Jenkins or Knative, in addition to OpenShift, because Tekton is open source and adheres to common standards. Red Hat provides OpenShift Pipelines, a CI/CD solution built on Tekton and native to Kubernetes, to streamline and simplify the pipeline construction process overall. In addition to offering a seamless experience and close connection with other OpenShift tools, this makes the pipeline safer and more resilient by allowing each stage to operate in an own container and scale on its own.Scalability and Availability:
OpenShift offers robust scalability and high availability features. It can automatically scale applications based on demand, ensuring that resources are used efficiently. Additionally, it provides built-in support for load balancing and failover, ensuring that applications remain available even during peak times or in case of failures.OpenShift Monitoring and Logging:
Any system that adheres to the most fundamental best practices should have the capability to track an application workload and gather the logs in one location. The implementation of these may differ depending on whether your application is running in an on-premises or cloud environment. OpenShift's ability to be deployed across several environments presents a problem, but it is also one of its advantages. The ability to make your system applications portable between environments will be hampered if a developer must interface with a particular tooling in the environment where OpenShift is deployed, such as AWS CloudWatch or Azure Monitor. OpenShift is pre-configured with logging and monitoring features to streamline the development process and standardize the deployment and operation of the applications. To be fair, OpenShift goes beyond those features and addresses a number of observability-related topics by utilizing well-known open-source projects: Istio to implement a service mesh for distributed microservices architectures, Jaeger for transaction tracing, Kali for dashboards and visualization, and Prometheus for monitoring and alert management.Multi-cloud and Hybrid cloud:
OpenShift facilitates deployment in on-premises settings and across numerous cloud providers, allowing enterprises to implement a hybrid cloud approach. Because of this adaptability, companies can maximize performance and minimize expenses while avoiding vendor lock-in. Customers of OpenShift have the option to install and run in AWS, Microsoft Azure, and Google in addition to an on-premises self-managed environment. This method makes it simpler to run a workload on a hybrid cloud architecture or move from on-premises to the public cloud.Developer Productivity:
Developers can synchronize the development process by utilizing the ecosystem of tools that Kubernetes offers. A variety of projects are available to make the developer experience as seamless as possible, ranging from using Helm Charts to create the most complicated container-based application to administering Kubernetes clusters using CLI tools like kubectl. OpenShift provides you with a fully functional Kubernetes cluster. Therefore, OpenShift is compatible with all Kubernetes-related tools. By offering supplementary CLI tools and a web-based user interface that grants control over all OpenShift platform capabilities, Red Hat further improved the developer experience. Red Hat OpenShift Container Platform is a powerful solution for enterprises looking to leverage Kubernetes for their containerized applications. With its enhanced developer tools, robust scalability, high availability, and comprehensive security features, OpenShift provides a complete platform for managing containers in production environments. By adopting OpenShift, organizations can streamline their development and operations processes, ensuring efficient and reliable application delivery. Embrace the capabilities of Red Hat OpenShift Container Platform to take your container orchestration to the next level and achieve greater agility and efficiency in your IT operations. [table id=5 /] [post_title] => Top 5 Benefits of Using OpenShift Container Platform [post_excerpt] => [post_status] => publish [comment_status] => closed [ping_status] => closed [post_password] => [post_name] => top-5-benefits-of-using-openshift-container-platform [to_ping] => [pinged] => [post_modified] => 2025-01-22 19:05:24 [post_modified_gmt] => 2025-01-22 19:05:24 [post_content_filtered] => [post_parent] => 0 [guid] => https://keyvatech.com/?p=4835 [menu_order] => 0 [post_type] => post [post_mime_type] => [comment_count] => 0 [filter] => raw ) [6] => WP_Post Object ( [ID] => 4818 [post_author] => 15 [post_date] => 2025-02-04 20:43:52 [post_date_gmt] => 2025-02-04 20:43:52 [post_content] => Red Hat's OpenShift platform is a Kubernetes solution that has been gaining popularity in recent years, thanks in part to the rising popularity of containerization, be it for micro-services, cloud-native appliances, or simply for ease of CI/CD integrations and portability. Beyond such benefits, many companies and now looking into containerization as a possible alternative following recent licensing changes to VMware's suite of products following its Broadcom acquisition. Moving from one abstraction platform to another is a harrowing prospect, particularly with the maturity of virtualization as a technology. I remain something of a holdout against going all in on containerization, but nevertheless, more and more of my services are being moved to containerization over time. While I still use virtualization for application development (VMware Workstation on my Linux-based daily driver machine and Parallels on my Mac laptop), reasons to not use containerization are dwindling as the containerization space matures. OpenShift, in particular, offers a management interface that should feel right at home to vCenter administration veterans, and interaction with the containers it runs have been very smooth from my experience as well. And so, I would like to take some time to offer a high-level overview of how to try OpenShift using environments that you may be familiar with already. OpenShift is at its core a Kubernetes platform to assist in the deployment and management of containers. Some of the features include CI/CD pipelines, easier to understand security assignments, and the aforementioned management interface in the form of a web-based console. Of course, if you are already familiar with management via command line tools, the oc command with open shift will feel quite similar to the k8s or k3s commands you may already be used to. Operating systems that are officially certified for containerization with OpenShift and continually changing. At present, RHEL, SUSE, Ubuntu and Windows systems are supported, but I suggest looking into this listing in case this post becomes out of date. At the time of writing, this list can be found here. For the sake of brevity, I will assume an environment in which OpenShift is already installed and proceed to the steps required to migrate your existing VMware virtual machines. If you've already decided to use OpenShift beyond a testing capacity don't forget to also configure storage, networking and Identity Access Management. Before attempting to import existing machine, you will need to open the OpenShift console and install the "Migration Toolkit for Virtualization Operator" found through the administration role under [Operators -> OperatorHub]. Once installed, an additional menu will appear as [Migration]. Once this is done, proceed to [Migration -> Providers for Virtualization]. There will already be something here for the host cluster you are running, but you will need to add your vCenter appliance to this configuration. Start by clicked "Create Provider" on the upper right. Multiple options will appear here, but the one needed for this sort of migration is vSphere. Fill out the following screen, paying attention to the note for the URL field. For instance, if your vCenter appliance is hosted at “https://vcenter.mycorporation.local”, you will want to provide “https://vcenter.mycorporation.local/sdk” as the response. Next is the VDDK image. This is not required but can significantly increase speed of transfers if used. The VDDK, or Virtual Disk Development Kit, can be downloaded from the Broadcom developer site. Beyond this, a vSphere REST API username (with an FQDN, e.g. "os-migration-user@vcenter.mycorporation.local") and password needs to be provided. Lastly, the SHA-1 fingerprint for your vCenter application can be added here. This is a suggested step but may be skipped with the "skip certificate validation" option. You should get the SHA-1 fingerprint from the certificate with the command openssl x509 -in <cert file location> -noout -fingerprint -sha1 You can also find the fingerprint in the certificate information of your web browser when visiting your vCenter appliance, though this is less recommended than using your cert file as a source of truth. Once complete, OpenShift will immediately start populating the inventory from vCenter. When this is finished (it will likely be instant), proceed to [Migration -> Plans for virtualization]. Click "Create plan" and give the new plan a name of your choosing. Select your newly created provider as your source provider, and the already included provider (named "host" by default) as the target provider. Select a namespace ("imported-vms" is suggested). Proceed to the VM selection step. Select your cluster and your VMs for transfer here. The next step involves selecting a network mapping. If you have not set this up already and if you are already using the VMware data network, you can simply select the pod network as the target namespace. For storage on the next step, select the default storage class. After this, you can select the type of migration you wish to use. A cold migration is the most straightforward and involves shutting down your VMs fully to transfer them. However, a "warm" migration option also exists if downtime is not possible. This will transfer your currently running machines and post incremental updates (similar to snapshot deltas) until it's time to cut over. Once done, click Finish, and you will be returned to the [Plans for virtualization] menu with your newly assembled plan. Click the "Start" button for your plan to begin the transfer. The following page will give you the status of your initiated transfer, including allocation, the copy itself, and the conversion step from VMDK to KubeVirt. Depending on the size of your VMs and your network speed, this may take several minutes to complete. Your migrated systems now can be found under [Virtualization -> Virtual Machines]. Once started, you can proceed into details for any of your VMs by clicking there name. From here, you can see the status of your machine, including a VNC console to interact with it. Migrating from VMware infrastructure to containerized virtualization can feel daunting on its surface. Thankfully, the landscape for containerized infrastructure has significantly matured to make this a process that can reasonably be set up to run in less than a half hour; minutes even, if you're experienced with the process. Hopefully this high-level guide can provide useful on your own discovery into the applications of containerized infrastructure. [table id=11 /] [post_title] => Step-by-Step Guide to Migrating from VMware to Red Hat OpenShift [post_excerpt] => [post_status] => publish [comment_status] => closed [ping_status] => closed [post_password] => [post_name] => migrating-from-vmware-to-red-hat-openshift [to_ping] => [pinged] => [post_modified] => 2025-02-06 17:11:37 [post_modified_gmt] => 2025-02-06 17:11:37 [post_content_filtered] => [post_parent] => 0 [guid] => https://keyvatech.com/?p=4818 [menu_order] => 0 [post_type] => post [post_mime_type] => [comment_count] => 0 [filter] => raw ) [7] => WP_Post Object ( [ID] => 4820 [post_author] => 15 [post_date] => 2025-01-22 20:42:59 [post_date_gmt] => 2025-01-22 20:42:59 [post_content] =>Use Case: Provisioning new resources and services
Ansible works with and within infrastructure and service pipelines, performing well as a step within the process of provisioning hardware, resources, or services, just as easily as the coordinator of the full request process, taking the defined state from configuration and ensuring necessary resources match that state. When functioning as a step in the process of provisioning new resources, Ansible playbooks will run as configured to perform commands and API calls to consistently perform the same set of operations each run. Within a playbook, each task is defined in code as a configuration that will be applied against target resources. Those can be API calls, filesystem changes, system commands, or a custom resource, and Ansible will apply the configuration to update those resources to the desired state. The flexibility of Ansible allows it to take structured requests like API calls, which known or expected inputs and outputs, or amorphous tasks, like complicated shell commands, and define the intended task or command to be executed as well as the expected outcome to verify the success of failure of an action, all in declarative configuration.Use Case: Deploying changes to applications
Once an application or service has been deployed to production, many of the tasks involved in deploying the project are going to be reused to deploy new versions, additional components, update agents, or migrate it to new hardware. Often, only a subset of the tasks performed to provision the infrastructure are required to deploy version updates, patch dependencies, or configure additional telemetry. Utilizing Ansible Automation Platform, the deploy process is defined by a template of tasks, inventory, and credentials, and then configured each run by providing variables, like the software or platform version to be deployed, to create a consistent and idempotent change process. Enterprises can then use those pipelines to create a template to standardize similar project deployments. Multiple teams can use the playbook and central inventory within Ansible Automation Platform and combine them with their own configuration deploy separate projects easily.Use Case: Remediating drift
In systems that can't or don't use immutable infrastructure, it's vital to ensure that as other changes are made to a system or resource, the current state of deployed resources matches the expected state from a configuration. Ansible allows infrastructure managers to ensure that the expected configuration of a system matches the actual configuration of the system each time a playbook is run. For each playbook run, Ansible takes a collection of tasks and applies them with the expected configuration against all resources in an inventory. Defining the tasks in an Ansible playbook ensures that each run is idempotent, utilizing the same configuration and running the same collection of tasks each time, so it can safely be run anytime to ensure the target hosts match the expected state, and reconfigure any hosts that do not. Engineers and sysadmins can also utilize "Check Mode" within Ansible Automation Platform job templates to perform dry runs to locate and document where configuration has started to drift and notify stakeholders before remediation.Use Case: Incident response
When there is an incident, Ansible standardizes and codifies the process of gathering incident context from affected services, speeding up the investigation and time to resolution of an incident. Event-Driven Ansible, deployed alongside the Ansible Automation Platform, connects event streams, such as Amazon Kinesis or Apache MQTT, webhooks, or other alerting and event sources, to playbooks within Ansible Automation Platform. Teams can define playbooks that consist of a set of tasks, like grabbing log data, a list of running processes, or an API result, and send that data to update a ticket in the CMDB and notify the support via Teams or Slack. Ansible Automation Platform can additional expedite time to resolution by automatically executing playbooks against the target inventory when a known incident occurs. Engineers configure Event-Driven Ansible to invoke playbooks to pull context or parse an event to trigger job templates within Ansible Automation Platform which can perform recovery tasks automatically, reducing the load on support teams. [table id=12 /] [post_title] => How Red Hat Ansible Enhances Automation - Common Use Cases [post_excerpt] => [post_status] => publish [comment_status] => closed [ping_status] => closed [post_password] => [post_name] => how-red-hat-ansible-enhances-automation-common-use-cases [to_ping] => [pinged] => [post_modified] => 2025-01-23 17:39:45 [post_modified_gmt] => 2025-01-23 17:39:45 [post_content_filtered] => [post_parent] => 0 [guid] => https://keyvatech.com/?p=4820 [menu_order] => 0 [post_type] => post [post_mime_type] => [comment_count] => 0 [filter] => raw ) ) [post_count] => 8 [current_post] => -1 [before_loop] => 1 [in_the_loop] => [post] => WP_Post Object ( [ID] => 4905 [post_author] => 15 [post_date] => 2025-03-24 14:30:13 [post_date_gmt] => 2025-03-24 14:30:13 [post_content] => In the same way that humans cannot live without water, today's digital businesses cannot function without data. As individuals, we consume water throughout the day in various forms and locations. We get a glass of water from the refrigerator or the water cooler at work. We take a quick gulp from a water bottle while on the treadmill or from the school water fountain. All this water is sourced from rivers, wells, or lakes, then transported via pipelines or highways, forming a distribution system so reliable we seldom consider its complexity. Similarly, the flow of data in modern enterprises demands robust and dependable systems to keep it accessible, secure, and usable.The Keyva Seamless Data Pump
Keyva Seamless Data Pump is a data integration platform designed to transfer large data sets between multiple systems, both on-premises and cloud-based. It secures the data and transforms it into the required format for each end user. The Data Pump also ensures that you are only served the amount of data you need, whether it be a single serving or a disaster recovery weekly backup. This enhances both the relevance of the data and its security. Some of its key features include:- A single source of truth since data is pulled from disparate sources for a single view to make better business decisions.
- Seamless integration with various tools from multiple vendors and support for multiple CMDB platforms.
- Data loads can be scheduled during off-peak hours to minimize impact on business operations.
- Comes with extensive prebuilt modules for faster implementation while offering complete customization to meet specific needs.
Use Cases of Keyva Seamless Data Pump
Need to transform data from multiple sources in multiple datacenters into a centralized CMDB, Seamless Data Pump delivers. Here are two examples use cases: A large global bank needed to make sure their CMDB was kept current and accurate. With multiple sources of data gathering and data inputs, limited capability of the discovery engine, and an engineering team that did not have expertise in every tool’s API schema, they needed help in getting data transformed and entered into the CMDB in an automated way and quickly. Any delays could exacerbate the problem of data drift and data integrity. The Data Pump helped consolidate data from multiple systems and used the power of CMDB reconciliation to assign appropriate weights to specific datasets, and helped control all of this through a standardized interface which also reduced the need for staff training. Now consider an international manufacturing and distribution organization that had three geographically dispersed data centers: two for operational resiliency and one for disaster recovery. In this setup, enormous volumes of data were continuously transferred across dedicated links between these facilities. Just as water transportation incurs significant costs, moving large amounts of data can was expensive. They wanted to optimize data transfer costs, while not changing or losing any of the current endpoint functionality. The Data Pump addressed this challenge with several key features:- Data Compression: Significantly reduces the volume of data transferred, lowering bandwidth requirements and associated costs.
- Real-time Monitoring: Continuously tracks data transfers to ensure completeness and integrity.
- Automatic Error Detection and Correction: Identifies any missing or corrupted data during transfer and automatically initiates retransmission to ensure complete data accuracy.
- Scheduling and Prioritization: Allows for strategic timing of large data transfers to utilize off-peak hours and optimize network resources.
- Deduplication: Eliminates redundant data regardless of disparate IT assets.
Scalability and Security
In today’s fast-paced environments, data surges can be unpredictable. For instance, consider a hospital overwhelmed with patients following a natural disaster or construction accident. Such a surge generates a significant influx of data that must be processed quickly, but with Keyva Seamless Data Pump, there's no need to expand your data teams to manage the load. This highly scalable solution can instantly adjust to ensure that the relevant data is sent to target data sources. Security is equally critical. All data is encrypted during transit to thwart any unauthorized access. The Data Pump also supports the use of service accounts, so organizations can control the permissions model for the type and amount of data that gets processed. It uses secure connection protocols for respective APIs of the source and target products, so that data is securely translated and loaded. The ability of the Data Pump to adapt to sudden data surges while maintaining stringent security protocols makes it an exceptional choice for organizations dealing with high-volume data transfers in dynamic environments.Conclusion
Just as people rely on consistent, reliable drinking water from national distribution networks, businesses and stakeholders should expect the same dependability from their data infrastructure. While many solutions can move data, the Keyva Seamless Data Pump stands out for its consistency, reliability, and scalability. The Date Pump exemplifies Keyva’s commitment to providing innovative tools that transform our client IT environments and businesses. Our team can assess your environment, understand your needs, and demonstrate how Keyva Seamless Data Pump can add value. We offer implementation and customization services to ensure the Data Pump works optimally for you. [post_title] => The Future of Data Automation: Keyva Seamless Data Pump in Action [post_excerpt] => [post_status] => publish [comment_status] => closed [ping_status] => closed [post_password] => [post_name] => the-future-of-data-automation-keyva-seamless-data-pump-in-action [to_ping] => [pinged] => [post_modified] => 2025-02-26 14:32:42 [post_modified_gmt] => 2025-02-26 14:32:42 [post_content_filtered] => [post_parent] => 0 [guid] => https://keyvatech.com/?p=4905 [menu_order] => 0 [post_type] => post [post_mime_type] => [comment_count] => 0 [filter] => raw ) [comment_count] => 0 [current_comment] => -1 [found_posts] => 146 [max_num_pages] => 19 [max_num_comment_pages] => 0 [is_single] => [is_preview] => [is_page] => [is_archive] => [is_date] => [is_year] => [is_month] => [is_day] => [is_time] => [is_author] => [is_category] => [is_tag] => [is_tax] => [is_search] => [is_feed] => [is_comment_feed] => [is_trackback] => [is_home] => 1 [is_privacy_policy] => [is_404] => [is_embed] => [is_paged] => 1 [is_admin] => [is_attachment] => [is_singular] => [is_robots] => [is_favicon] => [is_posts_page] => [is_post_type_archive] => [query_vars_hash:WP_Query:private] => 78786a6e639c29b4db7d53856140c66c [query_vars_changed:WP_Query:private] => [thumbnails_cached] => [allow_query_attachment_by_filename:protected] => [stopwords:WP_Query:private] => [compat_fields:WP_Query:private] => Array ( [0] => query_vars_hash [1] => query_vars_changed ) [compat_methods:WP_Query:private] => Array ( [0] => init_query_flags [1] => parse_tax_query ) [query_cache_key:WP_Query:private] => wp_query:bba64d078b07c53f642cc119ead65aa5 [tribe_is_event] => [tribe_is_multi_posttype] => [tribe_is_event_category] => [tribe_is_event_venue] => [tribe_is_event_organizer] => [tribe_is_event_query] => [tribe_is_past] => )
The Future of Data Automation: Keyva Seamless Data Pump in Action
In the same way that humans cannot live without water, today’s digital businesses cannot function without data. As individuals, we consume water throughout the day in various forms and locations. ...

Case Study: Automated Mainframe Storage Management
Read about a client who faced operational inefficiencies in managing its mainframe storage system. Download now

Intelligent Search: How Smarter Searches Result in Smarter Decisions
Think about how much time we spend searching for stuff. Whether it be trying to locate something in the junk drawer at home, searching for misplaced car keys, googling a ...

Managing Secrets with Red Hat Ansible
“Config” is factor 3 of The Twelve-Factor App. Embedded in that config is the data an application uses to understand and work with the environment it is deployed. Config may ...

Case Study: Virtualization Automation & Infrastructure Management
Read about a client who faced significant challenges in automating their virtual machine (VM) image build and lifecycle management Download now

Top 5 Benefits of Using OpenShift Container Platform
In today’s fast-paced digital landscape, organizations are increasingly adopting containerization to streamline application development and deployment. One of the leading platforms in this space is the OpenShift Container Platform by Red Hat. ...

Step-by-Step Guide to Migrating from VMware to Red Hat OpenShift
Red Hat’s OpenShift platform is a Kubernetes solution that has been gaining popularity in recent years, thanks in part to the rising popularity of containerization, be it for micro-services, cloud-native ...

How Red Hat Ansible Enhances Automation – Common Use Cases
Use Case: Provisioning new resources and services Ansible works with and within infrastructure and service pipelines, performing well as a step within the process of provisioning hardware, resources, or services, ...