Get Appointment
- contact@wellinor.com
- +(123)-456-7890
Blog & Insights
- Home
- Blog & Insights
Seamless Data Pump Integration Platform Acquired by Keyva, LLC
Keyva Acquires Leading Data Integration Platform & IP from TD Synnex
MINNEAPOLIS, Minnesota - Keyva, LLC (Keyva) has announced that it has acquired Seamless Data Pump, a leading data integration platform, from TD Synnex. This includes substantially all assets relating to the products and support of commercially available Seamless Data Pump, Event Integrations, and Plugins.
Since 1992, the Seamless Data Pump product has provided a unique set of intellectual property and software that enables faster integration and deployment of large-scale private cloud and IT infrastructure environments.
“Effective data integration is essential in today’s dynamic hybrid IT environments,” said Jaime Gmach, President and Chief Executive Officer, Keyva. “The addition of these new product and service offerings supports our long-range vision of delivering technologies, services and solutions that provide high business value and innovation to our clients.”
The addition of Seamless Data Pump further enhances the full range of Automation, DevOps, Hybrid Cloud, and IP Development services offered by Keyva.
“This set of solutions will complement our overall strategy and enable our partners and clients to achieve their business goals,” said Anuj Tuli, Chief Technology Officer, Keyva. “The Keyva team is looking forward to bringing innovation to the ongoing development, delivery, and support of this high-quality software.”
Worldwide support and services for the Seamless Data Pump, Event Integrations and Plugins have been transitioned to Keyva. Clients can access the client support portal at https://support.keyvatech.com.
“The Keyva team is dedicated to providing the high level of support and services Seamless Data Pump clients have come to expect,” said Jaime Gmach, President and Chief Executive Officer, Keyva.
To learn more about Keyva and Seamless Data Pump, visit keyvatech.com
About Keyva
At Keyva, we exist today so our clients can thrive tomorrow. This means we do everything we can to provide services and expertise that go beyond IT. We work hard to simplify our clients’ technologies, to free up time so they can focus on their core business. The digital transformation within technology is happening at frightening speed and Keyva is ready to take the pain out of that process. Our consultants help enterprises to automate multi-clouds, multi-vendors, processes, applications, and infrastructure within their environment. From determining issues to developing a strategy to the execution of automation, we thoroughly walk our clients through each step. Learn more at www.keyvatech.com.
###
For more information: Kelly Hirner, Director of Marketing, Keyva, khirner@keyvatech.com
[post_title] => Seamless Data Pump Integration Platform Acquired by Keyva, LLC [post_excerpt] => [post_status] => publish [comment_status] => closed [ping_status] => closed [post_password] => [post_name] => seamless-data-pump_acquired [to_ping] => [pinged] => [post_modified] => 2024-05-15 20:01:02 [post_modified_gmt] => 2024-05-15 20:01:02 [post_content_filtered] => [post_parent] => 0 [guid] => https://keyvatech.com/?p=4177 [menu_order] => 0 [post_type] => post [post_mime_type] => [comment_count] => 0 [filter] => raw ) [1] => WP_Post Object ( [ID] => 4090 [post_author] => 18 [post_date] => 2023-11-14 21:46:33 [post_date_gmt] => 2023-11-14 21:46:33 [post_content] =>As I have been meeting with clients over that past few months, one topic that has been brought up consistently is returning to working in the office and what does that look like. Companies have a lot to think about now that COVID-19 has become an endemic. With the widespread adoption of remote work, companies are being forced to rethink their strategies.
The Pros of Returning to the Office
- Collaboration: Returning to the office can provide IT teams a space for spontaneous discussions, knowledge transfer and quick problem solving. In-person interactions often lead to creative and efficient solutions to technical problems.
- Data Security: Companies have made substantial investments in security policies and infrastructure in the office. Returning to the office ensures that data and systems remain within the controlled and secure environment of the company network, reducing the risk of data breaches.
- Network Performance: Remote work can sometimes lead to bandwidth and connectivity issues. Returning to the office guarantees access to high-speed, reliable internet connections, ensuring that teams can work without having to worry about network limitations.
- Culture: Nothing can replace in the benefit of being in person to form long lasting personal and professional relations amongst team members.
The Cons of Returning to the Office
- Commute and Flexibility: IT workers may find the daily commute time-consuming and disruptive to their workflow. Remote work provides the flexibility to manage work schedules while maintaining a work-life balance. This can be challenging to replicate in and office setting.
- Health Concerns: There continues to be ongoing health and safety concerns. This can be extra sensitive for IT professionals working in close quarters such as data centers or server rooms. Companies must invest in robust safety measures to make the IT professional feel safe.
- Remote Work Productivity: IT professionals have reported higher productivity when working remotely due to fewer distractions.
- The Home Office: The home office has evolved greatly in the past few years. Many IT professionals have heavily invested in agronomical office equipment and hardware including monitors and cameras.
I’ve heard everything from 100% remote, 2-3 days a week in the office to 100% in the office. If companies require any time on the office, they need to consider the delicate balance between the advantages of in-person collaboration and the benefits of remote work. By adopting hybrid work models, addressing health and safety concerns and maintaining a strong IT infrastructure, tech companies can make the transition as smooth as possible.
[table id=9 /] [post_title] => The Return to the Office for IT Professionals Post-Pandemic [post_excerpt] => [post_status] => publish [comment_status] => closed [ping_status] => closed [post_password] => [post_name] => the-return-to-the-office-for-it-professionals-post-pandemic [to_ping] => [pinged] => [post_modified] => 2023-11-14 21:47:02 [post_modified_gmt] => 2023-11-14 21:47:02 [post_content_filtered] => [post_parent] => 0 [guid] => https://keyvatech.com/?p=4090 [menu_order] => 0 [post_type] => post [post_mime_type] => [comment_count] => 0 [filter] => raw ) [2] => WP_Post Object ( [ID] => 3794 [post_author] => 7 [post_date] => 2023-11-14 08:30:00 [post_date_gmt] => 2023-11-14 08:30:00 [post_content] =>Keyva CTO Anuj Tuli discusses the adoption of microservices and containers.
[post_title] => CTO Talks: Adoption of Microservices and Containers [post_excerpt] => [post_status] => publish [comment_status] => closed [ping_status] => closed [post_password] => [post_name] => cto-talks-adoption-of-microservices-and-containers [to_ping] => [pinged] => [post_modified] => 2024-05-15 19:57:29 [post_modified_gmt] => 2024-05-15 19:57:29 [post_content_filtered] => [post_parent] => 0 [guid] => https://keyvatech.com/?p=3794 [menu_order] => 0 [post_type] => post [post_mime_type] => [comment_count] => 0 [filter] => raw ) [3] => WP_Post Object ( [ID] => 4069 [post_author] => 7 [post_date] => 2023-11-02 15:14:12 [post_date_gmt] => 2023-11-02 15:14:12 [post_content] =>Amazon Cognito is a powerful service provided by AWS that allows you to manage user identities and authentication for your applications easily. In this short guide, I will walk you through the steps to create a Cognito User Pool, a fundamental component for handling user sign-ups, sign-ins, and identity management. Let’s get started!
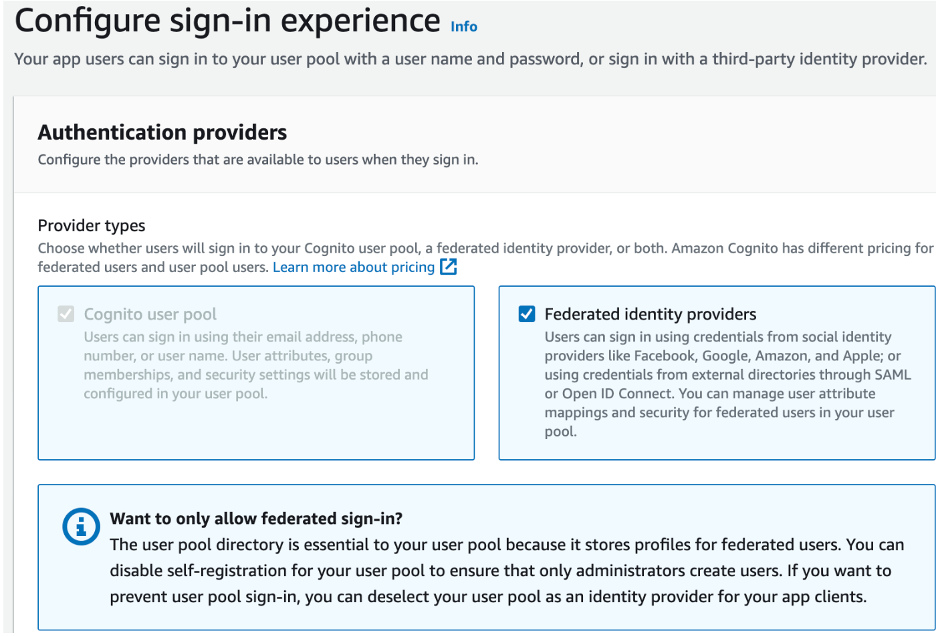
Step One: Configure Sign-in Experience
- Go to the Amazon Cognito Console.
- Select User Pools and click on Create user pool.
- Under the Configure sign-in experience, check Federated Identity providers
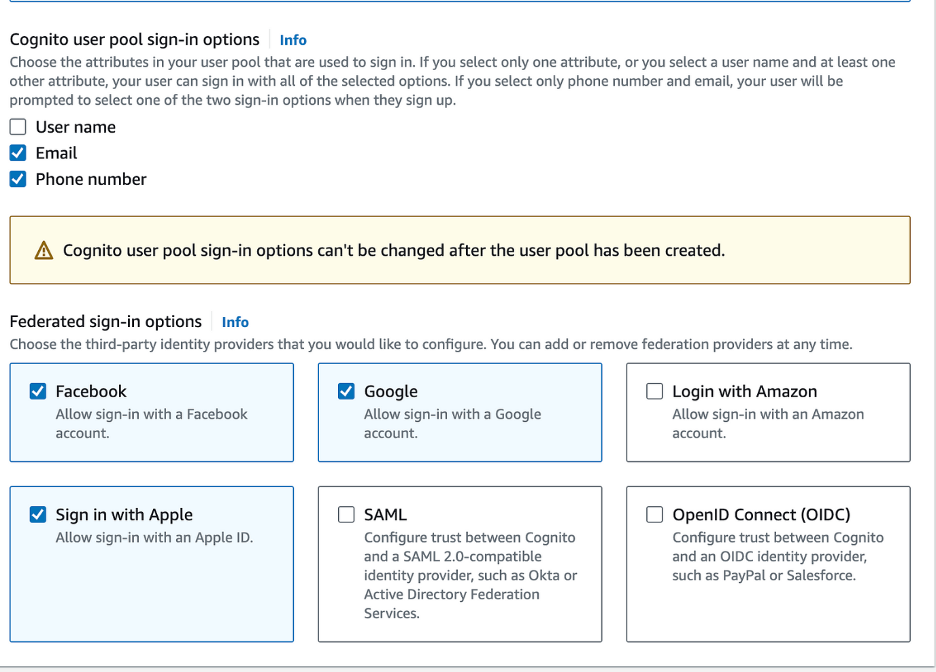
- Check Email and Phone Number for Cognito User Pool Sign-in Options
- Under the Federated sign-in options, check the desired providers (e.g., Facebook, Google, Sign in with Apple). You can configure these options later.
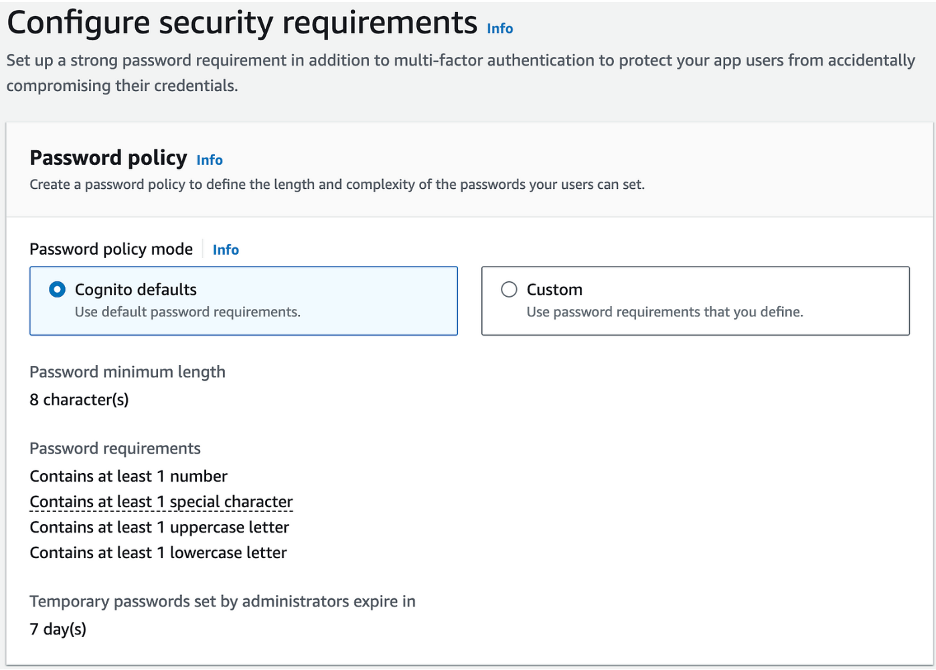
Step Two: Configure Security Requirements
- Leave Cognito Defaults for Password Policy
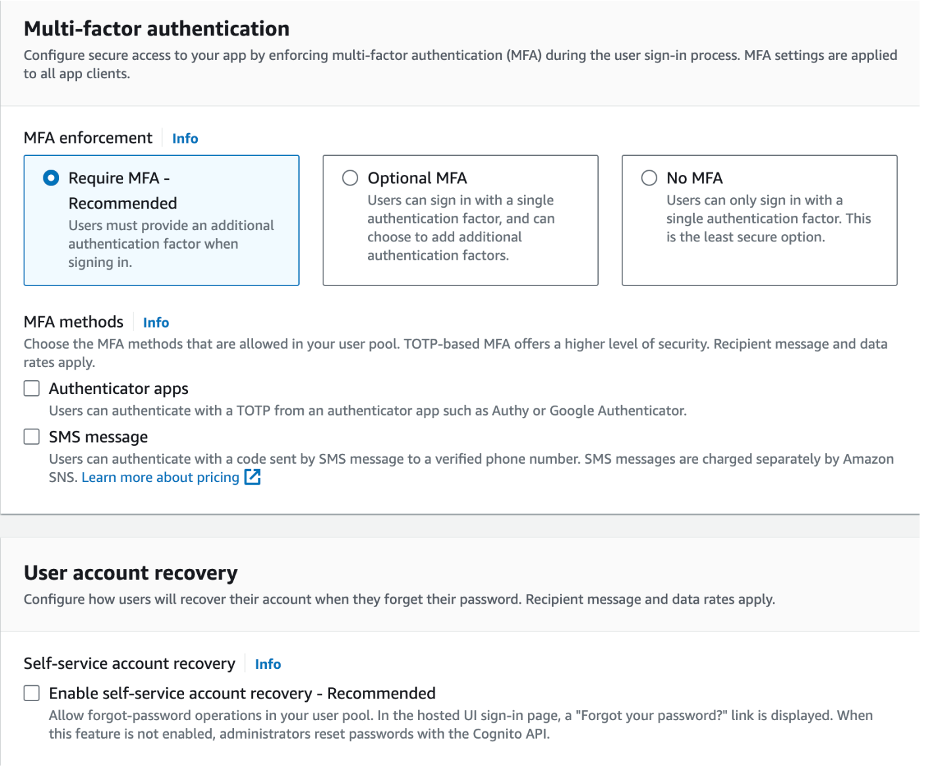
- Configure Multi-Factor Authentication (MFA) as per your security requirements.
- Disable Self-Service Account Recovery
Step Three: Configure Sign-Up Experience
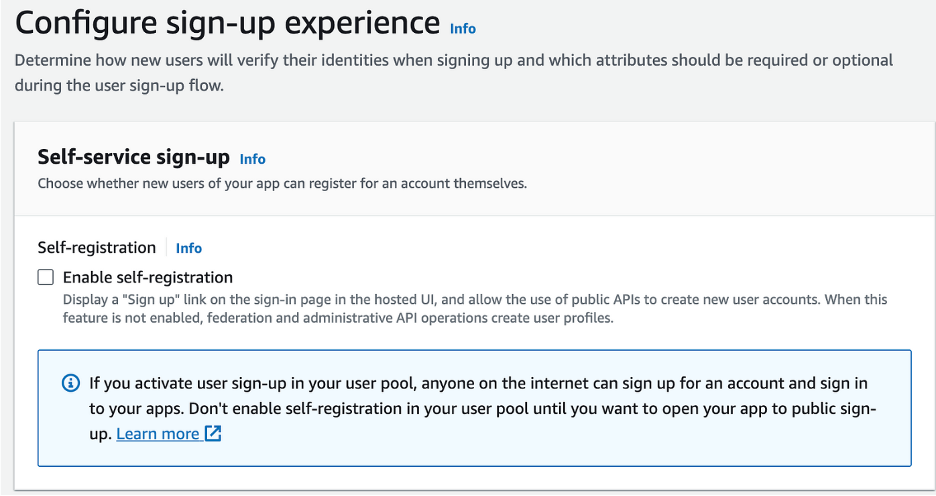
- Disable Self-Registration
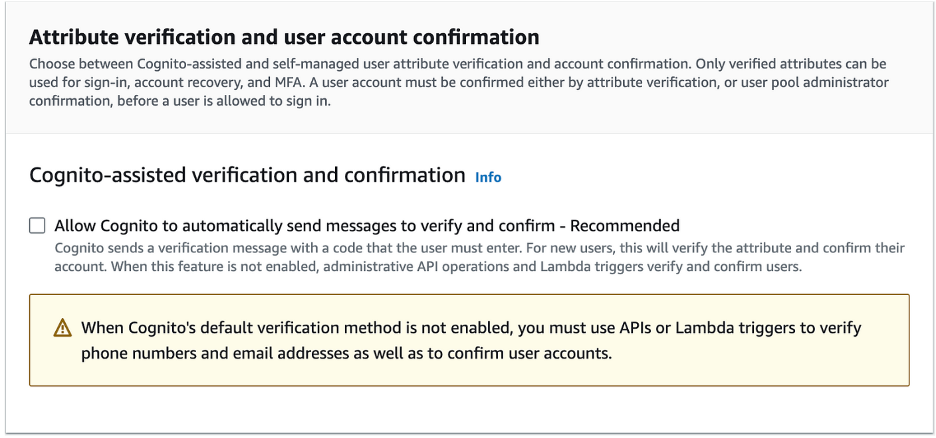
- Uncheck Allow Cognito to Automatically Send Messages
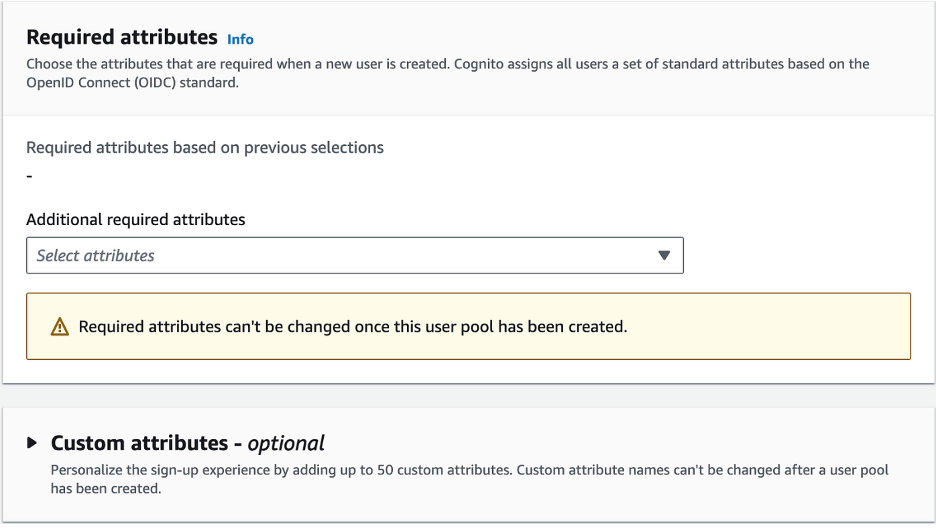
- Leave Required Attributes and Custom Attributes as Default
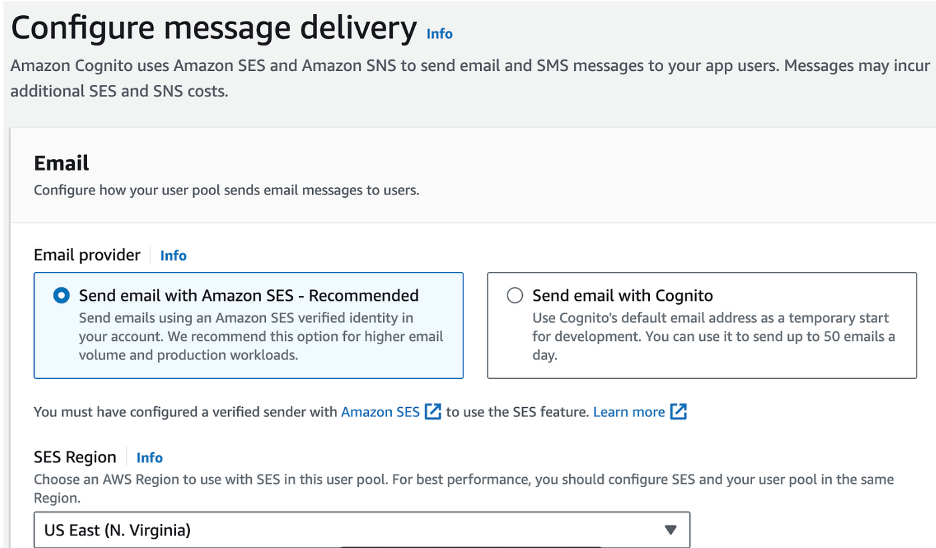
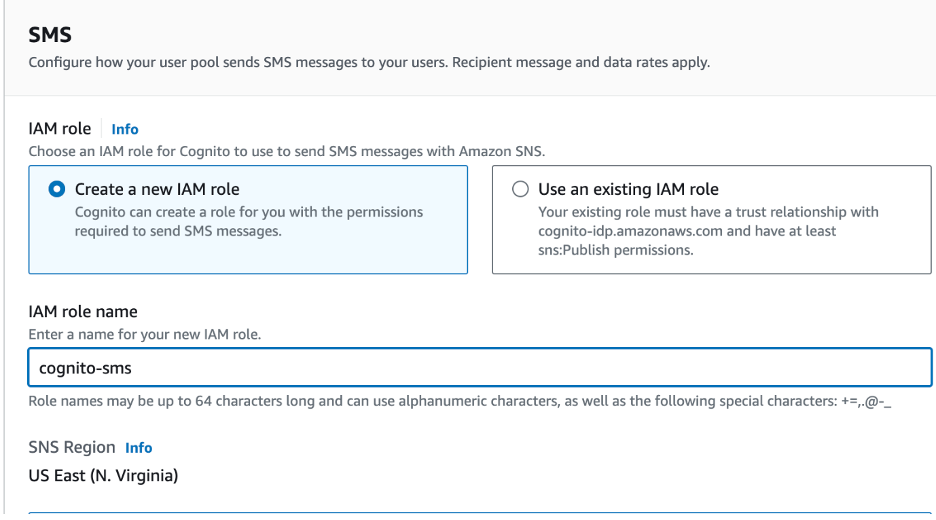
Step Four: Configure Message Delivery
- Leave Email Provider as Send Email with Amazon SES
- Choose Your Region
- Choose an email address that you have verified with Amazon SES
- Configure SMS IAM Role. (Create a new role or choose an existing role)
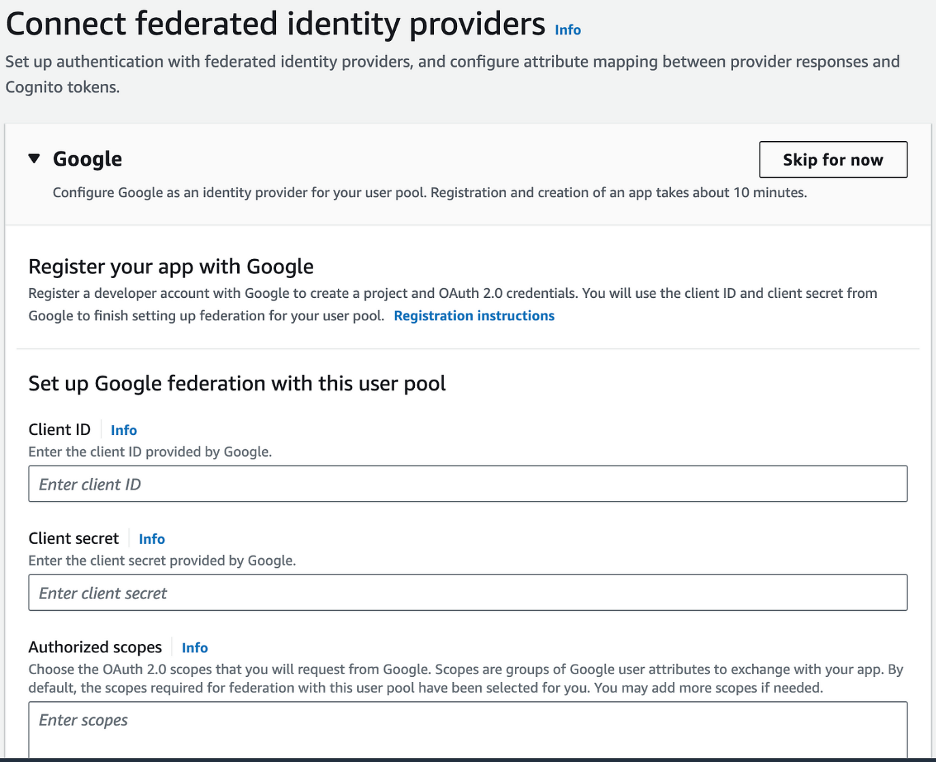
Step Five: Connect Federated Identity Providers
- When prompted to register your app with Google, Facebook, and Apple, you can skip this step for now.
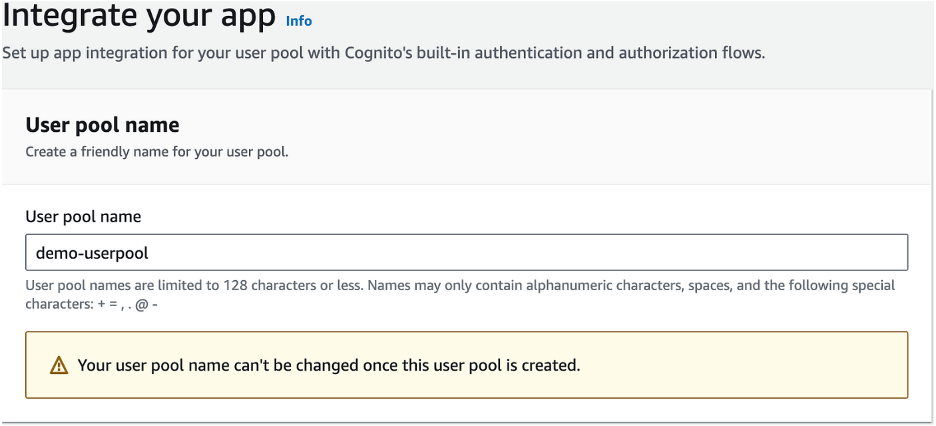
Step Six: Integrate Your App
- Enter the User Pool name
- Select Use a Cognito domain, and provide a unique Cognito Domain name.
- For the initial app client, choose Public client, set the App client name, and choose to generate a client secret if needed.
- Specify allowed callback URLs .
In this post, we will utilize terraform to create an architecture that can be used to deploy a front and backend web application. N-tier architectures are split into multiple tiers and distributed. A common N-tier architecture is the 3-tier which is made up of a presentation, application, and data tier. But this code can be scaled very easily to add more tiers if needed.
We will deploy network infrastructure, which is called a virtual network in Azure. Within that virtual network we will deploy two small subnets. To run the web application, we will use Azure App Service which is a managed PaaS service that allows you easily scale out your application by adding new instances of web apps. Azure App Service can also be used to store mobile backends and REST APIs.
Requirements:
Terraform
Azure Account
Environment Setup:
Before you start, confirm you have a valid Azure Cloud account. Also, ensure you have Terraform installed on your local machine. Terraform provides official documentation on how to do this.
Start by creating a new directory in the desired location and navigate to it. Then paste the following code to create the resource group, two private subnets, service plan and app service:
# Azure provider source and version being used
terraform {
  required_providers {
    azurerm = {
      source  = "hashicorp/azurerm"
      version = "3.75.0"
    }
  }
}

provider "azurerm" {
  features {
  }
}

# create a resource group
resource "azurerm_resource_group" "TerraformCreate" {
  name     = "TerraformCreate"
  location = "eastus"
}

# Create a vnet with two private subnets
resource "azurerm_virtual_network" "TerraformCreateVM" {
  name                = "TerraformCreateVM"
  location            = azurerm_resource_group.TerraformCreate.location
  resource_group_name = azurerm_resource_group.TerraformCreate.name
  address_space       = ["10.0.0.0/16"]

  subnet {
    name           = "private-subnet-1"
    address_prefix = "10.0.1.0/24"
  }

  subnet {
    name           = "private-subnet-2"
    address_prefix = "10.0.2.0/24"
  }
}

# Create a app service plan and web app
resource "azurerm_service_plan" "TerraformCreateASP" {
  name                = "TerraformCreateASP"
  location            = azurerm_resource_group.TerraformCreate.location
  resource_group_name = azurerm_resource_group.TerraformCreate.name
  os_type             = "Linux"
  sku_name            = "P1v2"
}

resource "azurerm_linux_web_app" "TerraformCreateWA" {
  name                = "TerraformCreateWA"
  location            = azurerm_resource_group.TerraformCreate.location
  resource_group_name = azurerm_resource_group.TerraformCreate.name
  service_plan_id     = azurerm_service_plan.TerraformCreateASP.id

  site_config {
    application_stack {
      node_version = "18-lts"
    }
  }
}
Now let’s break down the above code:
We have a required terraform block that specifies the Azure provider and the version which is the latest currently. It always good to check the latest version of the Azure provider and update your code.
Next, we create a resource group, a virtual network and two private subnets. A resource group is collection of like resources to make monitoring, provisioning, access control and de-provisioning convenient and effective. A virtual network is used to house our network resources like our subnets.
From there we create a service plan and web app. Our web apps are just instances of our application that are connected to our service plan and define those resources for the application to run. In this example, we are using NodeJS on Linux instances. We are also placing all resources in the resource group. Now you might be asking why use App Service over a virtual machine. As mentioned above App Service is a managed service. That means Azure takes more off the responsibility off the hands of the customer so you can easily and quickly deploy your application. You specify your runtime, manage your data, your application and Microsoft Azure will take care of the rest. Whereas when you deploy on a virtual machine, you have more to manage like your runtime and your OS.
Creating our application stack:
Then we will run the following commands to create the above resources:
Terraform init
Terraform plan
Terraform apply
After running apply, you should see a successful apply with four resources created. Be sure to destroy any unused resources.
[table id=7 /] [post_title] => Creating N-tier Architecture in Azure with Terraform [post_excerpt] => [post_status] => publish [comment_status] => closed [ping_status] => closed [post_password] => [post_name] => creating-n-tier-architecture-in-azure-with-terraform [to_ping] => [pinged] => [post_modified] => 2023-10-16 18:11:42 [post_modified_gmt] => 2023-10-16 18:11:42 [post_content_filtered] => [post_parent] => 0 [guid] => https://keyvatech.com/?p=4062 [menu_order] => 0 [post_type] => post [post_mime_type] => [comment_count] => 0 [filter] => raw ) [5] => WP_Post Object ( [ID] => 3792 [post_author] => 7 [post_date] => 2023-10-05 08:30:00 [post_date_gmt] => 2023-10-05 08:30:00 [post_content] =>Keyva CTO Anuj Tuli discusses how Kubernetes is necessary for organizations to adopt container technology.
[post_title] => CTO Talks: Containerize Workloads at Scale [post_excerpt] => [post_status] => publish [comment_status] => closed [ping_status] => closed [post_password] => [post_name] => cto-talks-containerize-workloads-at-scale [to_ping] => [pinged] => [post_modified] => 2024-05-15 19:50:38 [post_modified_gmt] => 2024-05-15 19:50:38 [post_content_filtered] => [post_parent] => 0 [guid] => https://keyvatech.com/?p=3792 [menu_order] => 0 [post_type] => post [post_mime_type] => [comment_count] => 0 [filter] => raw ) [6] => WP_Post Object ( [ID] => 4045 [post_author] => 7 [post_date] => 2023-10-02 19:47:34 [post_date_gmt] => 2023-10-02 19:47:34 [post_content] =>Keyva is pleased to announce the certification of the Keyva Service Integration Hub for the Red Hat Ansible and Openshift Automation Platform for the new ServiceNow Vancouver release. Clients can now seamlessly upgrade their ServiceNow App from previous ServiceNow releases (Tokyo, Rome, San Diego, Utah) to the Vancouver release.
The Vancouver release has new solutions that enhance security and governance, simplify critical processes in healthcare and finance, and accelerate talent transformation through AI.
Learn more about the Keyva ServiceNow Integrations Hub for Red Hat products and view all the ServiceNow releases for which Keyva has been certified at the ServiceNow store, visit Ansible https://bit.ly/3RKgoGA and Openshift https://bit.ly/3PXPGZE.
[post_title] => Keyva Service Integration Hub for Red Hat Ansible and OpenShift Automation Platforms – Certified for Vancouver Release [post_excerpt] => [post_status] => publish [comment_status] => closed [ping_status] => closed [post_password] => [post_name] => keyva-service-integration-hub-for-red-hat-ansible-and-openshift-automation-platforms-certified-for-vancouver-release [to_ping] => [pinged] => [post_modified] => 2023-10-02 19:47:36 [post_modified_gmt] => 2023-10-02 19:47:36 [post_content_filtered] => [post_parent] => 0 [guid] => https://keyvatech.com/?p=4045 [menu_order] => 0 [post_type] => post [post_mime_type] => [comment_count] => 0 [filter] => raw ) [7] => WP_Post Object ( [ID] => 3790 [post_author] => 7 [post_date] => 2023-08-23 08:30:00 [post_date_gmt] => 2023-08-23 08:30:00 [post_content] =>Keyva CTO Anuj Tuli discusses how automated remediation helps organizations reduce staff time spent on repetitive tasks.
[post_title] => CTO Talks: Automated Remediation [post_excerpt] => [post_status] => publish [comment_status] => closed [ping_status] => closed [post_password] => [post_name] => cto-talks-automated-remediation [to_ping] => [pinged] => [post_modified] => 2024-05-15 19:54:21 [post_modified_gmt] => 2024-05-15 19:54:21 [post_content_filtered] => [post_parent] => 0 [guid] => https://keyvatech.com/?p=3790 [menu_order] => 0 [post_type] => post [post_mime_type] => [comment_count] => 0 [filter] => raw ) ) [post_count] => 8 [current_post] => -1 [before_loop] => 1 [in_the_loop] => [post] => WP_Post Object ( [ID] => 4177 [post_author] => 13 [post_date] => 2024-01-12 20:03:14 [post_date_gmt] => 2024-01-12 20:03:14 [post_content] =>Seamless Data Pump Integration Platform Acquired by Keyva, LLC
Keyva Acquires Leading Data Integration Platform & IP from TD Synnex
MINNEAPOLIS, Minnesota - Keyva, LLC (Keyva) has announced that it has acquired Seamless Data Pump, a leading data integration platform, from TD Synnex. This includes substantially all assets relating to the products and support of commercially available Seamless Data Pump, Event Integrations, and Plugins.
Since 1992, the Seamless Data Pump product has provided a unique set of intellectual property and software that enables faster integration and deployment of large-scale private cloud and IT infrastructure environments.
“Effective data integration is essential in today’s dynamic hybrid IT environments,” said Jaime Gmach, President and Chief Executive Officer, Keyva. “The addition of these new product and service offerings supports our long-range vision of delivering technologies, services and solutions that provide high business value and innovation to our clients.”
The addition of Seamless Data Pump further enhances the full range of Automation, DevOps, Hybrid Cloud, and IP Development services offered by Keyva.
“This set of solutions will complement our overall strategy and enable our partners and clients to achieve their business goals,” said Anuj Tuli, Chief Technology Officer, Keyva. “The Keyva team is looking forward to bringing innovation to the ongoing development, delivery, and support of this high-quality software.”
Worldwide support and services for the Seamless Data Pump, Event Integrations and Plugins have been transitioned to Keyva. Clients can access the client support portal at https://support.keyvatech.com.
“The Keyva team is dedicated to providing the high level of support and services Seamless Data Pump clients have come to expect,” said Jaime Gmach, President and Chief Executive Officer, Keyva.
To learn more about Keyva and Seamless Data Pump, visit keyvatech.com
About Keyva
At Keyva, we exist today so our clients can thrive tomorrow. This means we do everything we can to provide services and expertise that go beyond IT. We work hard to simplify our clients’ technologies, to free up time so they can focus on their core business. The digital transformation within technology is happening at frightening speed and Keyva is ready to take the pain out of that process. Our consultants help enterprises to automate multi-clouds, multi-vendors, processes, applications, and infrastructure within their environment. From determining issues to developing a strategy to the execution of automation, we thoroughly walk our clients through each step. Learn more at www.keyvatech.com.
###
For more information: Kelly Hirner, Director of Marketing, Keyva, khirner@keyvatech.com
[post_title] => Seamless Data Pump Integration Platform Acquired by Keyva, LLC [post_excerpt] => [post_status] => publish [comment_status] => closed [ping_status] => closed [post_password] => [post_name] => seamless-data-pump_acquired [to_ping] => [pinged] => [post_modified] => 2024-05-15 20:01:02 [post_modified_gmt] => 2024-05-15 20:01:02 [post_content_filtered] => [post_parent] => 0 [guid] => https://keyvatech.com/?p=4177 [menu_order] => 0 [post_type] => post [post_mime_type] => [comment_count] => 0 [filter] => raw ) [comment_count] => 0 [current_comment] => -1 [found_posts] => 162 [max_num_pages] => 21 [max_num_comment_pages] => 0 [is_single] => [is_preview] => [is_page] => [is_archive] => [is_date] => [is_year] => [is_month] => [is_day] => [is_time] => [is_author] => [is_category] => [is_tag] => [is_tax] => [is_search] => [is_feed] => [is_comment_feed] => [is_trackback] => [is_home] => 1 [is_privacy_policy] => [is_404] => [is_embed] => [is_paged] => 1 [is_admin] => [is_attachment] => [is_singular] => [is_robots] => [is_favicon] => [is_posts_page] => [is_post_type_archive] => [query_vars_hash:WP_Query:private] => 26eeb327a2ea8b8c7b4e5b168931cff3 [query_vars_changed:WP_Query:private] => [thumbnails_cached] => [allow_query_attachment_by_filename:protected] => [stopwords:WP_Query:private] => [compat_fields:WP_Query:private] => Array ( [0] => query_vars_hash [1] => query_vars_changed ) [compat_methods:WP_Query:private] => Array ( [0] => init_query_flags [1] => parse_tax_query ) [query_cache_key:WP_Query:private] => wp_query:ba11f9ef040c001cbdaa0a0381fd4c93 [tribe_is_event] => [tribe_is_multi_posttype] => [tribe_is_event_category] => [tribe_is_event_venue] => [tribe_is_event_organizer] => [tribe_is_event_query] => [tribe_is_past] => )
Seamless Data Pump Integration Platform Acquired by Keyva, LLC

The Return to the Office for IT Professionals Post-Pandemic

CTO Talks: Adoption of Microservices and Containers

How to Create a Cognito User Pool: A Quick Guide

Creating N-tier Architecture in Azure with Terraform
CTO Talks: Containerize Workloads at Scale

Keyva Service Integration Hub for Red Hat Ansible and OpenShift Automation Platforms – Certified for Vancouver Release