Get Appointment
- contact@wellinor.com
- +(123)-456-7890
Blog & Insights
- Home
- Blog & Insights
In this blog post, we will explore how Terraform can be utilized to create a BigQuery database in Google Cloud (GCP). BigQuery is one of the most popular GCP services due to its many advantages. BigQuery is a fully managed petabyte scale data warehouse database that uses SQL. Its serverless and allows you to query external data sources without having to store that data inside GCP itself. An important note is that a major advantage of BigQuery is that you pay for the data scanned and not the amount of data stored.
Terraform
GCP Account
Environment setup:
Before you begin, make sure you have a valid Google Cloud account and project setup. We are also going to use a service account to generate the database via Google recommended best practices. Also, make sure you have Terraform installed on your local machine. Terraform provides official documentation on how to do this.
Create a new directory in the desired location and navigate to it and paste the following code to create the BigQuery database:
#Setup RHEL subscription
subscription-manager register
provider "google" {
  credentials = file("<service_account_key_file>.json")

  project = "<ID of your GCP project>"
  region  = "us-central1"
  zone    = "us-central1-a"
}

terraform {
  required_providers {
    google = {
      source  = "hashicorp/google"
      version = "4.51.0"
    }
  }
}

resource "google_bigquery_dataset" "bigquery_blog" {
  dataset_id    = "bigquery_blog"
  friendly_name = "blog"
  description   = "Dataset for blog"
  location      = "US"

  labels = {
    env = "dev"
  }
}

resource "google_bigquery_table" "bigquery_blog" {
  dataset_id = google_bigquery_dataset.bigquery_blog.dataset_id
  table_id   = "blogs"

  time_partitioning {
    type = "DAY"
  }

  labels = {
    env = "dev"
  }

  schema = <<EOF
[
  {
    "name": "blog_title",
    "type": "STRING",
    "mode": "NULLABLE",
    "description": "Name of blog"
  },
  {
    "name": "blog_date",
    "type": "DATETIME",
    "mode": "NULLABLE",
    "description": "Date of blog"
  }
]
EOF
}
Now let’s break down the above code:
The provider block uses the Google provider which is a plugin that is used for resources management. Here we define the service account credentials file that we want to use create the database also the project ID, region and zone. For the service account, we use least privilege access and just scope its permissions to BigQuery.
Next, we have the resource blocks. Before we create the actual table, we need to create a dataset. A BigQuery dataset is thought of as a container for tables. You can house multiple tables in a dataset or just have a single table. Here we set the location to “US” and add labels so that we can easily id the table. For the table resource, I would like to point out we added a time partitioning configuration. It is recommended that you partition tables and data because it helps with maintainability and query performance.
Creating the database:
Then we will run the following commands to create the database in GCP with our service account.
terraform init
terraform plan
terraform apply
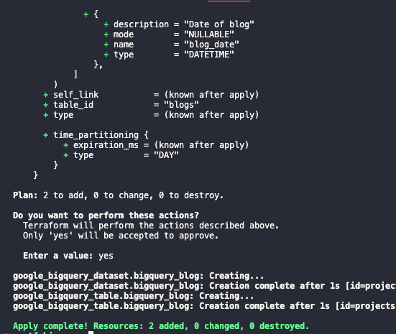
After running apply, you should see a similar output with the success of the terraform apply.
About the Author
[table id=7 /] [post_title] => Leveraging Terraform to Create BiqQuery Database in Google Cloud [post_excerpt] => [post_status] => publish [comment_status] => closed [ping_status] => closed [post_password] => [post_name] => leveraging-terraform-to-create-biqquery-database-in-google-cloud [to_ping] => [pinged] => [post_modified] => 2023-08-08 15:14:46 [post_modified_gmt] => 2023-08-08 15:14:46 [post_content_filtered] => [post_parent] => 0 [guid] => https://keyvatech.com/?p=4024 [menu_order] => 0 [post_type] => post [post_mime_type] => [comment_count] => 0 [filter] => raw ) [1] => WP_Post Object ( [ID] => 4031 [post_author] => 15 [post_date] => 2023-08-10 06:02:00 [post_date_gmt] => 2023-08-10 06:02:00 [post_content] =>The company continues its mission to help clients address the complexity of modern IT environments
“Good people attract good people,” says Jaime Gmach, Chief Executive Officer of Keyva as he reflects on the critical role the Keyva team has played in the company's growth and success.
Keyva, established in 2018, is dedicated to simplifying technology and enabling businesses to focus on innovation. As the organization celebrates its five-year anniversary, Gmach emphasizes the need for automation to accelerate business results.
“We launched Keyva to address a significant need for automation in the technology space,” says Gmach. “There are so many manual, repetitive tasks that can be automated to free up resources and deliver greater value to organizations.”
Keyva addresses the increasing complexity of modern IT environments by prioritizing three key areas:
- Automation and Orchestration: Keyva assists clients in automating processes and implementing solutions that enhance business efficiency, reduce risk, and cut costs.
- DevOps: Keyva emphasizes organizational culture change, encompassing people, processes, and technology, to help organizations become more agile and adopt a DevOps mindset.
- Hybrid Cloud: Keyva guides clients in planning and streamlining their cloud journey, ensuring incremental value, cost reduction, complexity mitigation, and risk management at every step.
When engaging with new clients, Keyva prioritizes small wins to demonstrate the potential of automation. This approach enables clients to spread the message within their organization, highlighting the positive impacts of automation across the entire enterprise. These small wins may involve, for example, freeing up teams to focus on mission-critical IT activities instead of repetitive tasks or automating data transfer across applications.
Keyva also has a focus on continuous education for both clients and team members. Keyva's approach involves tackling problems at the ground level and documenting the solutions to empower clients to handle similar issues independently in the future.
A key part of Keyva’s success is its partnership with Evolving Solutions, which helps enable modern operations in a hybrid cloud world. “The powerful combination of our comprehensive solutions and specialized expertise creates numerous benefits for our clients and it enables us to deliver exceptional outcomes,” says Gmach.
Looking ahead, Gmach aims to have Keyva and Evolving Solutions work together to help clients realize the potential of end-to-end automation. The need for automation in IT is not going away—and disruption is now the norm. Gmach notes, “Automation can’t be a future consideration. It is a requirement today because the benefits it offers in terms of efficiency, cost reduction, accuracy, scalability, customer experience, and competitive advantage make it essential for organizations to thrive in a rapidly changing and increasingly digitized world.”
The Keyva team's dedication, expertise, and commitment to simplifying technology have paved the way for a bright future. With automation as the driving force, the organization is poised to continue transforming businesses, enabling them to stay ahead in an era of constant disruption and transformation.
“As we embrace automation, we unlock new possibilities, elevate our efficiency, and position ourselves for sustained success in an ever-evolving technological landscape,” says Gmach. “I am excited by the opportunity to embark on a journey with our clients to harness the power of automation to create a future that is filled with endless opportunities.”
[post_title] => Keyva: 5 Years of IT Automation and Innovation [post_excerpt] => [post_status] => publish [comment_status] => closed [ping_status] => closed [post_password] => [post_name] => keyva-5-years-of-it-automation-and-innovation [to_ping] => [pinged] => [post_modified] => 2023-08-08 15:03:24 [post_modified_gmt] => 2023-08-08 15:03:24 [post_content_filtered] => [post_parent] => 0 [guid] => https://keyvatech.com/?p=4031 [menu_order] => 0 [post_type] => post [post_mime_type] => [comment_count] => 0 [filter] => raw ) [2] => WP_Post Object ( [ID] => 4015 [post_author] => 13 [post_date] => 2023-08-03 08:15:00 [post_date_gmt] => 2023-08-03 08:15:00 [post_content] =>In the world of containerized applications, Kubernetes has emerged as the standard for container orchestration, empowering developers to deploy and manage applications at scale. Docker images serve as the building blocks for these containers, and a reliable container registry like Nexus is essential for storing and distributing these images securely.
In this blog, we will explore how to migrate Docker images from one Kubernetes cluster to another using two separate Nexus registries. One for development and another for production. This process ensures a smooth and controlled transition of applications from dev to prod environments.
Prerequisites
Before we proceed, ensure that Docker is installed and properly configured on your machine with access to both the dev and prod Kubernetes clusters. Set up Docker credentials to authenticate with the Nexus registries.
1. Pull Image from Dev Registry
- Login to the dev Nexus registry and pull the desired image:
docker login <dev-nexus-registry-url>
docker pull <dev-nexus-registry-url>/<image-name>:<tag>

Replace <dev-nexus-registry-url>with the URL of your dev Nexus registry, <image-name> with the image's name, and <tag> with the specific version or tag of the image.
2. Tag the Image for Prod Registry
- Retag the image with the prod registry’s address:
docker tag <dev-nexus-registry-url>/<image-name>:<tag> <prod-nexus-registry-url>/<image-name>:<tag>

3. Push the Image to Prod Registry
- Log in to the prod Nexus registry and push the retagged image:
docker login <prod-nexus-registry-url>
docker push <prod-nexus-registry-url>/<image-name>:<tag>

4. Verify the Pushed Image
- Confirm that the image has been successfully pushed to the prod Nexus registry by logging on to the nexus-prod console.

Conclusion:
Migrating Docker images between Kubernetes clusters using Nexus registries is a crucial process for safely moving applications from dev to production environments. By following the steps outlined in this blog, you can ensure a controlled transition, reducing the risk of discrepancies and unexpected behavior in your production environment.
[post_title] => Migrating Docker Images Between Kubernetes Clusters Using Nexus Registry [post_excerpt] => [post_status] => publish [comment_status] => closed [ping_status] => closed [post_password] => [post_name] => migrating-docker-images-between-kubernetes-clusters-using-nexus-registry [to_ping] => [pinged] => [post_modified] => 2023-07-28 20:38:39 [post_modified_gmt] => 2023-07-28 20:38:39 [post_content_filtered] => [post_parent] => 0 [guid] => https://keyvatech.com/?p=4015 [menu_order] => 0 [post_type] => post [post_mime_type] => [comment_count] => 0 [filter] => raw ) [3] => WP_Post Object ( [ID] => 3994 [post_author] => 7 [post_date] => 2023-07-31 22:23:55 [post_date_gmt] => 2023-07-31 22:23:55 [post_content] =>In my previous blog post, I demonstrated how to use Azure Storage to set up Remote Terraform State. In this post, I will illustrate the process of setting up an Azure Virtual Network (VNet).
This step is essential as it serves as a prerequisite for a future post, where I’ll explain how to deploy an Azure Kubernetes Service (AKS) cluster in a custom Azure VNet.
Azure Virtual Network
Azure Virtual Network offers several advantages for cloud networking. It allows you to isolate your resources, providing network security and access control through features like network security groups and virtual network service endpoints. VNet enables hybrid connectivity, connecting your Azure resources with on-premises infrastructure or other cloud environments. It also facilitates subnet and IP address management, allowing you to organize and control your resources effectively. VNet integrates with various Azure services, enabling seamless communication and integration, while regional connectivity and VNet peering support scalability and resource distribution.
Note: This article assumes you have Linux and Terraform experience.
Prerequisites
- Terraform Installed
- Azure Account
- Azure CLI
Code
You can find the GitHub Repo here.
Brief Overview of the Directory Structure
/terraform-aks/
├── modules
│   ├── 0-remotestate
│   └── 1-vnet
└── tf
    └── dev
        ├── global
        │   └── 0-remotestate
        └── westus2
            └── aksdemo
                └── 1-vnet
- /terraform-aks: This is the top-level directory.
- /modules: Within this directory, we store the child modules that will be invoked by the root modules located in /tf/.
- /0-remotestate: This sub-directory, found within the /modules/ directory, contains the necessary resources for creating storage used to store our remote state.
- /1-vnet: This sub-directory, found within the /module/ directory, contains the necessary resources for creating our virtual network. These resources include a vnet, subnet, service endpoints, Nat Gateway.
- /tf: The configurations for all root modules are located in this directory.
- /dev: Representing the environment, this directory contains configurations specific to the dev environment.
- /global: This subdirectory houses configurations that are shared across different regions.
- /0-remotestate: Located within the /global/ directory, this subdirectory represents the root module responsible for calling the child module located in /modules/0-remotestate/ in order to create our storage.
- /tf/westus2/: This subdirectory represents anAzure region, in this case, westus2
- /tf/westus2/aksdemo/: This subdirectory is specific to the project within the westus2 region.
- /tf/westus2/aksdemo/1-vnet: This subdirectory represents the root module responsible for calling the child module located in /modules/1-vnet/ in order to create our virtual network resources.
Usage
To utilize the modules, make necessary modifications to the main.tf file located at the root level: /tf/westus2/aksdemo/1-vnet, according to your specific criteria.
Let’s take a look at the resources needed to create our Virtual Network within our child module located in terraform-aks/modules/1-vnet/main.tf
We are creating the following:
- Resource Group: The resource group serves as a logical container for all the resources related to the virtual network. It helps manage and organize your resources within Azure.
- Virtual Network (VNet): The AKS cluster requires a dedicated virtual network to operate. The VNet provides an isolated network environment where the AKS nodes and other related resources can communicate with each other. It helps ensure secure and controlled networking within the cluster.
- Subnet: Within the VNet, the AKS cluster requires a subnet to be provisioned specifically for the cluster. The subnet serves as a smaller segmented network within the VNet where AKS nodes are deployed. It helps control network traffic, security policies, and connectivity for the AKS cluster.
- Service Endpoints: Service endpoints allow the AKS cluster to securely access specific Azure services directly through the Azure backbone network. This helps improve network performance and security by bypassing the public internet.
- NAT Gateway: The NAT gateway can be used in scenarios where your AKS cluster needs outbound internet connectivity. It provides a way for the AKS nodes to communicate with external resources over the internet while appearing as if the traffic is originating from a single IP address (the NAT gateway’s IP).
Let’s go through main.tf and variables.tf files to understand the Terraform code.
Main.tf
- Resource Group for VNet: This block defines an Azure resource group that will be created to hold the virtual network resources. The name of the resource group is generated using variables like var.name , var.location , and var.environment.
- VNet: This block creates an Azure virtual network (VNet). It references the resource group created in the previous block and sets properties such as name, location, address space, and tags. The VNet’s name is generated similarly to the resource group name, using variables.
- AKS Subnet: This block creates a subnet within the VNet for an AKS (Azure Kubernetes Service) cluster. It specifies the subnet name, virtual network name, resource group name, address prefixes, service endpoints, and enables private endpoint network policies.
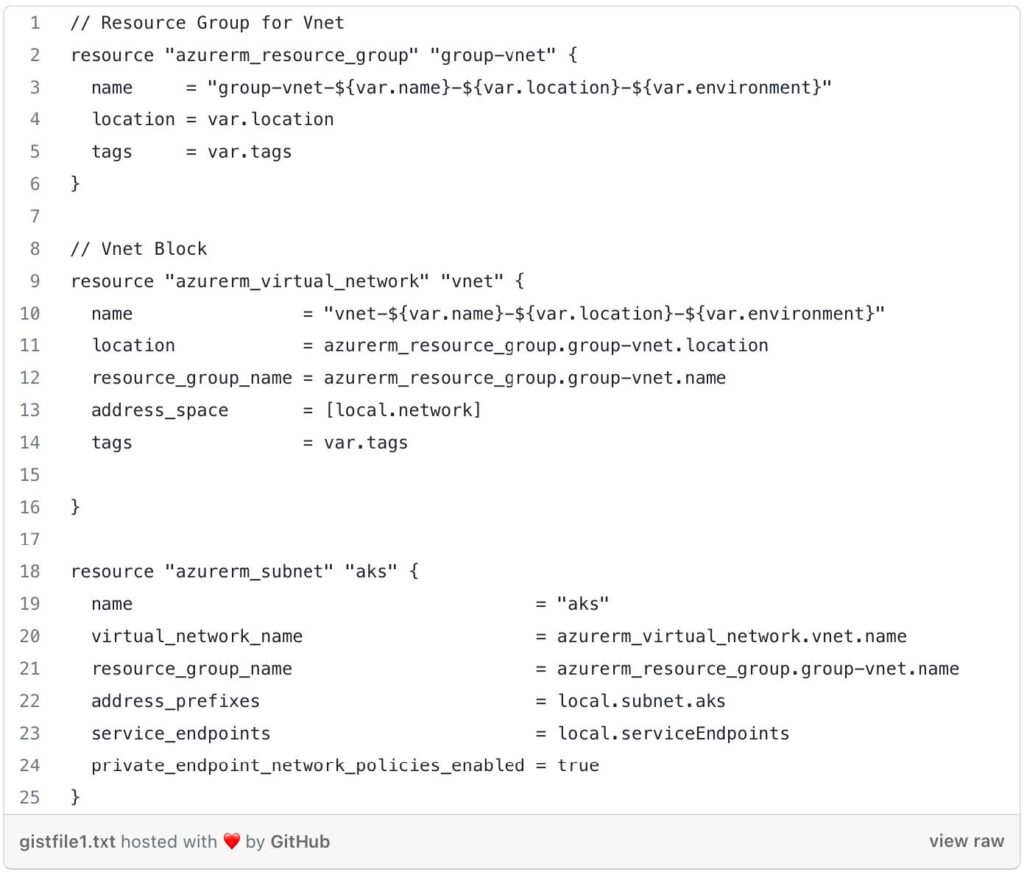
Nat Gateway Configuration: This section sets up a NAT (Network Address Translation) gateway and associates it with the VNet and subnet created earlier.
- azurerm_public_ip.natip: This block defines a public IP address for the NAT gateway, specifying its allocation method, name, location, resource group, and SKU (Stock Keeping Unit).
- azurerm_nat_gateway.natgw: This block creates a NAT gateway with a name, location, resource group, and SKU.
- azurerm_nat_gateway_public_ip_association.nat-ip: This block associates the public IP address with the NAT gateway.
- azurerm_subnet_nat_gateway_association.aks: This block associates the NAT gateway with the AKS subnet.


variables.tf
This file defines various input variables that can be customized when running the Terraform code. Here’s a breakdown of some of the variables:
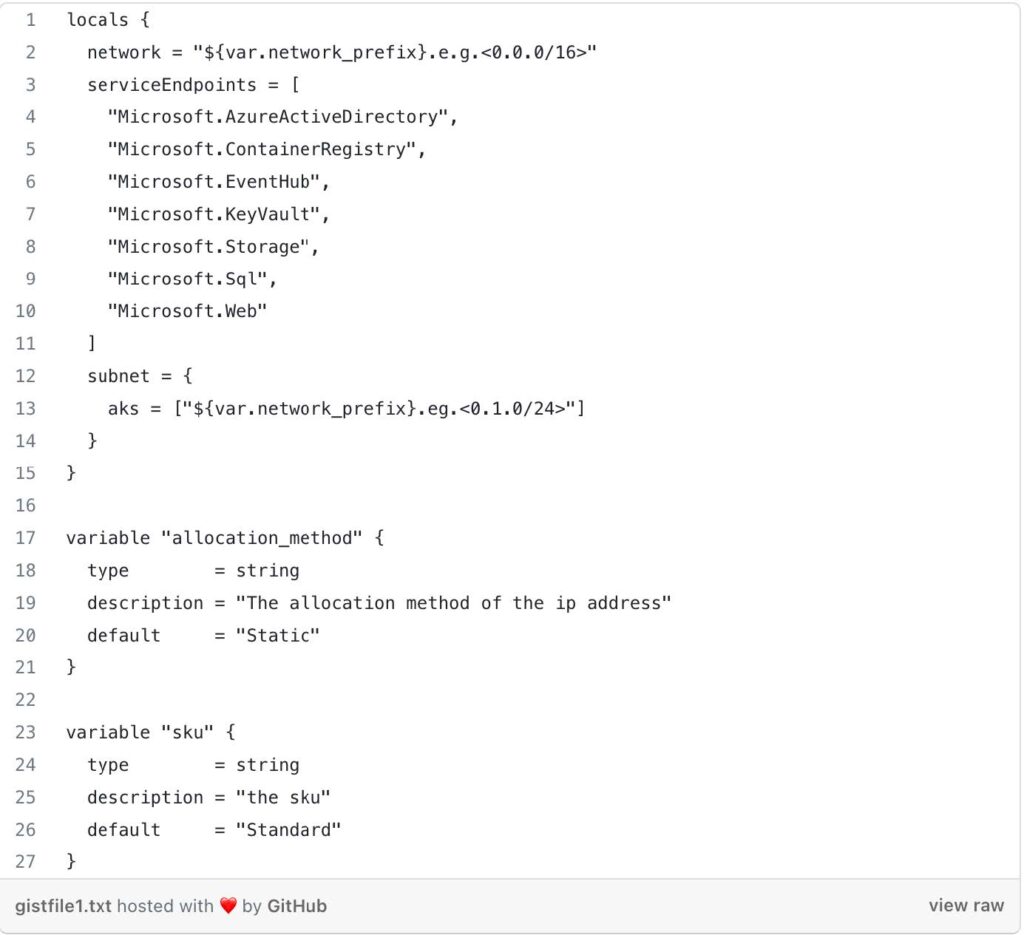
- network_prefix: The prefix of the VNet’s IP address range.
- name: The name of the project.
- location: The Azure region where the VNet will be created.
- globalLocation: The Azure region where the resource group of the VNet exists.
- environment: The Azure environment, such as “dev,” “qa,” or “prod.”
- tags: Additional tags to add or overwrite the default tags for resources.

- Locals: This block defines local values that can be used within the Terraform configuration. In this case, it sets the VNet’s network address space, service endpoints, and the AKS subnet’s address prefix. They have default values but can be overridden if desired.
- Additional Variables: These variables define the allocation method and SKU for the NAT gateway. They have default values but can be overridden if desired.
The Terraform code sets up the Azure provider and defines local variables to extract information from the working directory path. It then calls the child module from terraform-aks/modules/1-vnet/to create an Azure VNet and associated resources. The state file for Terraform is stored in an Azure Storage Account using the specified backend configuration. The actual values for the <resource-group-name>, <storage_account_name>, <container_name>, and <key> will need to be replaced with actual values to work with your Azure environment.
/tf/dev/westus2/askdemo/1-vnet/main.tf
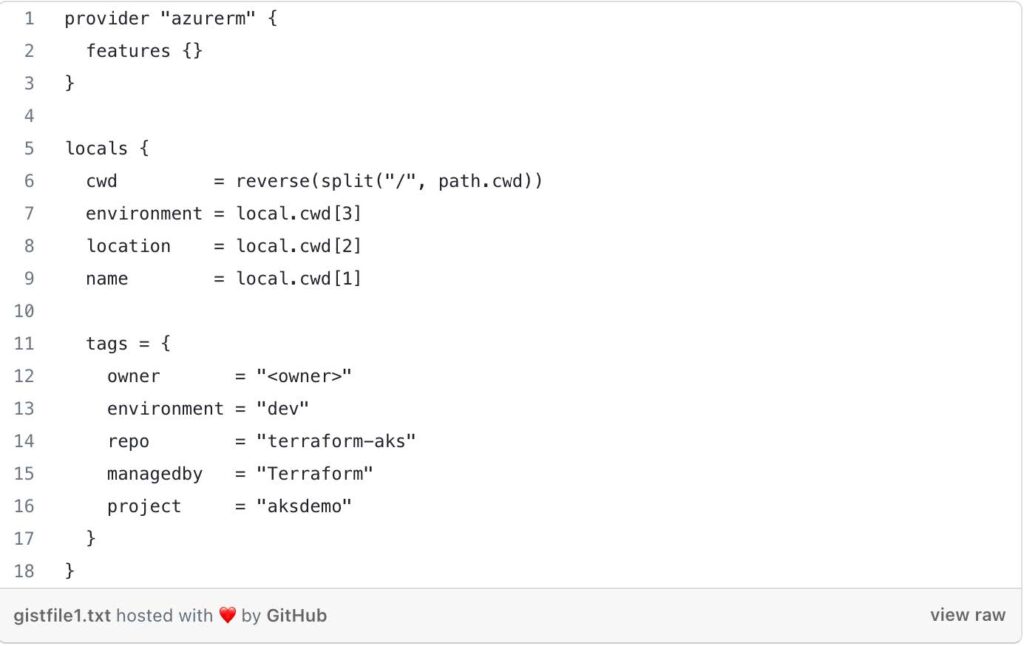
- Provider Block: This block configures the Azure provider, indicating that Terraform will be managing Azure resources in this configuration. The features {} block specifies that all provider features are enabled.
- Locals Block: This block defines local variables for the root module to make the configuration cleaner and more readable. It extracts information from the current working directory path to determine the environment, location, and name. It also defines a set of tags that will be applied to the resources.
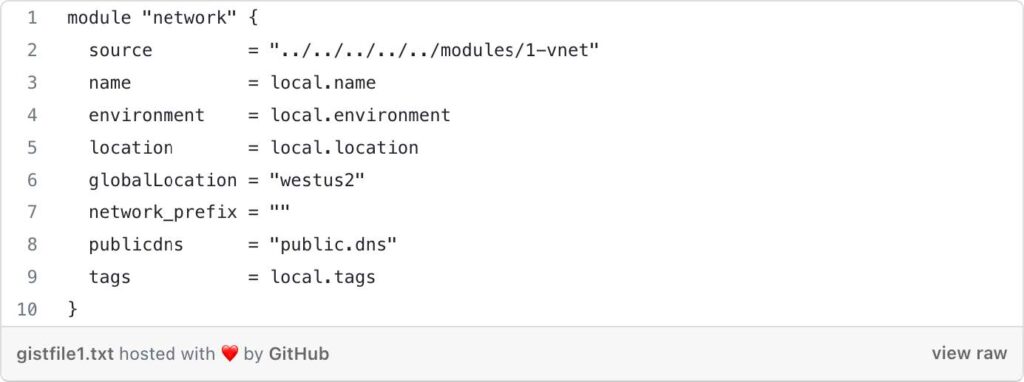
Module “network”: This block calls the child module 1-vnet located at terraform-aks/modules/1-vnet. The child module is used to create an Azure Virtual Network (VNet) and associated networking resources. The module is invoked with the following arguments:
- source: The relative path to the child module.
- name: The name of the project extracted from the local variables.
- environment: The environment extracted from the local variables.
- location: The Azure region extracted from the local variables.
- globalLocation: The Azure region where the resource group for the VNet exists. In this case, it’s set to “westus2”.
- network_prefix: The IP address prefix of the VNet. The value is an empty string, you will need to modify it. (e.g. 10.0)
- publicdns: The name of the public DNS, set to "public.dns".
- tags: The tags defined in the local variables.
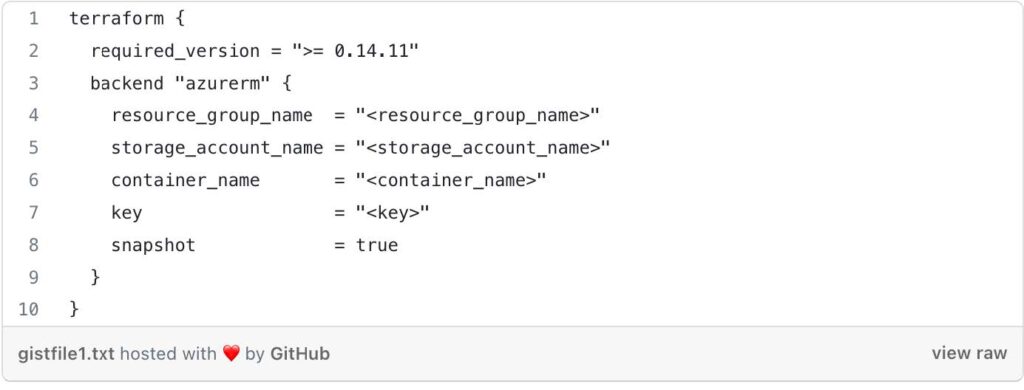
Terraform Block: This block specifies some Terraform-specific configurations:
- required_version: It sets the minimum required version of Terraform to 0.14.11.
- backend “azurerm”: This indicates that Terraform will use the Azure Storage Account as the backend to store the state. The state file will be stored in the specified resource_group_name, storage_account_name, and container_name. The key is the name of the state file.
Now that we have set up the root module in the terraform-aks/tf/dev/westus2/aksdemo/1-vnet/main.tf directory, it's time to provision the necessary resources using the child module located at terraform-aks/modules/1-vnet.
terraform init:
- Open your terminal or command prompt.
- Navigate to the directory containing the root module code (terraform-aks/tf/dev/westus2/aksdemo/1-vnet/) .
- Run the following command:
terraform init - This command initializes your working directory and downloads the necessary providers and modules specified in the configuration.
terraform plan:
- After successful initialization, you can now generate an execution plan to preview the changes that Terraform will make to your infrastructure.
- Run the following command:
terraform plan - Terraform will analyze your configuration and display a summary of the changes it intends to apply, including any additions, modifications, or deletions of resources.
terraform apply:
- Once you have reviewed the plan and are ready to apply the changes to your Azure environment, run the following command:
terraform apply - Terraform will prompt you to confirm that you want to apply the changes. Type “yes” and press Enter.
- The apply process will create or update the Azure resources based on the configuration provided in the terraform-aks/tf/dev/westus2/1-vnet directory.
- After the apply is completed, Terraform will display the details of the resources created or modified.
Keyva CTO Anuj Tuli discusses our expertise in developing point-to-point integrations.
[post_title] => CTO Talks: Integrations [post_excerpt] => [post_status] => publish [comment_status] => closed [ping_status] => closed [post_password] => [post_name] => cto-talks-integrations [to_ping] => [pinged] => [post_modified] => 2024-05-15 19:46:01 [post_modified_gmt] => 2024-05-15 19:46:01 [post_content_filtered] => [post_parent] => 0 [guid] => https://keyvatech.com/?p=3788 [menu_order] => 0 [post_type] => post [post_mime_type] => [comment_count] => 0 [filter] => raw ) [5] => WP_Post Object ( [ID] => 3965 [post_author] => 7 [post_date] => 2023-07-17 07:11:00 [post_date_gmt] => 2023-07-17 07:11:00 [post_content] =>This article explores the process of utilizing Infrastructure as Code with Terraform to provision Azure Resources for creating storage and managing Terraform Remote State based on the environment.
Terraform State
Terraform state refers to the information and metadata that Terraform uses to manage your infrastructure. It includes details about the resources created, their configurations, dependencies, and relationships.
Remote state storage enhances security by preventing sensitive information from being stored locally and allows for controlled access to the state. It enables state locking and preventing conflicts. It simplifies recovery and auditing by acting as a single source of truth and maintaining a historical record of changes.
Azure Storage
Azure Storage is a highly scalable and durable solution for storing various types of data. To store Terraform state in Azure Storage, we will be utilizing the Azure Blob Storage backend. Azure Blob Storage is a component of Azure Storage that provides a scalable and cost-effective solution for storing large amounts of unstructured data, such as documents, images, videos, and log files.
Note: This article assumes you have Linux and Terraform experience.
Prerequisites
- Terraform Installed
- Azure Account
- Azure CLI
Code
You can find the GitHub Repo here.
Brief Overview of the Directory Structure
/terraform-aks/
├── modules
│   ├── 0-remotestate
│
└── tf
    └── dev
        |
        ├── global
        │   └── 0-remotestate
- /terraform-aks: This is the top-level directory.
- /modules: Within this directory, we store the child modules that will be invoked by the root modules located in /tf/.
- /0-remotestate: This sub-directory, found within the /modules/ directory, contains the necessary resources for creating storage used to store our remote state.
- /tf: The configurations for all root modules are located in this directory.
- /dev: Representing the environment, this directory contains configurations specific to the dev environment.
- /global: This subdirectory houses configurations that are shared across different regions.
- /0-remotestate: Located within the /global/ directory, this subdirectory represents the root module responsible for calling the child module located in /modules/0-remotestate/ in order to create our storage.
Usage
To use the module, modify the main.tf at the root level and child module at main.tf based on your criteria.
Let’s take a look at the resources needed to create our storage for our remote state within our child module located in terraform-aks/modules/0-remotestate/main.tf
We are creating the following:
Resource Group: A resource group is a logical container for grouping and managing related Azure resources.
Storage Account: Storage accounts are used to store and manage large amounts of unstructured data.
Storage Container: A storage container is a logical entity within a storage account that acts as a top-level directory for organizing and managing blobs. It provides a way to organize related data within a storage account.
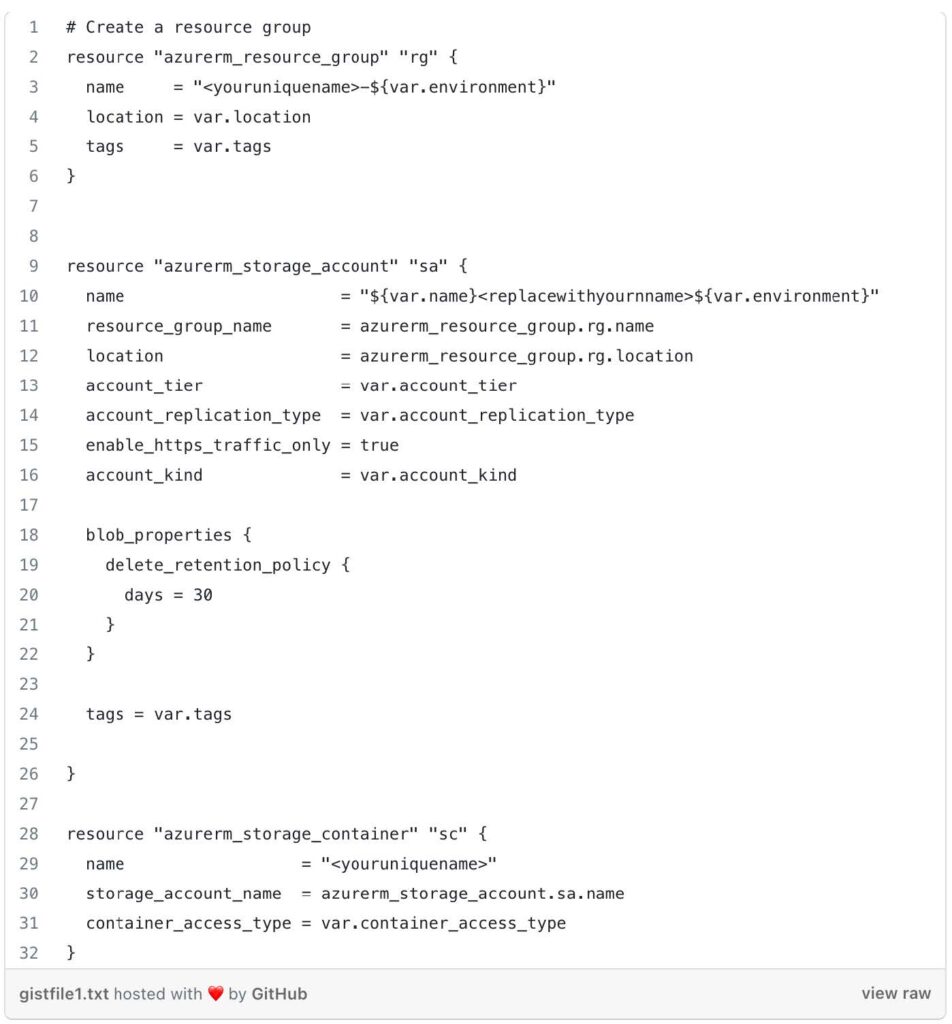
We use the Terraform Azure provider (azurerm) to define a resource group (azurerm_resource_group) in Azure. It creates a resource group with a dynamically generated name, using a combination of <youruniquename> and the value of the var.environment variable. The resource group is assigned a location specified by the var.location variable, and tags specified by the var.tags variable.
The Azure storage account (azurerm_storage_account) block is use to create a storage account. The name attribute is set using a combination of <var.name>, a placeholder that should be replaced with your own name, and the value of the var.environment variable.
An Azure storage container (azurerm_storage_container) is defined. The name attribute specifies the name of the container using <youruniquename> placeholder, which should be replaced with your desired name.
Next, let’s take a look at the variables inside terraform-aks/modules/0-remotestate/variables.tf
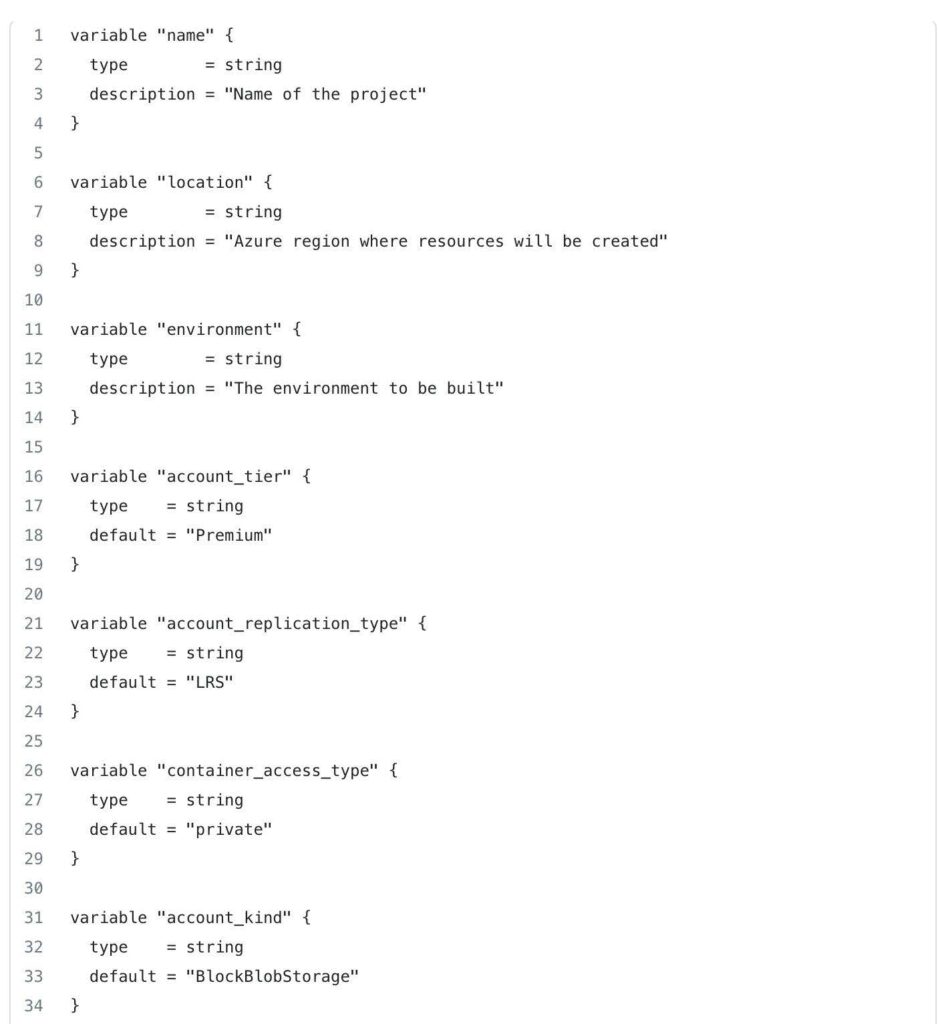
These variables provide flexibility and configurability to the 0-remotestate module, allowing you to customize various aspects of the resource provisioning process, such as names, locations, access types, and more, based on your specific requirements and preferences.
Next, lets take a look at the outputs located in terraform-aks/modules/0-remotestate/outputs.tf
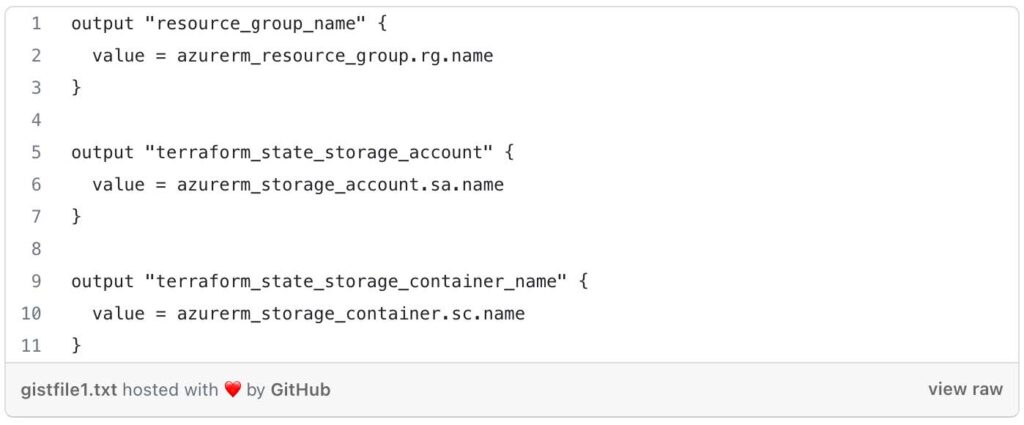
By defining these outputs, the outputs.tf file allows you to capture and expose specific information about the created resource group, storage account, and container from the 0-remotestate module.
Let’s Navigate to our Root module located at terraform-aks/tf/dev/global/0-remotestate /main.tf
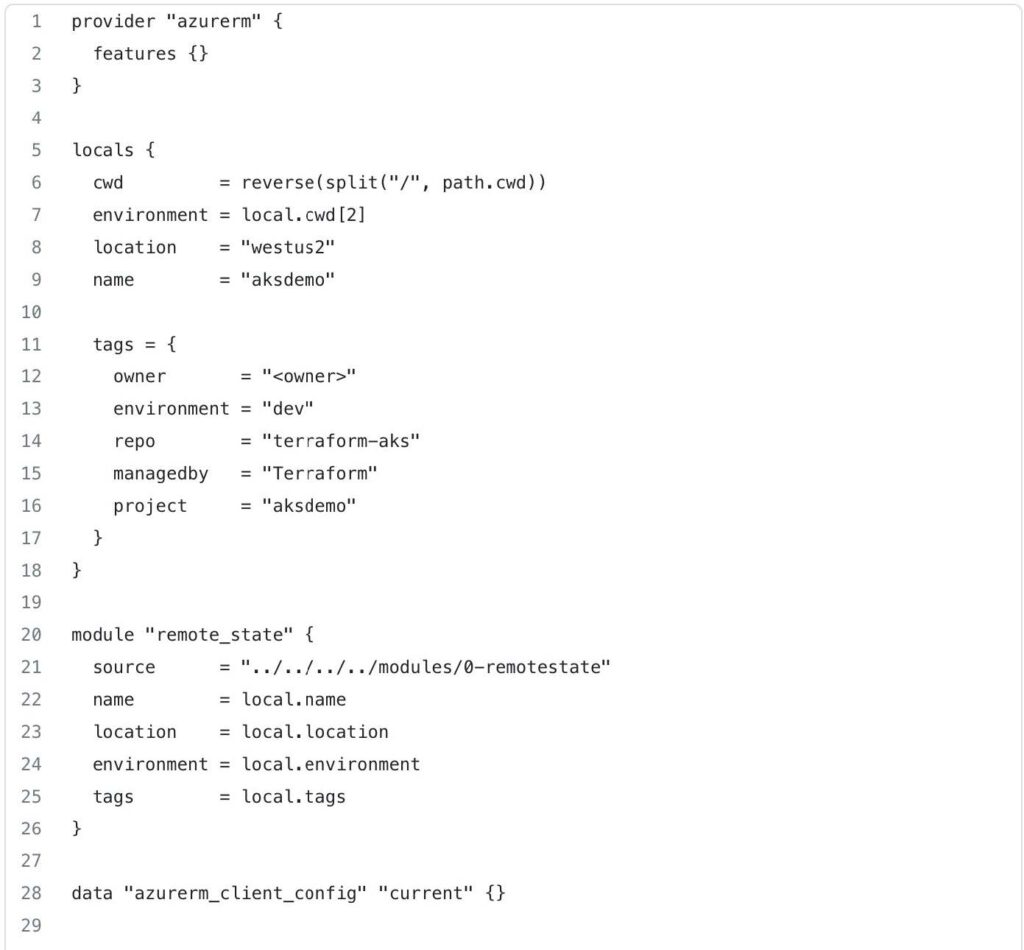
This code begins by defining the azurerm provider, which enables Terraform to interact with Azure resources. The features {} block is empty, indicating that no specific provider features are being enabled or configured in this case.
The locals block is used to define local variables. In this case, it defines the following variables:
cwd: This variable extracts the current working directory path, splits it by slashes ("/"), and then reverses the resulting list. This is done to extract specific values from the path.environment: This variable captures the third element from thecwdlist, representing the environment.location: This variable is set to the value"westus2", specifying the Azure region where resources will be deployed.name: This variable is set to the value"aksdemo", representing the name of the project or deployment.tags: This variable is a map that defines various tags for categorizing and organizing resources. The values within the map can be customized based on your specific needs.
This code block declares a module named remote_state and configures it to use the module located at ../../../../modules/0-remotestate. The source parameter specifies the relative path to the module. The remaining parameters (name, location, environment, and tags) are passed to the module as input variables, using values from the local variables defined earlier.
This code also, includes a data block to fetch the current Azure client configuration. This data is useful for authentication and obtaining access credentials when interacting with Azure resources.
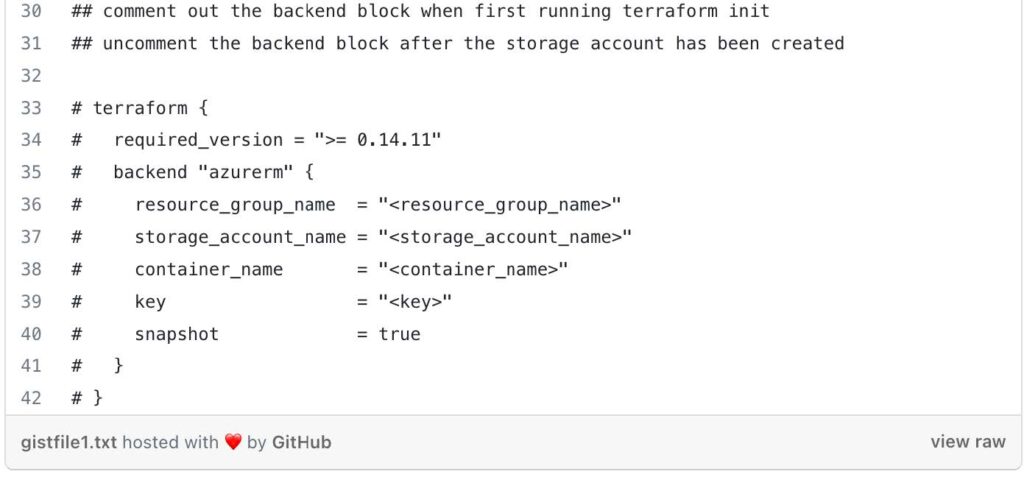
The commented out terraform block represents a backend configuration for storing Terraform state remotely. This block is typically uncommented after the necessary Azure resources (resource group, storage account, container, and key) are created. It allows you to configure remote state storage in Azure Blob Storage for better state management.
Now that we have set up the root module in the terraform-aks/tf/dev/global/0-remotestate/ directory, it's time to provision the necessary resources using the child module located at terraform-aks/modules/0-remotestate. The root module acts as the orchestrator, leveraging the functionalities and configurations defined within the child module to create the required infrastructure resources.
- From the directory: terraform-aks/dev/global/0-remotestate, with the backend commented out, run:
- Terraform init
- Terraform Plan
- Terraform apply
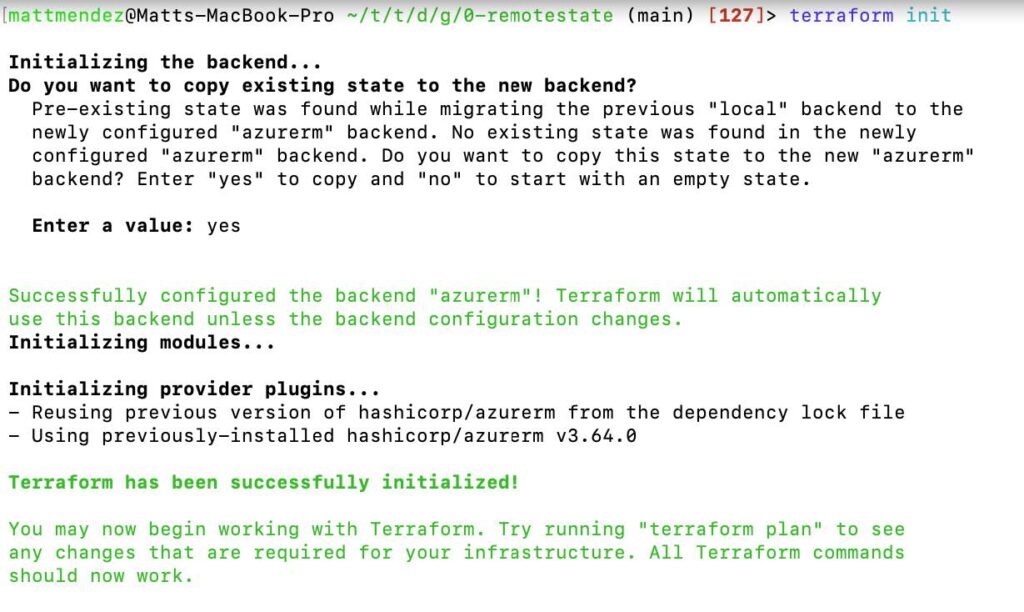
After executing terraform apply and successfully creating your storage resources, you can proceed to uncomment the backend block in the main.tf file. This block contains the configuration for storing your Terraform state remotely. Once uncommented, run another terraform init command to initialize the backend and store your state in the newly created storage account. This ensures secure and centralized management of your Terraform state, enabling collaborative development and simplified infrastructure updates.
Enter a value of yes when prompted.
This article details the process in Amazon Elastic Container Service to set up email notifications for stopped tasks.
Amazon Elastic Container Service (ECS)
Amazon Elastic Container Service (ECS) is a fully managed container orchestration service provided by AWS. It enables you to easily run and scale containerized applications in the cloud. ECS simplifies the deployment, management, and scaling of containers by abstracting away the underlying infrastructure.
An ECS task represents a logical unit of work and defines how containers are run within the service. A task can consist of one or more containers that are tightly coupled and need to be scheduled and managed together.
Amazon Simple Notification Service (SNS)
Amazon Simple Notification Service is a fully managed messaging service provided by AWS that enables you to send messages or notifications to various distributed recipients or subscribers. SNS simplifies the process of sending messages to a large number of subscribers, such as end users, applications, or other distributed systems, by handling the message distribution and delivery aspects.
Amazon EventBridge
Amazon EventBridge is a fully managed event bus service provided by AWS. It enables you to create and manage event-driven architectures by integrating and routing events from various sources to different target services. EventBridge acts as a central hub for event routing and allows decoupled and scalable communication between different components of your applications.
Get Started
This demo assumes you have a running ECS cluster.
1. Configure a SNS Topic.
- In the AWS console, navigate to Simple Notification Service
- Select create topic
- For type, choose standard
- Name: (choose name. e.g. TaskStoppedAlert)
- Leave the other settings at default, scroll down, and click create topic
2. Subscribe to the SNS topic you created.
- Select create subscription.
- Leave the topic ARN as default
- For protocol, select email
- For endpoint, enter a valid email address
- Click create subscription
3. Confirm the subscription.
- Open up the email that you entered, search for the AWS notifications email and click on the confirm subscription link provided in the email
- Verify that the subscription is confirmed

4. Create an Amazon EventBridge rule to trigger the SNS Topic when the state changes to stopped on an ECS Task
- Navigate to Amazon EventBridge in the AWS console
- Click create rule
- Name your rule (e.g. ecs-task-stop)
- For rule type, select rule with an event pattern
- For event source, choose AWS events or EventBridge partner events
- For creation method, choose custom pattern (JSON editor)
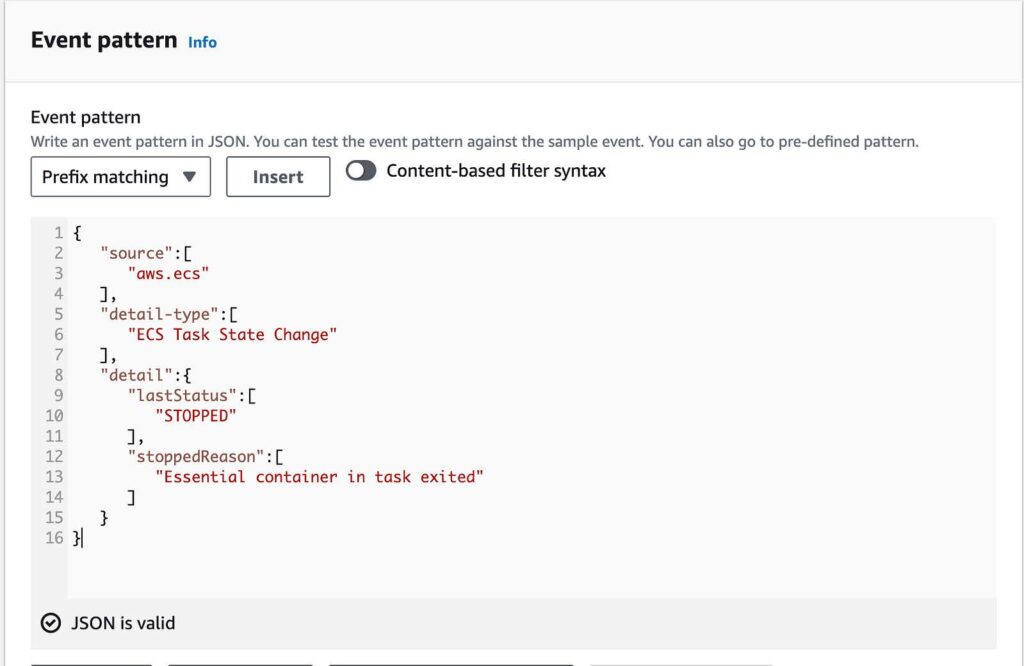
- Paste in the following code in the event pattern
{
  “source”:[
     “aws.ecs”
 ],
 “detail-type”:[
    “ECS Task State Change”
 ],
 “detail”:{
    “lastStatus”:[
       “STOPPED”
 ],
 “stoppedReason”:[
    “Essential container in task exited”
 ]
  }
}
Below is an example of the code
- For target types, select AWS service
- For target, select SNS Topic
- For topic, select the topic you created
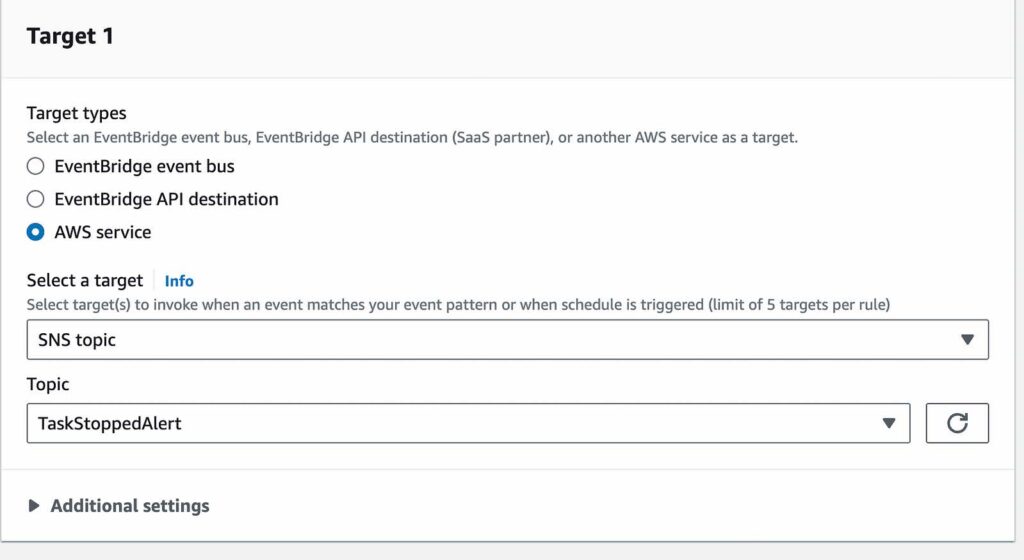
- Leave the rest default and select create rule
5. Add permissions that enable EventBridge to publish SNS topics.
- Use a JSON converter to convert the following into a string. Click here for the link to a JSON converter.
{
 “Sid”: “PublishEventsToMyTopic”,
 “Effect”: “Allow”,
 “Principal”: {
 “Service”: “events.amazonaws.com”
 },
 “Action”: “sns:Publish”,
 “Resource”: “arn:aws:sns:region:account-id:topic-name”
}
Below, is an example provided on how to use the JSON converter with the above code.

- Add the string you created in the previous step to the “statement” collection inside the “policy” attribute
- Use the aws sns set-topic-attributes command to set the new policy.
aws sns set-topic-attributes — topic-arn “arn:aws:sns:region:account-id:topic-name” \
 — attribute-name Policy \
 — attribute-value
Below is an example of how I used the AWS SNSset-topic-attribute command to set the new policy. This also contains the string I created using the JSON converter that adds the permissions.

- Verify the permissions were added with the
aws sns get-topic-attributes --topic-arncommand
6. Test your rule
Verify that the rule is working by running a task that exits shortly after it starts.
- Navigate to ECS in the AWS Console
- Choose task definitions
- Select create new task definition
- Select create a new task definition with JSON
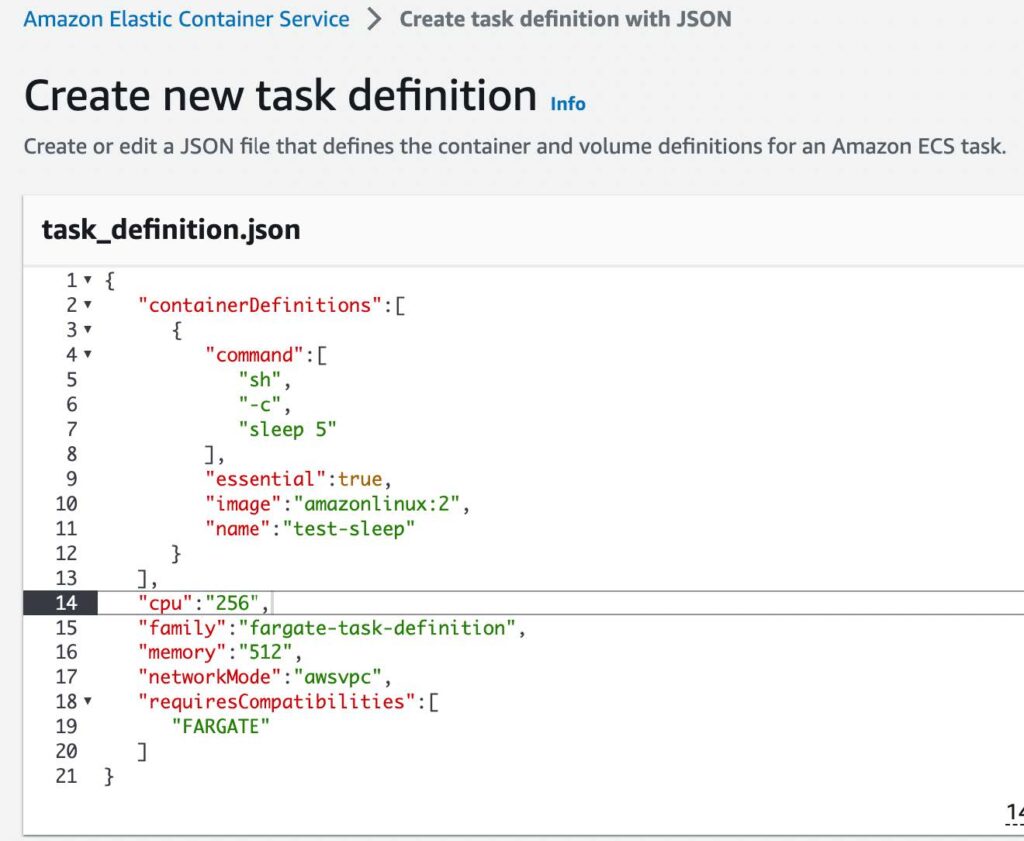
- In the JSON editor box, edit your JSON file, enter the following code into the editor
{
   "containerDefinitions":[
      {
         "command":[
            "sh",
            "-c",
            "sleep 5"
         ],
         "essential":true,
         "image":"amazonlinux:2",
         "name":"test-sleep"
      }
   ],
   "cpu":"256",
   "family":"fargate-task-definition",
   "memory":"512",
   "networkMode":"awsvpc",
   "requiresCompatibilities":[
      "FARGATE"
   ]
}
Below is an example of how the code looks in the JSON editor
- Select create
7. Run the task.
- Navigate to ECS, select the cluster you want to run the test task in.
- Select Task, and choose run new task
- For Application type, choose Task
- For Task definition > Family > Choose fargate-task-definition
- Select the number of tasks you want to run. I chose one since this is a test task
- Select Create
8. Monitor the task.
If your event rule is configured correctly, you will receive an email message within a few minutes with the event text.
[post_title] => ECS: Setting Up Email Notifications For Stopped Tasks [post_excerpt] => [post_status] => publish [comment_status] => closed [ping_status] => closed [post_password] => [post_name] => ecs-setting-up-email-notifications-for-stopped-tasks [to_ping] => [pinged] => [post_modified] => 2023-06-30 14:22:20 [post_modified_gmt] => 2023-06-30 14:22:20 [post_content_filtered] => [post_parent] => 0 [guid] => https://keyvatech.com/?p=3940 [menu_order] => 0 [post_type] => post [post_mime_type] => [comment_count] => 0 [filter] => raw ) [7] => WP_Post Object ( [ID] => 3907 [post_author] => 7 [post_date] => 2023-07-03 10:23:00 [post_date_gmt] => 2023-07-03 10:23:00 [post_content] =>This article reviews the process to upgrade an Amazon DocumentDB cluster from version 4.0 to 5.0 with DMS.
Amazon DocumentDB
Amazon DocumentDB is a fully managed, NoSQL database service provided by AWS. It is compatible with MongoDB, which is a popular open-source document database. Amazon DocumentDB is designed to be highly scalable, reliable, and performant, making it suitable for applications that require low-latency and high-throughput database operations.
AWS Database Migration Service
AWS DMS simplifies the process of database migration by providing an efficient and reliable solution for moving databases to AWS or between different database engines. It supports a wide range of database sources, including on-premises databases, databases running on AWS, and databases hosted on other cloud platforms.
Get Started
This demo assumes you have an existing DocumentDB cluster with version 4.0.
1. Create a new DocumentDB cluster with version 5.0. Use this link to help you get started.
2. Authenticate to your Amazon DocumentDB cluster 4.0 using the mongo shell and execute the following commands:
db.adminCommand({modifyChangeStreams: 1,
database: "db_name",
collection: "",
enable: true});
AWS DMS requires access to the cluster’s change streams.
3. Migrate your index’s with the Amazon DocumentDB Index Tool.
- First install PyMongo, click here
- Next, connect to Amazon DocumentDB using Python when TLS is enabled. Use this link to help you get started.
- Below is a sample of how I connected to my DocumentDB cluster 4.0 with python and imported some sample data

connection demonstration with hostname removed
- Install the Amazon DocumentDB Index Tool with this link
- Export indexes from source DocumentDB version 4.0 cluter [The image below is an example from my screen]

- Restore those indexes in your target Amazon DocumentDB version 5.0 cluster [The following image is an example of how to restore your indexes to your target cluster]

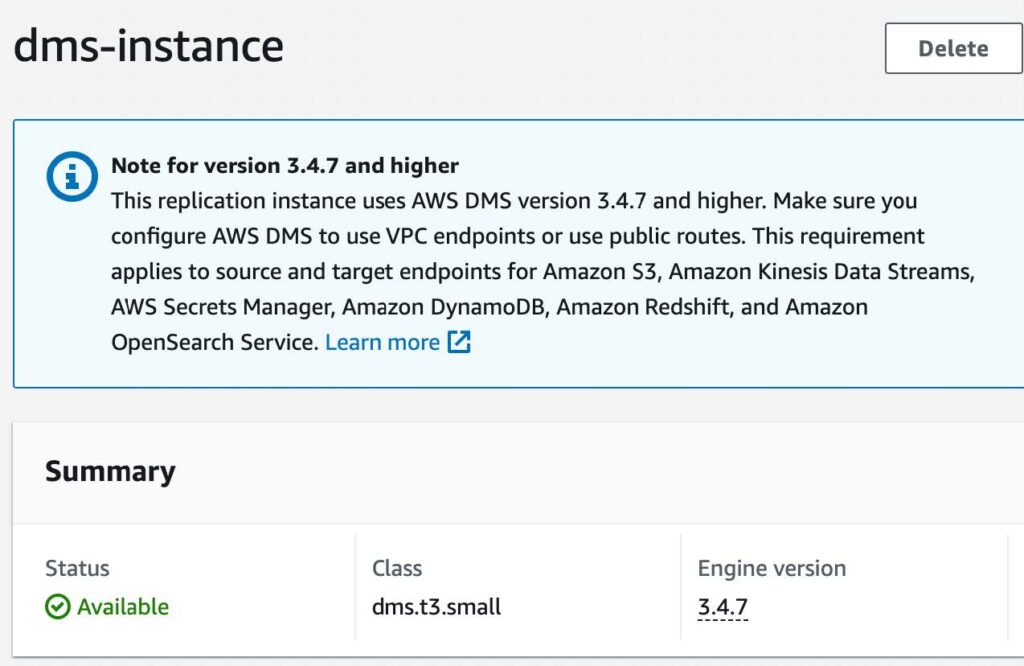
4. Create a replication instance.
- Navigate to Database Migration Service
- Select replication instances from left menu
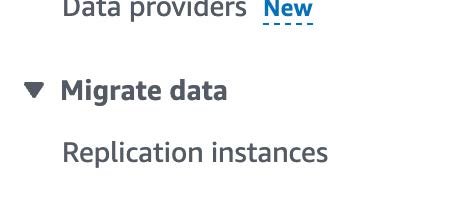
- Click on the create replication instance button
- Name: (name of replication instance)
- Description: (description of instance)
- VPC: (use default or any specific VPC)
- For Multi AZ, select Dev or test workload (Single-AZ)
- Uncheck publicly accessible
- Click create
5. Update Security Groups.
- Copy the Private IP address of the new replication instance.
- Select the security group for your DocumentDB instances.
- Click edit inbound rules
- Click add rule
- Select TCP for type
- For port range select 27017
- For source, enter your replication instance’s private IP address you copied with a /32
- Save rules
6. Create Source endpoint.
- Navigate back to DMS
- Select endpoints on left menu
- Click on the create endpoint button
- Select source endpoint
- Endpoint identifier: (name of the endpoint)
- For source engine, select Amazon DocumentDB
- For access to endpoint database, select provide access information manually
- Server name: (server name of DocumentDB cluster with version 4.0) e.g. source.cluster-hsyfhsia.region.docdb.amazonaws.com
- Port: 27017
- For Secure Socket Layer (SSL) mode, select verify-full
- Click add new CA certificate
- Click choose file, and find and upload the Certificate Authority; this is the certificate used to connect to the cluster

- For certificate identifier, choose a name
- Click import certificate
- Enter in username and password used to connect to your DocumentDB cluster
- Enter in your database name
- Click create endpoint
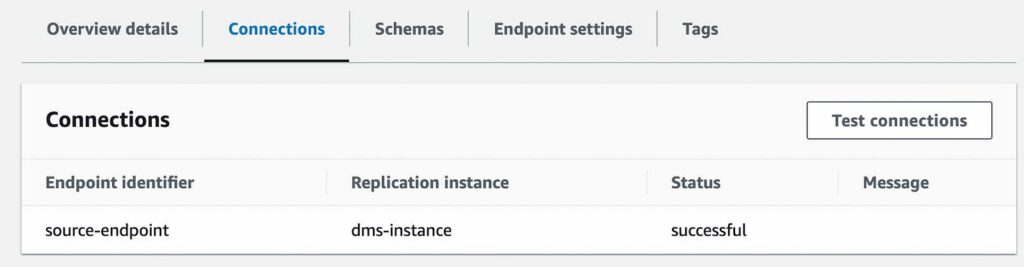
- Test your connection to verify it was successfully setup
7. Create Target Endpoint
- Repeat the steps above to configure your DocumentDB version 5.0 cluster as the Target Endpoint
8. Create the Database Migration Task
- Click on the create task button
- Task identifier (name of task identifier)
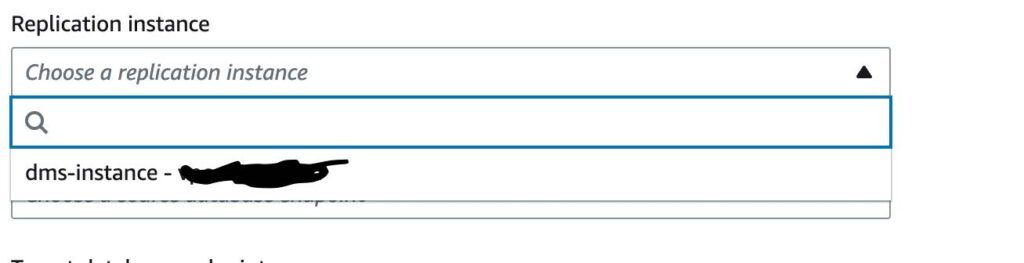
- For replication instance, select the replication instance you created
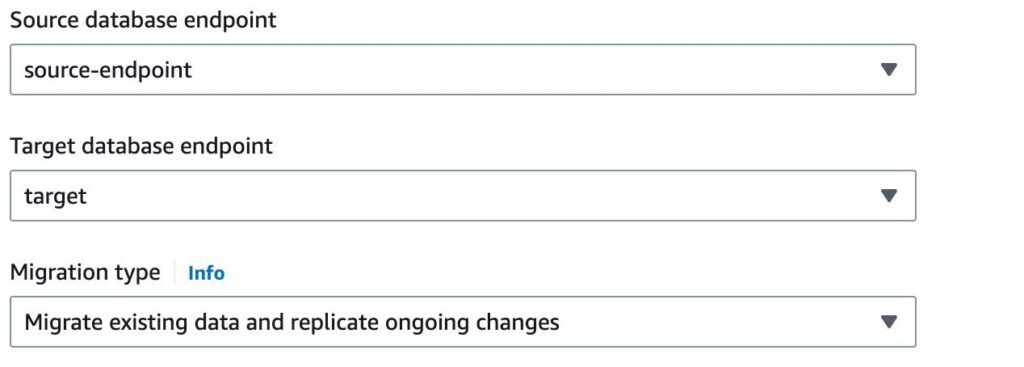
- For source database endpoint, select your DocumentDB cluster version 4.0
- For target database endpoint, select your newly created DocumentDB cluster version 5.0
- For migration type, select Migrate Existing Data and Replicate Ongoing Changes
- For task settings, and under target table preparation mode, select do nothing
- For migration task startup configuration, choose automatically on create; this will automatically start the migration task once complete.
9. Monitor the migration task.
- Once the task has started, you can monitor the progress of Full Load and CDC replication on the individual collection with the Table Statistics tab
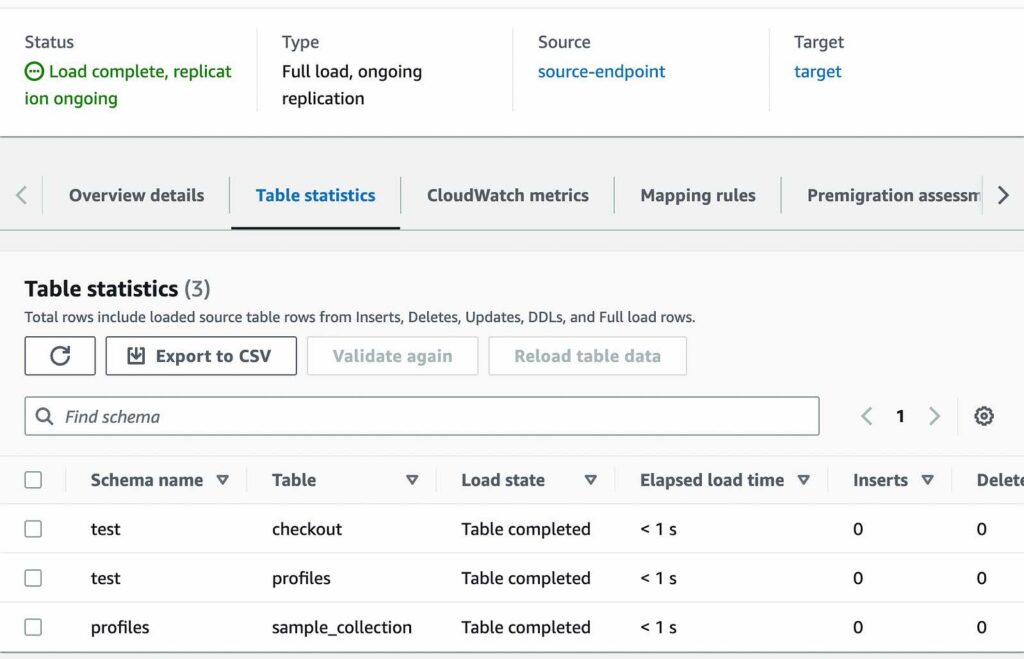
- AWS DMS has completed a full load migration of your source Amazon DocumentDB 4.0 cluster to your target Amazon DocumentDB 5.0 cluster and is now replicating change events
You are now ready to change your application’s database connection endpoint from your source Amazon DocumentDB 4.0 cluster to your target Amazon DocumentDB 5.0 cluster.
[post_title] => Upgrading an Amazon DocumentDB Cluster From Version 4.0 to 5.0 With DMS [post_excerpt] => [post_status] => publish [comment_status] => closed [ping_status] => closed [post_password] => [post_name] => upgrading-an-amazon-documentdb-cluster-from-version-4-0-to-5-0-with-dms [to_ping] => [pinged] => [post_modified] => 2023-06-30 14:03:23 [post_modified_gmt] => 2023-06-30 14:03:23 [post_content_filtered] => [post_parent] => 0 [guid] => https://keyvatech.com/?p=3907 [menu_order] => 0 [post_type] => post [post_mime_type] => [comment_count] => 0 [filter] => raw ) ) [post_count] => 8 [current_post] => -1 [before_loop] => 1 [in_the_loop] => [post] => WP_Post Object ( [ID] => 4024 [post_author] => 15 [post_date] => 2023-08-15 07:14:00 [post_date_gmt] => 2023-08-15 07:14:00 [post_content] =>In this blog post, we will explore how Terraform can be utilized to create a BigQuery database in Google Cloud (GCP). BigQuery is one of the most popular GCP services due to its many advantages. BigQuery is a fully managed petabyte scale data warehouse database that uses SQL. Its serverless and allows you to query external data sources without having to store that data inside GCP itself. An important note is that a major advantage of BigQuery is that you pay for the data scanned and not the amount of data stored.
Terraform
GCP Account
Environment setup:
Before you begin, make sure you have a valid Google Cloud account and project setup. We are also going to use a service account to generate the database via Google recommended best practices. Also, make sure you have Terraform installed on your local machine. Terraform provides official documentation on how to do this.
Create a new directory in the desired location and navigate to it and paste the following code to create the BigQuery database:
#Setup RHEL subscription
subscription-manager register
provider "google" {
  credentials = file("<service_account_key_file>.json")

  project = "<ID of your GCP project>"
  region  = "us-central1"
  zone    = "us-central1-a"
}

terraform {
  required_providers {
    google = {
      source  = "hashicorp/google"
      version = "4.51.0"
    }
  }
}

resource "google_bigquery_dataset" "bigquery_blog" {
  dataset_id    = "bigquery_blog"
  friendly_name = "blog"
  description   = "Dataset for blog"
  location      = "US"

  labels = {
    env = "dev"
  }
}

resource "google_bigquery_table" "bigquery_blog" {
  dataset_id = google_bigquery_dataset.bigquery_blog.dataset_id
  table_id   = "blogs"

  time_partitioning {
    type = "DAY"
  }

  labels = {
    env = "dev"
  }

  schema = <<EOF
[
  {
    "name": "blog_title",
    "type": "STRING",
    "mode": "NULLABLE",
    "description": "Name of blog"
  },
  {
    "name": "blog_date",
    "type": "DATETIME",
    "mode": "NULLABLE",
    "description": "Date of blog"
  }
]
EOF
}
Now let’s break down the above code:
The provider block uses the Google provider which is a plugin that is used for resources management. Here we define the service account credentials file that we want to use create the database also the project ID, region and zone. For the service account, we use least privilege access and just scope its permissions to BigQuery.
Next, we have the resource blocks. Before we create the actual table, we need to create a dataset. A BigQuery dataset is thought of as a container for tables. You can house multiple tables in a dataset or just have a single table. Here we set the location to “US” and add labels so that we can easily id the table. For the table resource, I would like to point out we added a time partitioning configuration. It is recommended that you partition tables and data because it helps with maintainability and query performance.
Creating the database:
Then we will run the following commands to create the database in GCP with our service account.
terraform init
terraform plan
terraform apply
After running apply, you should see a similar output with the success of the terraform apply.
About the Author
[table id=7 /] [post_title] => Leveraging Terraform to Create BiqQuery Database in Google Cloud [post_excerpt] => [post_status] => publish [comment_status] => closed [ping_status] => closed [post_password] => [post_name] => leveraging-terraform-to-create-biqquery-database-in-google-cloud [to_ping] => [pinged] => [post_modified] => 2023-08-08 15:14:46 [post_modified_gmt] => 2023-08-08 15:14:46 [post_content_filtered] => [post_parent] => 0 [guid] => https://keyvatech.com/?p=4024 [menu_order] => 0 [post_type] => post [post_mime_type] => [comment_count] => 0 [filter] => raw ) [comment_count] => 0 [current_comment] => -1 [found_posts] => 162 [max_num_pages] => 21 [max_num_comment_pages] => 0 [is_single] => [is_preview] => [is_page] => [is_archive] => [is_date] => [is_year] => [is_month] => [is_day] => [is_time] => [is_author] => [is_category] => [is_tag] => [is_tax] => [is_search] => [is_feed] => [is_comment_feed] => [is_trackback] => [is_home] => 1 [is_privacy_policy] => [is_404] => [is_embed] => [is_paged] => 1 [is_admin] => [is_attachment] => [is_singular] => [is_robots] => [is_favicon] => [is_posts_page] => [is_post_type_archive] => [query_vars_hash:WP_Query:private] => 4b6a14939efc61b5c6c83cb73e278a35 [query_vars_changed:WP_Query:private] => [thumbnails_cached] => [allow_query_attachment_by_filename:protected] => [stopwords:WP_Query:private] => [compat_fields:WP_Query:private] => Array ( [0] => query_vars_hash [1] => query_vars_changed ) [compat_methods:WP_Query:private] => Array ( [0] => init_query_flags [1] => parse_tax_query ) [query_cache_key:WP_Query:private] => wp_query:1eba62cb572102ec265bf20e5565d53b [tribe_is_event] => [tribe_is_multi_posttype] => [tribe_is_event_category] => [tribe_is_event_venue] => [tribe_is_event_organizer] => [tribe_is_event_query] => [tribe_is_past] => )
Leveraging Terraform to Create BiqQuery Database in Google Cloud
Keyva: 5 Years of IT Automation and Innovation

Migrating Docker Images Between Kubernetes Clusters Using Nexus Registry

Azure Virtual Network and Terraform: Secure, Scalable, and Automated Infrastructure Deployment

CTO Talks: Integrations

Terraform Remote State With Azure Storage

ECS: Setting Up Email Notifications For Stopped Tasks