Get Appointment
- contact@wellinor.com
- +(123)-456-7890
Blog & Insights
- Home
- Blog & Insights
Keyva CEO Jaime Gmach shares our approach to modern DevOps.
[post_title] => Keyva: Modern DevOps [post_excerpt] => [post_status] => publish [comment_status] => closed [ping_status] => closed [post_password] => [post_name] => keyva-modern-devops [to_ping] => [pinged] => [post_modified] => 2024-05-16 15:47:19 [post_modified_gmt] => 2024-05-16 15:47:19 [post_content_filtered] => [post_parent] => 0 [guid] => https://keyvatech.com/?p=3419 [menu_order] => 0 [post_type] => post [post_mime_type] => [comment_count] => 0 [filter] => raw ) [2] => WP_Post Object ( [ID] => 3680 [post_author] => 15 [post_date] => 2022-09-26 16:21:12 [post_date_gmt] => 2022-09-26 16:21:12 [post_content] =>By: Saikrishna Madupu – Sr Devops Engineer
Ansible by Red Hat is the de-facto tool used by organizations for automated configuration management. It is commonly used for use cases around infrastructure deployment and post deployment actions, application deployments, and for infrastructure operations and lifecycle tasks.
In the following blog, we will cover some examples ansible callback plugins, which help us track events around playbook executions. You can use these plugins for notification of task failures, job statuses, etc.
Features:
- Stdout plugins
- Other Plugins (also includes notification plugins & aggregate plugins in general)
A complete list of available plugins can be viewed from terminal:
ansible-doc -t callback -l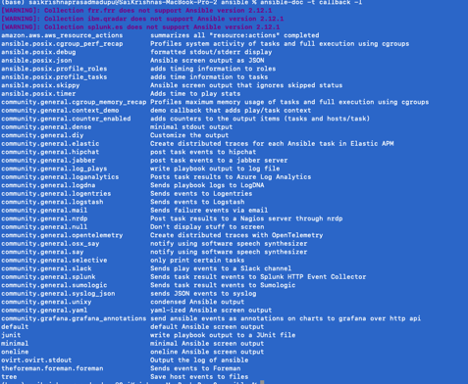
Stdout_plugins:
- This can be configured by adding stdout_callback plugin as a parameter in your ansible.cfg under defaults section. These plugins are limited to use one at a time.
- Syntax:
[defaults]
stdout_callback = actionable- Some stdout_plugins are listed below:
| Name | Description |
| Actionable | Changed/failed status |
| Default | Default o/p |
| debug | Readable stderr & stdout |
| Dense | Overwrite o/p rather than scrolling |
| Json | Json o/p |
| Minimal | Task details with proper format |
| Selective | o/p for tagged task |
| Skippy | Doesn’t show o/p for skipped hosts |
| Oneline | Similar to Minimal but in one line |
Examples of usage:
Actionable:
This plugin is deprecated.
Op:
- community.general.actionable has been removed. Use the 'default' callback plugin with 'display_skipped_hosts = no' and 'display_ok_hosts = no' options. This feature was removed from community.general in version 2.0.0. Please update your playbooks.
Debug:
By enabling debug plugin we don’t need to register output and use again debug module in our playbooks.

Default:
Displays standard error in human readable format

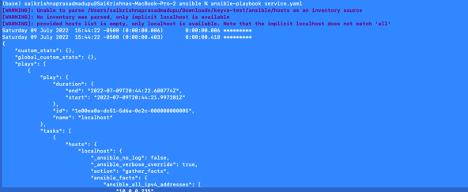
Dense:
It overwrites o/p and only shows two lines as shown below.

JSON:
Prints o/p in json format and we see the entire o/p.
Minimal:
It is quite similar to default,

Selective:
Selective plugin shows o/p for tasks that got executed successfully that are tagged with print_action

Skippy:
It doesn’t show o/p for the tasks that got skipped, when a task is not executed for any sort of host it will not be displayed as skipped likewise default do in cases.

Oneline:
It shows o/p of command in one format as shown below.

Other plugins:
- There are several other plugins which can send alerts in case of job failures to slack channels, records job execution time, notifications to Distribution lists (emails), and more. You can also enable and use multiple plugins at the same time.
- Syntax:
[defaults]
Callback_whitelist = slack, mail
Profile_tasks:
This shows the duration of time took to execute each task.

Mail:
It can be configured to monitor the job in case of success / failure. Below is the example.
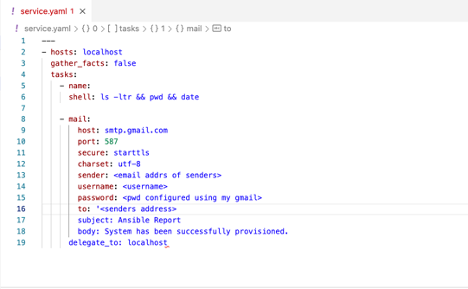
We will receive alerts in email once this playbook gets executed.
Some of the other_plugins are listed below
| Name | Description | Libraries required using pip |
| Foreman | Notifies to Foreman | |
| Hipchat | Notifies to HipChat | Prettytable |
| Jabber | Notifies to Jabber | git+https://github.com/ArchipelProject/xmpppy |
| Junit | Write JUnit-formatted to XML file | Junit_xml |
| Log_plays | Log results per hosts | |
| Logentries | Notifies to Logentries | Certifi flatdict |
| Logstash | Send results to Logstash | Python-logstash |
| Notifies through email when tasks fail | ||
| Osx_say | Speak notifications on macOS | |
| Profile_tasks | execution time for each task | |
| Slack | Notifies to Slack | Prettytable |
| timer | Report total execution time of playbook |
Ref: https://docs.ansible.com/ansible/latest/plugins/callback.htm
About the Author
[table id =5 /]
[post_title] => Ansible Callback Plugins [post_excerpt] => [post_status] => publish [comment_status] => closed [ping_status] => closed [post_password] => [post_name] => ansible-callback-plugins [to_ping] => [pinged] => [post_modified] => 2022-09-23 14:04:43 [post_modified_gmt] => 2022-09-23 14:04:43 [post_content_filtered] => [post_parent] => 0 [guid] => https://keyvatech.com/?p=3379 [menu_order] => 0 [post_type] => post [post_mime_type] => [comment_count] => 0 [filter] => raw ) [5] => WP_Post Object ( [ID] => 3371 [post_author] => 13 [post_date] => 2022-09-15 15:45:00 [post_date_gmt] => 2022-09-15 15:45:00 [post_content] =>Jaime Gmach has been named the recipient of a 2022 Lifetime Achievement Award by Vistage, the world’s largest CEO coaching and peer advisory organization for small and midsize businesses. The Lifetime Achievement Award honors long-standing members who see no finish line in their pursuit of world class. With a track record of bold decisions benefiting company, community and beyond, these members are a beacon to Vistage peers even as they achieve personal greatness.
Jaime Gmach is the founder and Chief Executive Officer of Evolving Solutions, a leading technology solution provider focused on helping enterprise clients modernize and automate their mission-critical infrastructure to support digital transformation. He also serves as CEO of Keyva, which he founded in 2018. Keyva is a services organization focused on cloud automation, orchestration, and DevOps, and was launched to help clients take advantage of innovation and disruptions driven by cloud technologies.
Both organizations thrive due to the commitment to their core values of Do the Right Thing, Be a Team Player, and Be Humbly Confident, highlighted by being named a Top Workplace in Minnesota in 2022. One of Jaime’s true passions in life is giving back to the communities of Minneapolis and St. Paul. He has led multiple Evolving Solutions and Keyva philanthropic initiatives that provide technology, financial, and labor support to charitable organizations throughout the region.
“I am honored and humbled to receive this prestigious award because of the transformational effect of my involvement with Vistage, said Gmach. “It supported me in building strong companies with a foundation of strong values, employee-first cultures and the focus of delivering the best outcomes to our clients.”
“Jaime was selected from over 300 local Vistage members as one who embodies our Vistage values of Growth, Challenge, and Commitment,” said Brian Davis, Vistage Master Chair. “Not only has he built two highly successful and thriving businesses, but he has also had a huge impact on his community and his fellow Vistage group members. In the last 10 years I have seen tremendous growth in him professionally, personally, and spiritually, and he serves as a model of what effective leadership looks like for all of us. I feel blessed to have him in our group!”
About Vistage Worldwide, Inc.
Vistage is the world’s largest CEO coaching and peer advisory organization for small and midsize businesses. For more than 60 years, we’ve been helping CEOs, business owners and key executives solve their greatest challenges through confidential peer groups and one-to-one executive coaching sessions. Today, more than 25,000 members in 25 countries rely on Vistage to help make better decisions for their companies, families, and communities. The results prove it: Vistage CEO members grew their annual revenue on average by 4.6% in 2020, while nonmembers with comparable small and midsize businesses saw revenue decrease by 4.7%, according to a study of Dun & Bradstreet data. Learn more at vistage.com.
About Evolving Solutions
Evolving Solutions helps clients modernize and automate their mission-critical applications and infrastructure to support business transformation. Our business is client-centric consulting and delivery of technical solutions to enable modern operations in a hybrid cloud world. Learn more at www.evolvingsol.com.
About Keyva
At Keyva, we exist today so our clients can thrive tomorrow. This means we do everything we can to provide services and expertise that go beyond IT. We work hard to simplify our clients’ technologies, to free up time so they can focus on their core business. Learn more at www.keyvatech.com.
By: Delroy Hall – Devops Engineer
In this blog we will cover how to install Portworx to be used as a highly available storage solution on Amazon EKS.
What is Portworx:
Portworx is a software defined storage solution designed for container environments. Portworx provides a wide range use case with various application with data protection, data security, data migration and more in mind.
Pre-requisites:
- AWS EKS cluster v1.21+ (To quickly spin up an EKS cluster feel free to follow this guide)
Installing Portworx via Operator:
1. Create an IAM policy using the following permissions and add the policy to your EKS nodegroup(s) role. These are the permissions needed for storage operations.
1.	{
2.	    "Version": "2012-10-17",
3.	    "Statement": [
4.	        {
5.	            "Sid": "",
6.	            "Effect": "Allow",
7.	            "Action": [
8.	                "ec2:AttachVolume",
9.	                "ec2:ModifyVolume",
10.	                "ec2:DetachVolume",
11.	                "ec2:CreateTags",
12.	                "ec2:CreateVolume",
13.	                "ec2:DeleteTags",
14.	                "ec2:DeleteVolume",
15.	                "ec2:DescribeTags",
16.	                "ec2:DescribeVolumeAttribute",
17.	                "ec2:DescribeVolumesModifications",
18.	                "ec2:DescribeVolumeStatus",
19.	                "ec2:DescribeVolumes",
20.	                "ec2:DescribeInstances",
21.	                "autoscaling:DescribeAutoScalingGroups"
22.	            ],
23.	            "Resource": [
24.	                "*"
25.	            ]
26.	        }
27.	    ]
28.	}
29.
2. To install Portworx on a Kubernetes cluster, you will need to generate a Kubernetes manifest file. Navigate to https://central.portworx.com
- You must log in or create a free account for access
3. To generate the manifest file, select Portworx Enterprise from product catalog
4. Under Product Line, select the option depending on your license/use case. For this guide select Portworx Enterprise, then click Continue.
- Portworx Enterprise comes with a 30-day trial
5. Check the box Use the Portworx Operator, select the latest version of Portworx available, and select the Built-in option for ETCD, the click Next.
- When using the Built-in option Portworx will create and manage an internal key-value store cluster.
6. For your environment select Cloud, and AWS Cloud Platform
7. For Configuring storage devices select Create Using a Spec and the following for storage
- EBS Volume Type: GP2
- Size: 150GB (Minimum required)
- Set Max storage nodes per availability zone: 1, then click Next.
8. Under Network keep the default options, then select Next.
9. Under Customize select Amazon Elastic Container Service for Kubernetes (EKS) and click Finish
- You can set your Cluster Name Prefix under Advanced Settings
10. After generating the spec file Portworx will provide you with the following commands to run against your AWS EKS cluster:
- Deploying the Operator
kubectl apply -f 'https://install.portworx.com/2.11?comp=pxoperator’- Deploying Portworx
kubectl apply -f 'https://install.portworx.com/2.11?operator=true&mc=false&b=true&kd=type%3Dgp2%2Csize%3D150&mz=1&s=%22type%3Dgp2%2Csize%3D150%22&c=px-cluster&stork=true&csi=true&mon=true&tel=false&st=k8s&promop=true'The cluster will provision EBS volumes based on our settings and attach them to the nodes.
To verify your install, you can run the following to get Portworx Cluster status:
PX_POD=$(kubectl get pods -l name=portworx -n kube-system -o jsonpath='{.items[0].metadata.name}')
kubectl exec $PX_POD -n kube-system -- /opt/pwx/bin/pxctl status
About the Author
[table id =6 /]
[post_title] => Deploying Portworx on Amazon EKS [post_excerpt] => [post_status] => publish [comment_status] => closed [ping_status] => closed [post_password] => [post_name] => deploying-portworx-on-amazon-eks [to_ping] => [pinged] => [post_modified] => 2024-05-28 18:25:51 [post_modified_gmt] => 2024-05-28 18:25:51 [post_content_filtered] => [post_parent] => 0 [guid] => https://keyvatech.com/?p=3357 [menu_order] => 0 [post_type] => post [post_mime_type] => [comment_count] => 0 [filter] => raw ) ) [post_count] => 8 [current_post] => -1 [before_loop] => 1 [in_the_loop] => [post] => WP_Post Object ( [ID] => 3683 [post_author] => 15 [post_date] => 2022-10-26 16:32:35 [post_date_gmt] => 2022-10-26 16:32:35 [post_content] =>
Keyva: Automation

Keyva: Modern DevOps

Keyva: Helping You Meet Your Core Objectives
Keyva: Unlock Tomorrow

Ansible Callback Plugins

Vistage recognizes Jaime Gmach with a 2022 Lifetime Achievement Award

Who is Keyva?