
Kubernetes powers modern cloud-native infrastructure, but its networking layer often demands more than basic tools can deliver—enter Cilium, an eBPF-powered Container Network Interface (CNI). This blog explores Cilium’s features, a practical use case with a diagram, step-by-step installation and configuration, and a comparison with Istio. Whether you’re securing workloads or optimizing performance, Cilium’s got something to offer—let’s dive in!
What is Cilium CNI?
Cilium is an open-source CNI plugin that leverages eBPF (extended Berkeley Packet Filter) to enhance Kubernetes networking. Running custom programs in the Linux kernel, Cilium outpaces traditional CNIs like Flannel or Calico by offering advanced security, observability, and Layer 3-7 control—all without modifying your apps.
Cilium Capability Services Diagram:
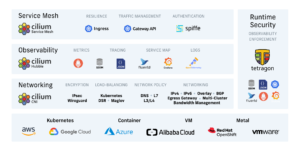
Key Features of Cilium
- eBPF Performance: Kernel-level packet handling for speed and efficiency.
- Identity-Based Security: Policies tied to Kubernetes labels, not fleeting IPs.
- Layer 7 Enforcement: Controls application traffic (e.g., HTTP, gRPC).
- Transparent Encryption: Secures communication with IPsec or WireGuard.
- Hubble Observability: Real-time network insights.
Cilium’s strengths make it a standout for microservices-heavy clusters.
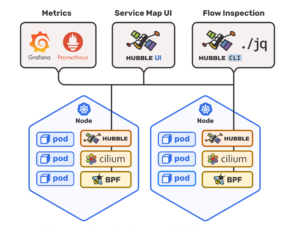
What is Hubble?
Hubble is a fully distributed networking and security observability platform for cloud native workloads. It is built on top of Cilium and eBPF to enable deep visibility into the communication and behavior of services as well as the networking infrastructure in a completely transparent manner. Hubble helps teams understand service dependencies and communication maps, operational monitoring and alerting, application monitoring, and security observability.
Why Cilium?
Traditional CNIs hit limits with scale—iptables slow down, and IP-based rules struggle with dynamic pods. Cilium’s eBPF approach and Layer 7 support, paired with Hubble’s visibility, address these gaps. But how does it compare to Istio? We’ll get there—first, a use case.
Use Case: Securing an E-Commerce Microservices App
Imagine managing a Kubernetes cluster for an e-commerce platform with user management, order processing, and payment services implemented using 3 tier web architecture:
- Frontend: NGINX web server for customer requests.
- Backend: Node.js API for user management, order processing & payment services.
- Database: PostgreSQL for persisting sensitive data.
Requirements
- Secure communication between microservices, ensuring that only authorized services can communicate with each other
- Granular control over HTTP traffic, allowing specific endpoints to be exposed or blocked
- Restrict frontend-to-backend traffic to port 8080.
- Limit backend-to-database traffic to port 5432.
- Block external database access.
- Real-time visibility into network traffic for troubleshooting and security monitoring.
Cilium handles this with ease.
Use Case Diagram
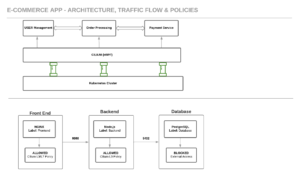
- Arrows (—–>): Allowed traffic paths with ports.
- Labels: Used for Cilium’s identity-based policies.
- Blocked: External access denied by default.
Installing Cilium
Let’s install Cilium on your Kubernetes cluster. This section walks through prerequisites, setup, and validation for a smooth deployment.
Prerequisites
- Kubernetes Cluster: Running 1.30+ (e.g., Minikube, Kind, or a cloud provider like EKS/GKE).
- Helm: Version 3.x installed (helm version to check).
- kubectl: Configured to access your cluster.
- Linux Kernel: 4.9+ with eBPF support (most modern distros qualify—check with uname -r).
Step 1: Prepare Your Cluster
Ensure your cluster is ready:
kubectl get nodes
Step 2: Add Cilium Helm Repository
Add and update the Helm repo:
helm repo add cilium https://helm.cilium.io/
helm repo update
Step 3: Install Cilium with Hubble
Deploy Cilium with observability enabled:
helm install cilium cilium/cilium --version 1.14.0 \
  --namespace kube-system \
  --set kubeProxyReplacement=disabled \
  --set hubble.enabled=true \
  --set hubble.relay.enabled=true \
  --set hubble.ui.enabled=true
- –set kubeProxyReplacement=disabled: Keeps kube-proxy (set to true for full replacement if desired).
- –set hubble.*: Enables Hubble and its UI for monitoring.
Step 4: Validate Installation
Check pod status:
kubectl get pods -n kube-system -l k8s-app=cilium
Expect output like:
NAME            READY   STATUS    RESTARTS   AGE
cilium-abc123   1/1     Running   0          5m
cilium-xyz789   1/1     Running   0          5m
Also verify Hubble:
kubectl get pods -n kube-system -l k8s-app=hubble-relay
Step 5: Test Connectivity
Deploy a simple pod and test networking:
kubectl run test-pod --image=nginx --restart=Never
kubectl exec -it test-pod -- curl <another-pod-ip>
Cilium should route traffic seamlessly.
Configuring Cilium for the Use Case
Now, configure Cilium for our e-commerce app.
Step 1: Label Pods
Add labels to your deployments:
# Frontend (snippet)
metadata:
  labels:
    app: frontend
# Backend
metadata:
  labels:
    app: backend
# Database
metadata:
  labels:
    app: database
Apply: kubectl apply -f <file>.yaml.
Step 2: Apply Network Policies
Define CiliumNetworkPolicy resources:
Policy 1: Frontend-to-Backend
apiVersion: cilium.io/v2
kind: CiliumNetworkPolicy
metadata:
  name: frontend-to-backend
spec:
  endpointSelector:
    matchLabels:
      app: backend
  ingress:
  - fromEndpoints:
    - matchLabels:
        app: frontend
    toPorts:
    - ports:
      - port: "8080"
        protocol: TCP
Policy 2: Backend-to-Database
apiVersion: cilium.io/v2
kind: CiliumNetworkPolicy
metadata:
  name: backend-to-db
spec:
  endpointSelector:
    matchLabels:
      app: database
  ingress:
  - fromEndpoints:
    - matchLabels:
        app: backend
    toPorts:
    - ports:
      - port: "5432"
        protocol: TCP
Apply: kubectl apply -f <file>.yaml.
Step 3: Enable Hubble
Start Hubble:
cilium hubble port-forward &
Monitor:
hubble observe --selector app=backend
Output:
Feb 22 2025 14:00:01 frontend-xyz -> backend-abc ALLOWED (TCP 8080)
Feb 22 2025 14:00:02 backend-abc -> database-def ALLOWED (TCP 5432)

Feb 22 2025 14:00:03 external-ip -> database-def DROPPED
Step 4: Optional Layer 7 Policy
Restrict to GET requests:
apiVersion: cilium.io/v2
kind: CiliumNetworkPolicy
metadata:
  name: frontend-to-backend-l7
spec:
  endpointSelector:
    matchLabels:
      app: backend
  ingress:
  - fromEndpoints:
    - matchLabels:
        app: frontend
    toPorts:
    - ports:
      - port: "8080"
        protocol: TCP
      rules:
        http:
        - method: "GET"
          path: "/api/.*"
Apply: kubectl apply -f frontend-to-backend-l7.yaml.
Istio vs. Cilium: A Comparison
Cilium and Istio both enhance Kubernetes networking, but they differ in scope and approach.
Overview
- Cilium: CNI for Layer 3-7 networking and security via eBPF.
- Istio: Service mesh for application-layer traffic management via sidecar proxies (Envoy).
Key Differences
| Aspect | Cilium | Istio |
| Layer | Kernel (eBPF, L3-L7) | Application (sidecar, L7 focus) |
| Primary Role | Networking + security | Traffic management + observability |
| Performance | High (no proxies) | Sidecar overhead |
| Security | Identity policies, encryption | mTLS, L7 rules |
| Observability | Hubble (flow logs) | Metrics, traces (Prometheus, grafana) |
| Use Case Fit | Cluster-wide networking | Microservices communication |
Strengths
- Cilium: Lightweight, broad networking scope, deep packet visibility.
- Istio: Advanced L7 features (e.g., retries, canaries), multi-cluster support.
When to Choose?
- Cilium: Ideal for our use case—securing and monitoring cluster traffic efficiently.
- Istio: Better for microservices needing traffic splitting or tracing and complex service-to-service communication patterns.
- Both: Use Cilium for networking, Istio for service mesh features.
The Result
Our e-commerce app gains:
- Security: Locked-down traffic, external threats blocked.
- Visibility: Hubble logs for fast debugging.
- Scalability: eBPF performance at scale.
Conclusion
Cilium transforms Kubernetes networking with eBPF, offering a potent mix of security, speed, and insight. Its installation is straightforward, and it shines in use cases like ours—while holding its own against Istio. Try it out and reach Keyva for any professional services support!
 | Venkateswarlu Mudduluru, Senior DevOps Engineer Senior DevOps Engineer with 18+ years of IT experience, specializing in cloud infrastructure, automation, and CI/CD pipelines. Certified Kubernetes Administrator (CKA) and Application Developer (CKAD), with a strong track record in building scalable, secure, and reliable systems. Passionate about sharing real-world solutions, technical insights, and DevOps best practices. |